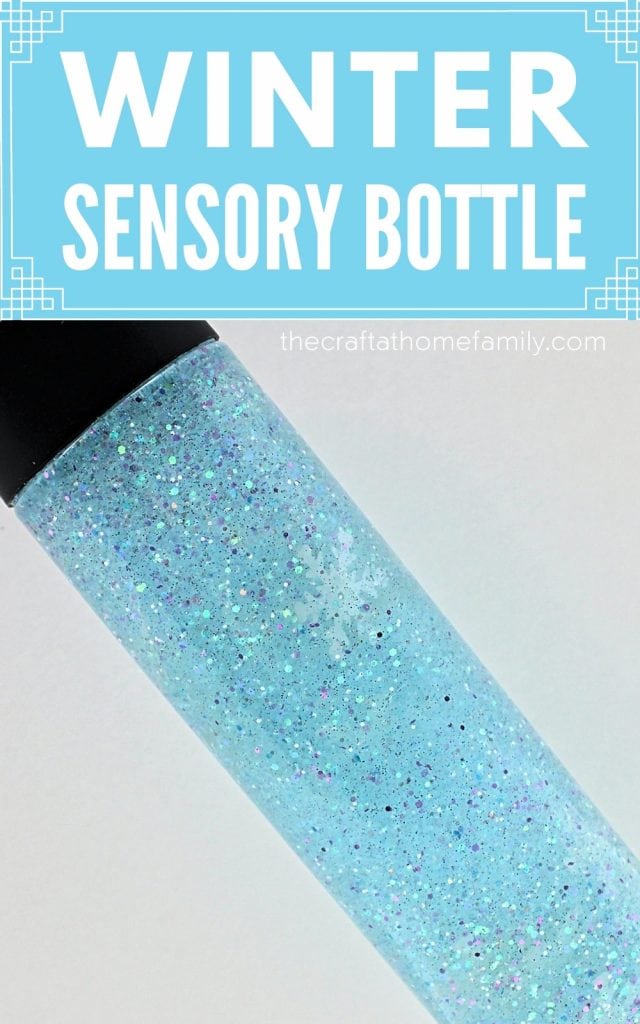
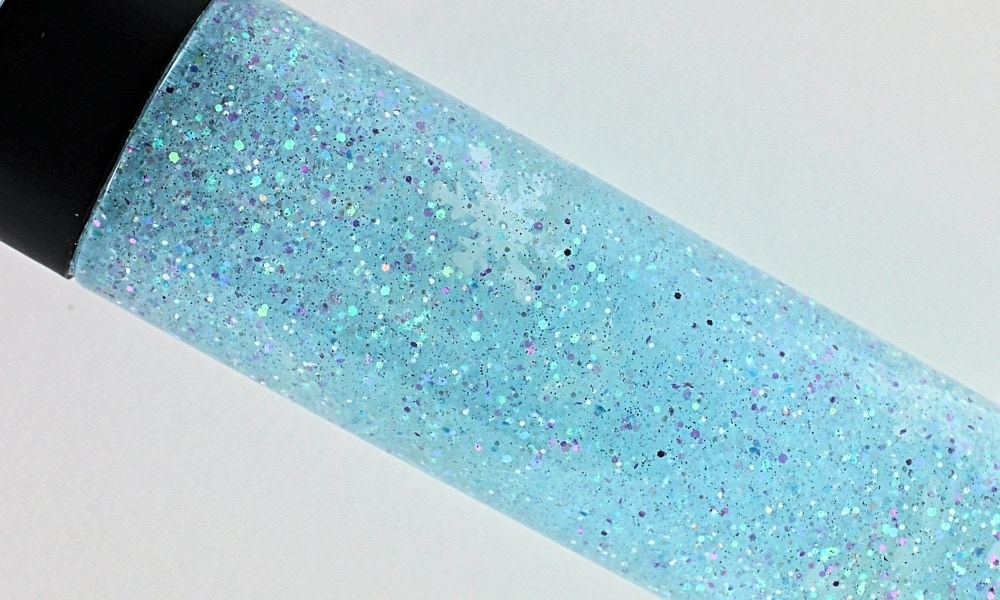
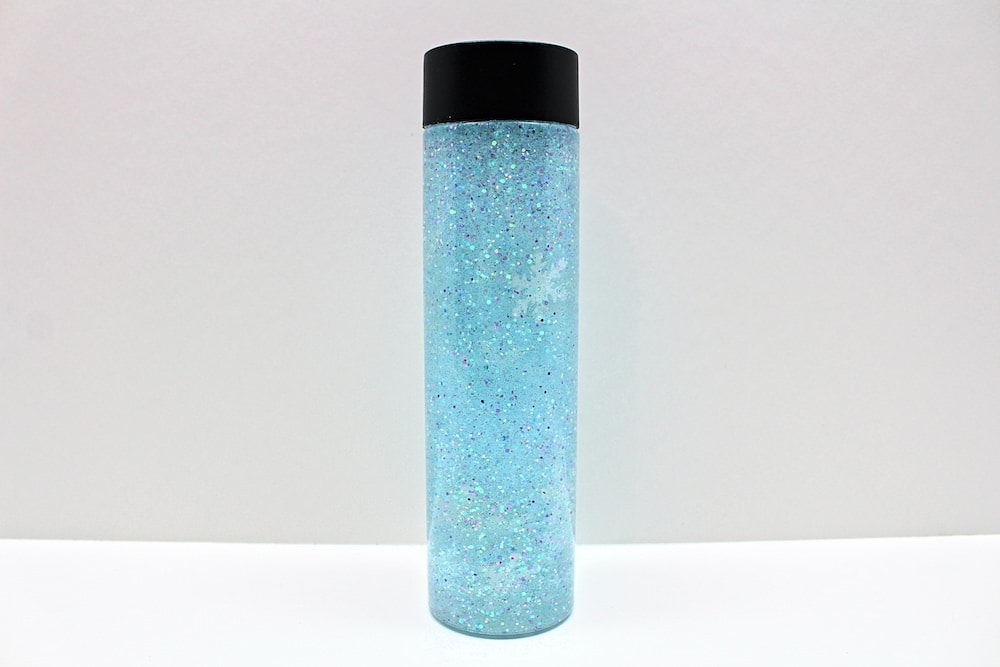
This winter sensory bottle is filled with gorgeous iridescent glitter and snowflakes—and its frosty blueish tinge makes it perfect for kids who love Frozen! Find out how to create your own glittery snowstorm-in-a-bottle in under 10 minutes with this easy winter craft!
This post may contain affiliate links, which means I may receive a commission, at no extra cost to you, if you make a purchase through a link. As an Amazon Associate, I earn from qualifying purchases. Please see my full disclosure for further information.
JUMP TO…
Do you love sensory bottles as much as we do? They’re so gorgeous, and they’re such a great way to let infants explore and to help toddlers control their emotions!
We have a ton of sensory bottles at home, and we seem to accumulate more with every passing season. So now that this year’s weird November heat wave is over, it’s only natural for our next sensory bottle to be frosty and wintery!
We first made this sensory bottle last year, but with three little ones at home, it never hurts to have a few spares. Plus, our girls have now watched Frozen and Frozen II multiple times, so this sensory bottle seems more relevant than ever!
And if you’re ready to try other ideas, you can also check out our detailed guide on making homemade sensory bottles.
GRAB OUR 12 BEST SENSORY RECIPES!
Subscribe to our email newsletter to receive 12 of our most popular sensory recipes in PDF format as a welcome gift:

Already a subscriber? Don’t worry, you won’t be subscribed twice. By submitting your email address, you are agreeing to the terms of our Privacy Policy. You can unsubscribe at any time.
Required Materials
Here’s what you’ll need to make your own frosty winter glitter jar at home:
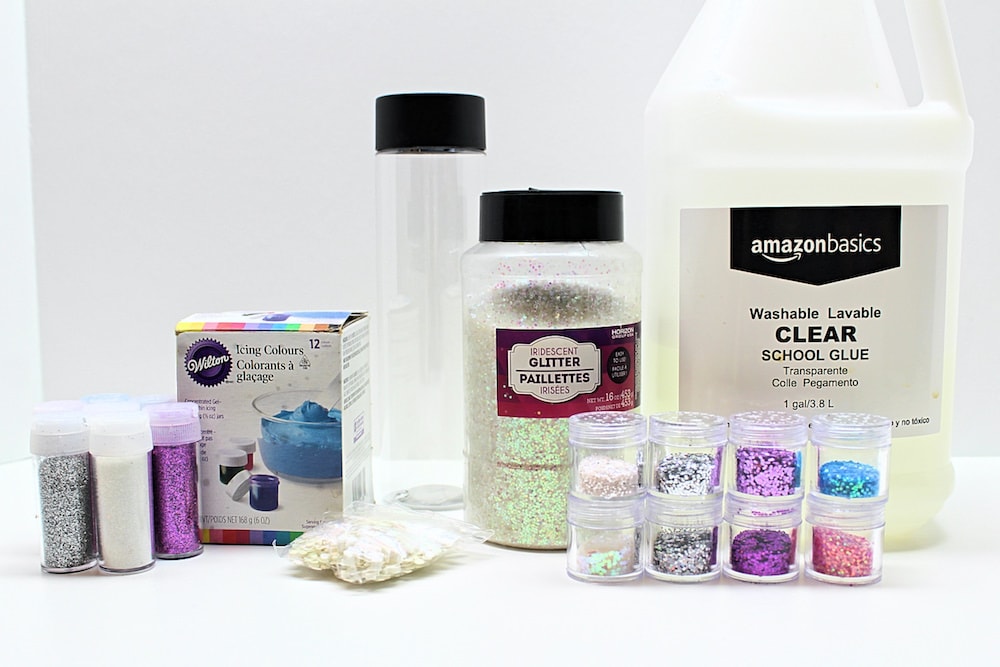
- Empty bottle
- Clear glue (we buy ours in bulk and use it to make slime and sensory bottles)
- Water
- Blue or teal liquid watercolours or food colouring (I tend to use icing gel for almost all my crafts)
- Iridescent glitter
- Optional: fine glitter and/or chunky glitter in winter colours (e.g. white, silver, light blue, light purple, light pink)
- Iridescent snowflakes (I couldn’t find any nice ones on Amazon, but our local Michaels had exactly what I needed!)
The bottle you use can be made of plastic or glass, but I highly recommend sticking with plastic if you have young kids who might drop it. You can use anything you have lying around, but I personally love these ones and use them for all my sensory bottles.

- LEAK PROOF- Unlike our competitors, our empty plastic bottles are leakproof by design, including a slip that helps seal the bottle when closed
- WIDE MOUTH- Allows for fruit or craft supplies to fit into these reusable water bottles. Our clear water bottle mouth is 40% bigger than a normal…
How to Make a Winter Sensory Bottle (Step-by-Step)
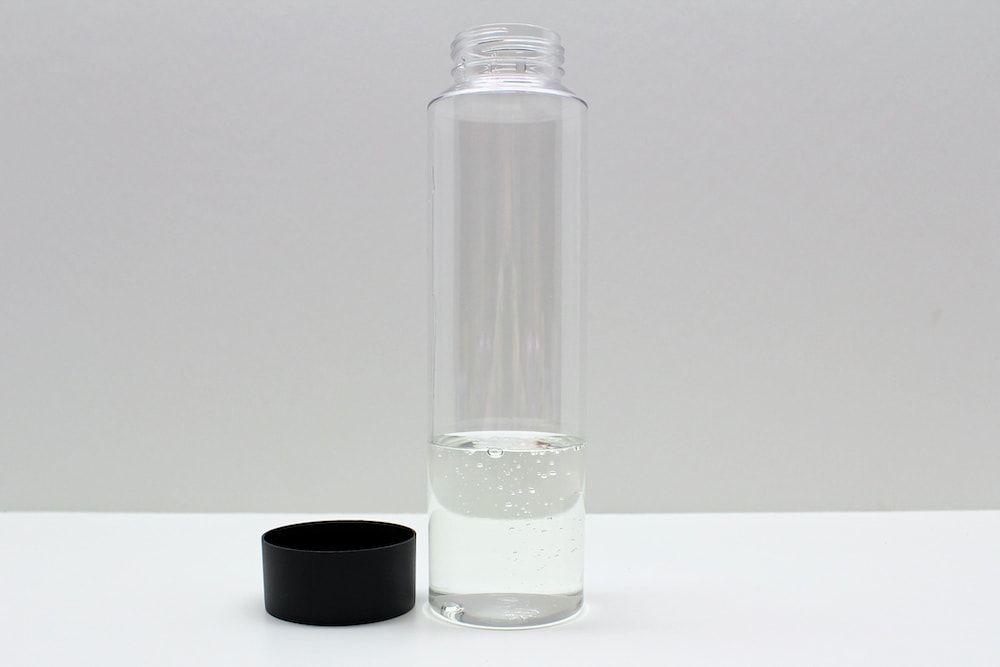
1. Pour Glue into Bottle
Start by pouring some clear glue into the bottle.
The quantity of glue you use will depend on both the brand of glue you buy and your personal preference. To test it, I made two bottles with different quantities of glue. They both turned out great, but their contents behaved very differently.
The first had about one third glue, and the glitter and snowflakes fell to the bottom quite quickly. It was, however, great for active exploration and play!
The second was mostly filled with glue, and the glitter and snowflakes stayed suspended for quite a bit longer—the snowflakes are much heavier than glitter so they need thicker liquid to stay suspended. The bottle looked lovely sitting on the counter, but it didn’t flow quite as nicely when it was being actively manipulated.
So keep these differences in mind when choosing how much glue to add, but remember that it’s not a huge deal if you don’t get it exactly right the first time. You can always dump and replace some of the contents after you’ve added the snowflakes and seen how your bottle flows.
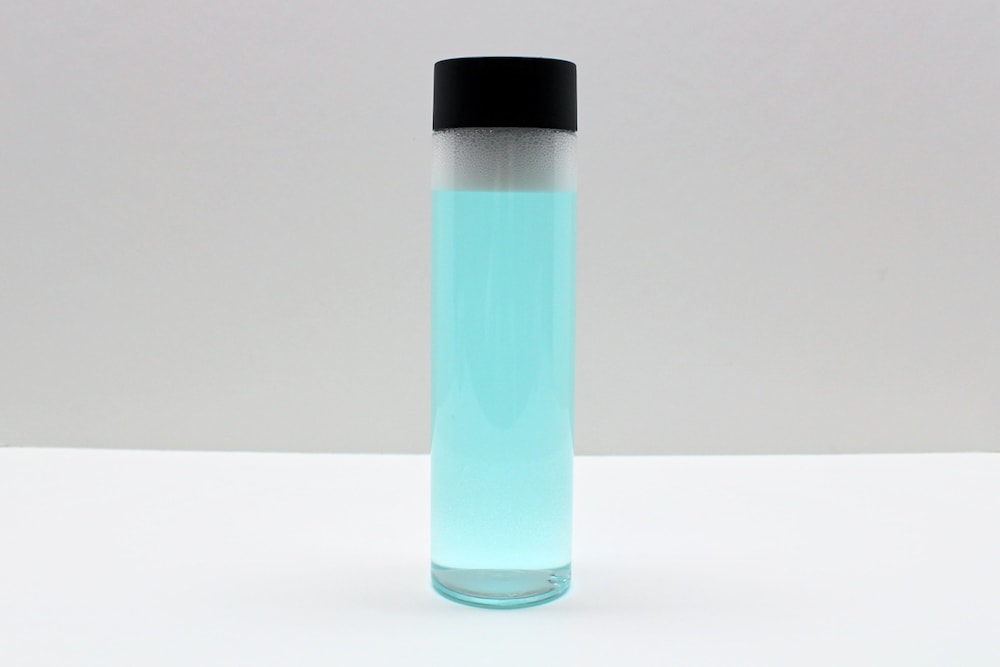
2. Add Water & Shake
Add enough water to mostly fill the bottle, then shake to combine the water and glue. Make sure you use warm water and leave some empty space at the top of the bottle, or you may have a hard time combining them.
Note: It’s perfectly normal for bubbles to form as you shake the bottle. They should go away on their own as you complete the other steps, but if ever they get in the way, you can help speed things along by scooping out some of the foam from the top using a spoon.
3. Add Colour
Add enough food colouring or liquid watercolour paint to give the liquid a light blueish tinge. If you use icing gel like me, I recommend adding a tiny bit at a time using a toothpick to avoid oversaturing it.
During my first attempt, I skipped the food colouring because I wanted the glitter to look like a snowy blizzard inside the bottle—but I found that it didn’t really pop until I added a bit of colour, so I highly recommend you do the same, especially if your kids love Frozen like ours do!
4. Add Glitter
Now is the time to add glitter to the bottle! As you can see, I went a little nuts…
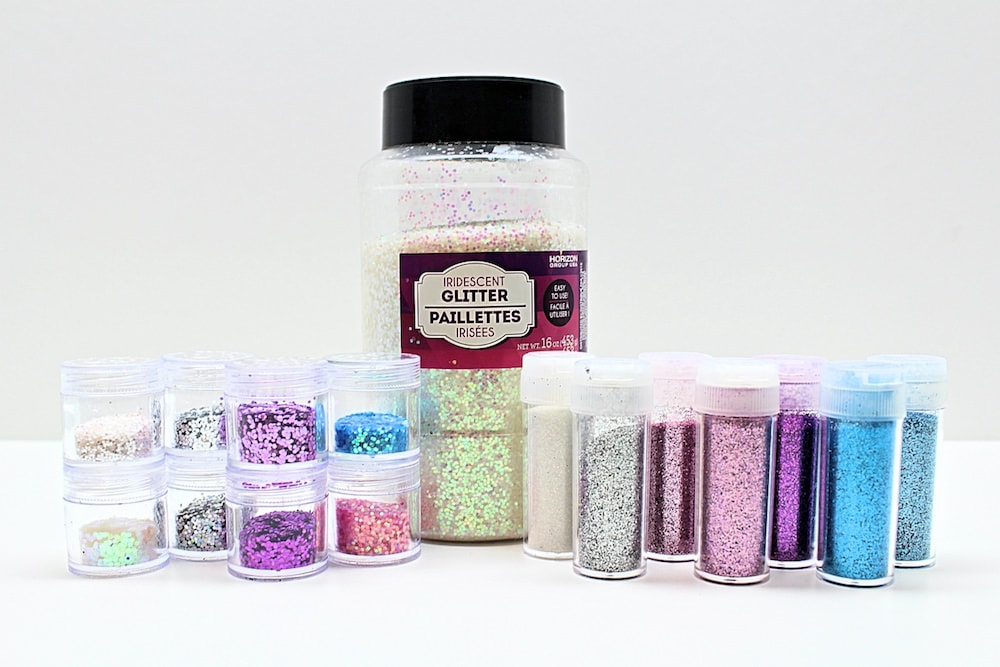
To be clear, you definitely do not need to add that many colours, so there’s no need to go out and buy a ton of glitter if you don’t already have it. I didn’t go out and buy more either—we just happen to do a lot of crafts around here, so we have a lot of supplies available for projects like this!
The one type of glitter you absolutely need for this project is iridescent glitter. It looks whitish in the bottle, but when you look at it from different angles, it reflects all sorts of colours, including blue, purple, pink and green. I find it quite beautiful!
Keep in mind that the glitter in your bottle should primarily be iridescent, though you’re free to add small quantities of other colours like I did! If you do decide to add other colours, the ones I recommend are white, silver, light blue, light purple and light pink. I mostly used iridescent glitter and only added a small amount of each other colour to give the bottle a little more depth.
Tip: I like to use a combination of fine and chunky glitter in all my sensory bottles—they don’t fall at the same speed, so they make the bottle more interesting to look at!
5. Add Snowflakes
Shake the bottle to test it, and if you’re happy with the amount of glitter you used, start adding snowflakes.
I looked for these snowflakes in many different stores before finding exactly what I was looking for. Thankfully, our local Michaels carries beautiful iridescent snowflakes that are just perfect for this project! And if you’re a fan of Christmas DIYs, they have a lot of other fun holiday-themed supplies as well!
Aren’t they gorgeous?
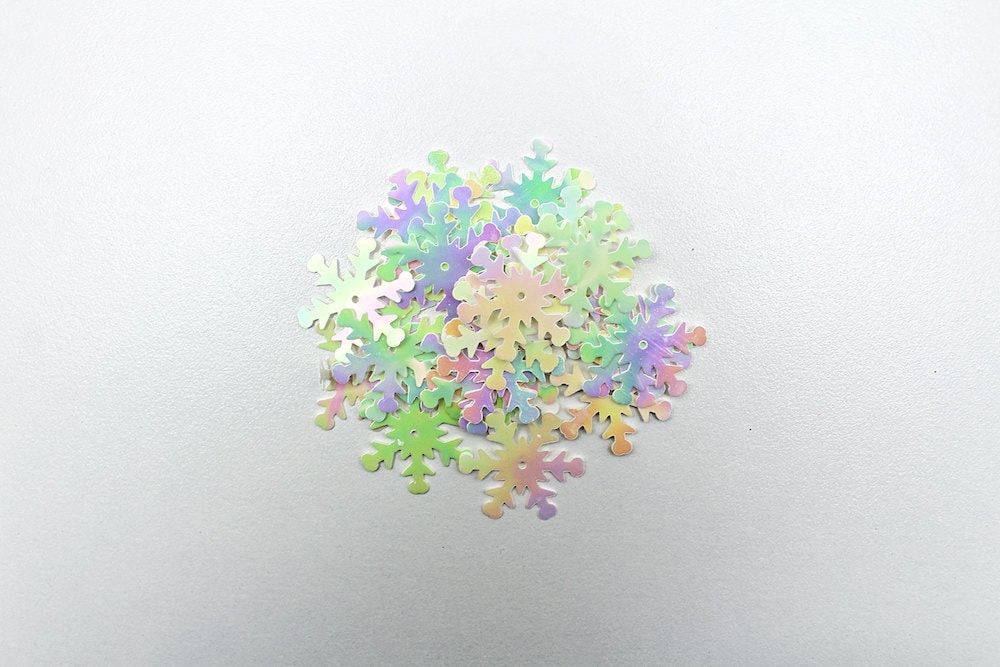
Depending on the size of your snowflakes, you may not need to use a lot. Mine were pretty big, so I only used about 25 of them, but feel free to add as few or as many as you like. I do highly recommend choosing snowflakes that are iridescent like the glitter!
Note: It’s a lot easier to add more snowflakes than to remove them once they’re covered in glue and glitter. For this reason, I recommend adding them in slowly and shaking the bottle frequently to determine whether you feel there are enough.
6. Make Adjustments
Finish filling the bottle with water, then shake it vigorously to test it! Here are some of the things you may want to adjust:
- Colour: Since you added the colour before the bottle was completely full, it’s possible that it will have changed slightly. Feel free to add a little more if it’s too light, or dump and replace some of the contents if it’s too dark.
- Glitter: Add more glitter as needed! I always recommend starting with less since it’s a lot easier to add more than to remove the excess.
- Flow: Depending on how much glue you used, you may find that the glitter and snowflakes settle too slowly… or too quickly. Adding more glue will help them stay suspended for longer, while adding more water will make them fall faster. So feel free to dump out some of the liquid and replace it accordingly until you’re satisfied!
And that’s all there is to it! You can always glue the lid shut if you’re scared that your children will try to open the bottle, but I don’t usually bother with this because it’s not something my kids have ever attempted. Every child is different though, so do whatever makes you feel comfortable!
Sensory bottles have been an obsession of mine ever since we started making them—I just can’t get over how gorgeous they are! I hope you and your kids love this project as much we do!
Related Sensory Bottle Articles
Do you love sensory bottles too? Check out these articles:
- Jack-o’-Lantern Sensory Bottle
- Starry Night Sensory Bottle (with Glow-in-the-Dark Stars!)
- Musical Pom-Pom Sensory Bottle
Join my mailing list using the form below to receive 12 of the most popular sensory recipes on my site in PDF format! You’ll be the first to know when I publish new recipes, and you’ll also gain access to my free printables library, which is filled with lots of printable activities for kids.
GRAB OUR 12 BEST SENSORY RECIPES!
Subscribe to our email newsletter to receive 12 of our most popular sensory recipes in PDF format as a welcome gift:
Already a subscriber? Don’t worry, you won’t be subscribed twice. By submitting your email address, you are agreeing to the terms of our Privacy Policy. You can unsubscribe at any time.
I am an Adult Development Instructor and these were an absolute hit with my clients. They had so much fun making them and watching how each of their’s turned out with their peers.
I am so glad to hear that!!