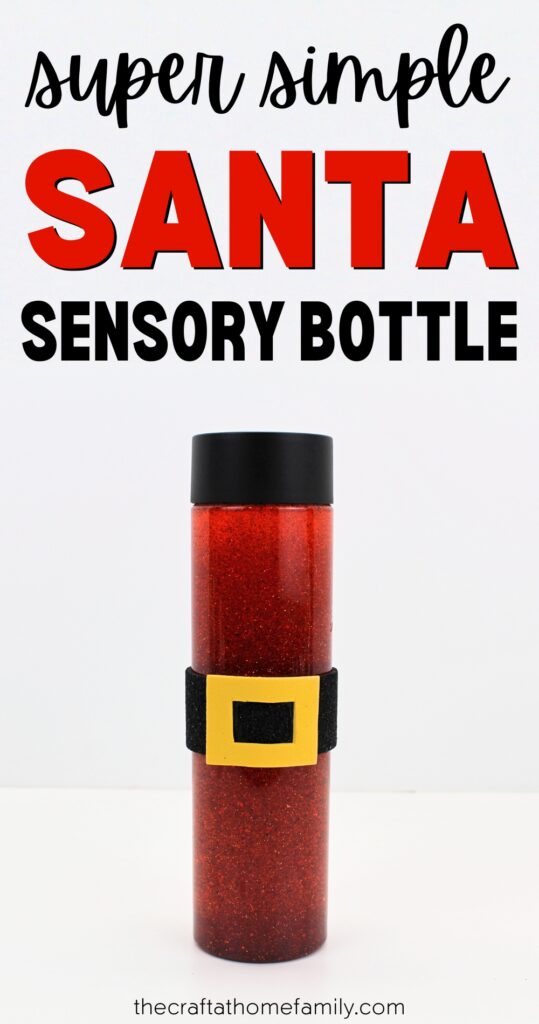

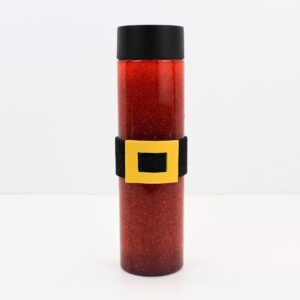
Have a young child at home? This Santa sensory bottle is super cute, simple to make, and great for babies and toddlers! Sensory bottles are a fantastic tool for emotional regulation, and this Santa-themed one is perfect for Christmas.
JUMP TO…
Sensory bottles are an awesome way to help kids regulate their emotions, and this Santa-themed calm down jar is perfect for the Christmas season! You’ll only need a few minutes of prep time in order to make one for your kids.
There is no need to be crafty to complete this project, and you may already have all the supplies you need to make it at home. Make sure you save the instructions so you can make your own!
Why You’ll Love This Craft
- Easy to make: This Christmas sensory bottle requires less than 10 minutes of active prep, and the prep mostly consists of basic pouring, cutting and glueing. It is perfect for busy parents, including those who aren’t very crafty.
- Safe for younger kids: If you have a baby or toddler at home, sensory bottles are a great way to let babies and toddlers safely explore without the risk of choking on small objects or loose parts.
- Calming effect: Sensory bottles are a fantastic tool for helping kids regulate their emotions. Even my older kids sometimes ask for them when they’re feeling upset, because they find it soothing to watch the glitter fall.
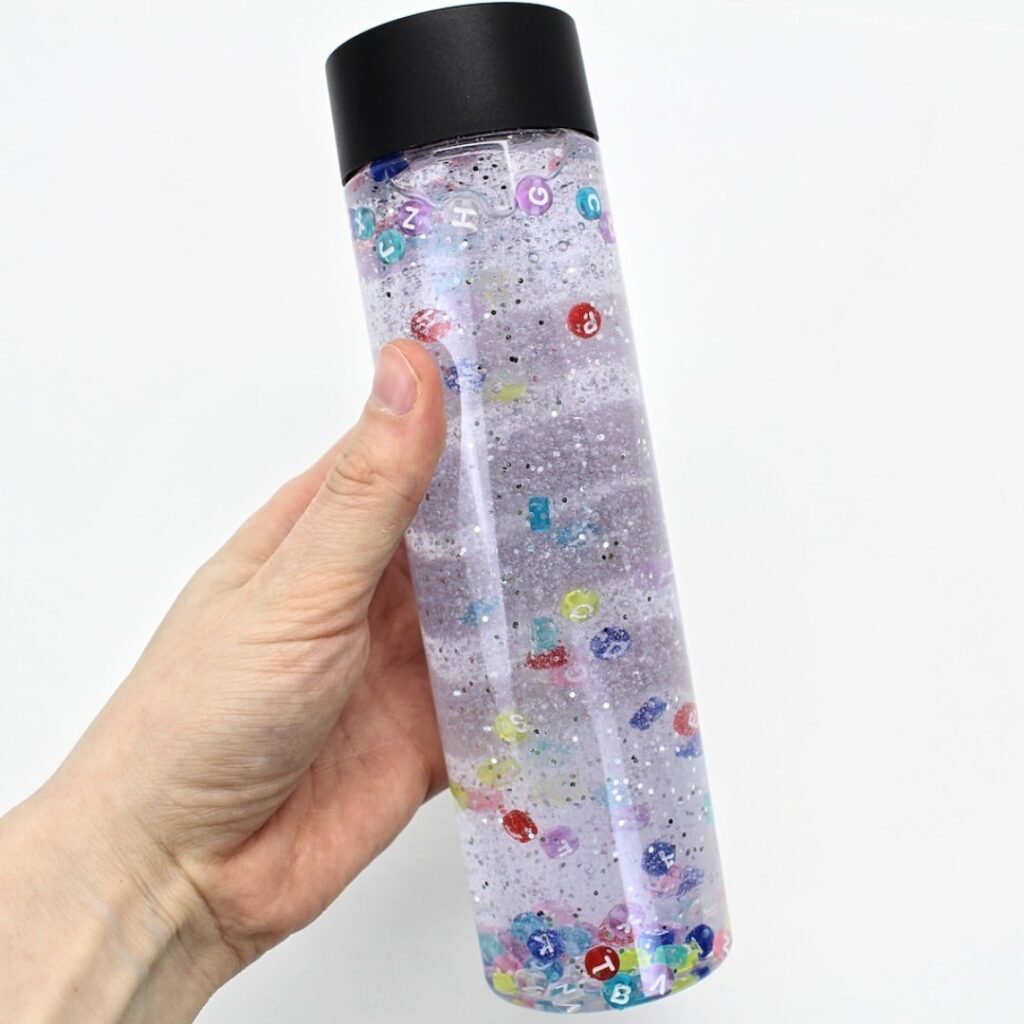
Love sensory bottles? Check out this Slow Motion Sensory Bottle, this Pom-Pom Sensory Bottle or this Glow-in-the-Dark Sensory Bottle—or read our handy guide on how to make a sensory bottle, which includes all our best tips!

Get hundreds of pages of activities!
Get access to all our paid printables, as well as monthly activity planners, for just $5/month. (New printables added twice per month!)
Required Materials
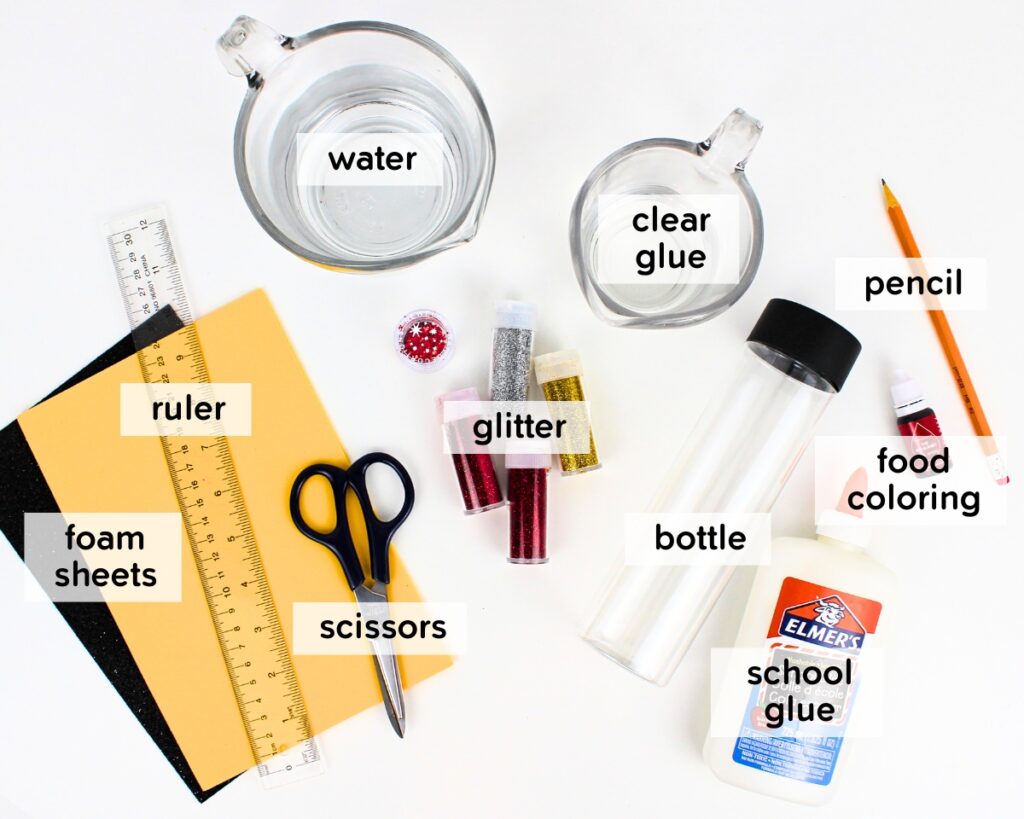
- Clear plastic bottle: I love these clear juice bottles because they give my homemade sensory bottles a consistent look, but if you don’t want to buy anything, you can use an empty bottle from the recycling. (VOSS water bottles are a popular choice.)
- Clear glue: I like to buy clear school glue in bulk because I use a lot of it in DIY Sensory Bottles and Homemade Slime. The exact amount you’ll need depends on the size of your plastic bottle and your own personal preference, so if you don’t buy your glue in bulk, I recommend that you buy two 5-ounce bottles to ensure you don’t run out.
- Water: Tap water is fine as long as it is clear in color. If possible, use warm water rather than cold, as it will mix more easily with the glue.
- Food coloring: I recommend liquid food coloring for this project since the color is added to water, but gel can work too. If you don’t have any food coloring, liquid watercolor paint is also a good option.
- Glitter: A combination of fine glitter and chunky glitter is best for homemade sensory bottles because they fall at different speeds and create a really neat effect. That being said, only the fine glitter is absolutely needed for this project. I used chunky red glitter and a mix of red, gold and silver fine glitter.
- Foam sheets: You’ll need black for the belt, and yellow or gold for the belt buckle. The black sheet should be self-adhesive if at all possible (you’ll need a glue stick if it isn’t), but the yellow one doesn’t have to be. I used the black from a set of self-adhesive glitter foam sheets, and the yellow from a set of regular foam craft sheets. You can use whatever is available to you.
- Pencil and ruler (optional): These are optional, but will help you cut the belt more evenly.
- Scissors: Make sure they’re sharp enough to cut through foam sheets. Plastic safety scissors won’t do.
- School glue (optional): This will be used to glue the yellow belt buckle to the black belt, so you won’t need it if your yellow foam sheet is self-adhesive. If you have any leftover clear glue after pouring glue into the plastic bottle, you can just use that instead.
- Hot glue or super glue (optional): This is also optional, but it will help secure the lid to ensure the bottle doesn’t pop open while your child is playing with it.
The full supply list and instructions can be found in the how-to card.
Grab our 12 best sensory recipes!

By submitting your email address, you are agreeing to the terms of our Privacy Policy. You can unsubscribe at any time.
How to Make a Santa Glitter Jar (Step-by-Step)
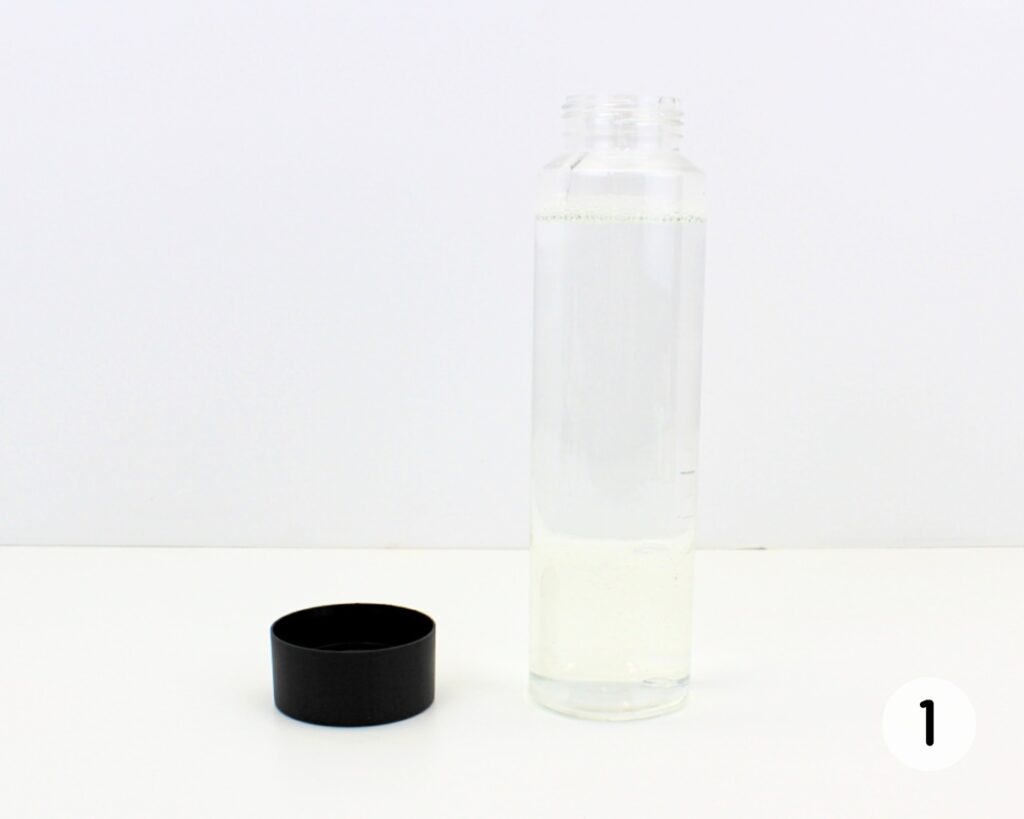
Step 1: Add liquid to bottle. Fill the bottle about a third of the way with clear glue. Add warm water, filling it almost to the top (but not completely), then seal it with the lid and shake to combine.
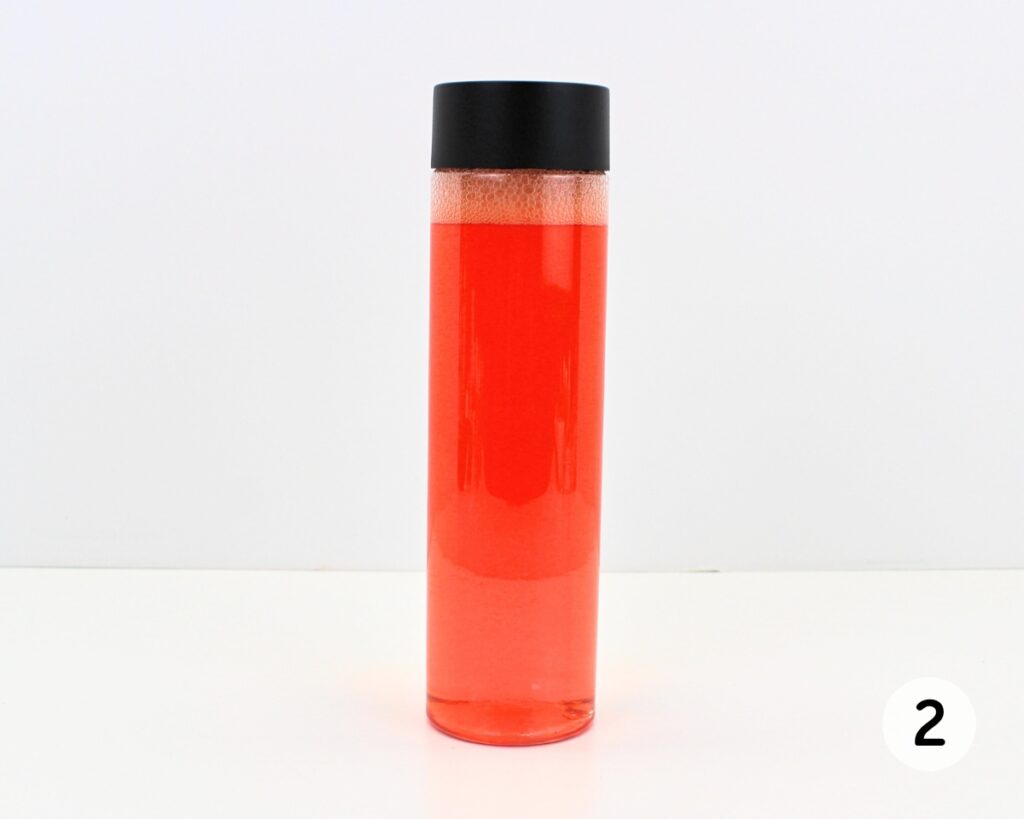
Step 2: Add coloring. Add 5-10 drops of red food coloring, seal the bottle with the lid and shake to spread the color throughout. If needed, add more food coloring and repeat this process until you are satisfied with the color.
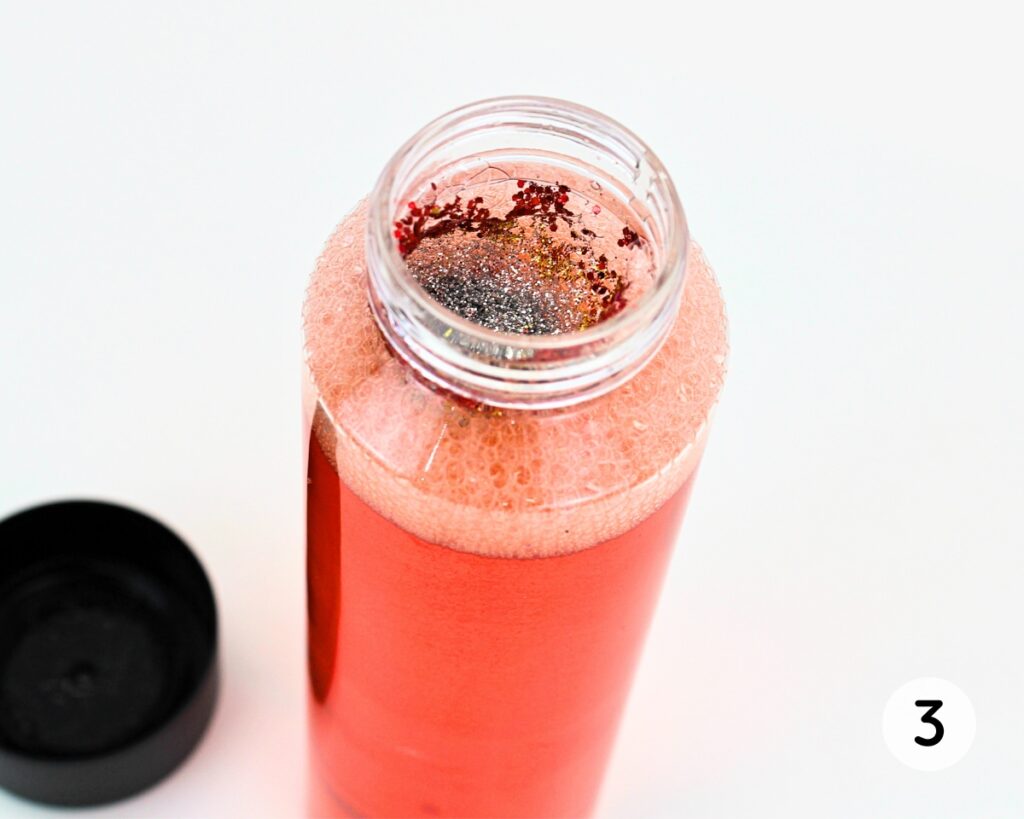
Step 3: Add glitter. Open the bottle and add some glitter. (You won’t need much—maybe a ¼ teaspoon per color.) Once again, seal the bottle and shake to combine.
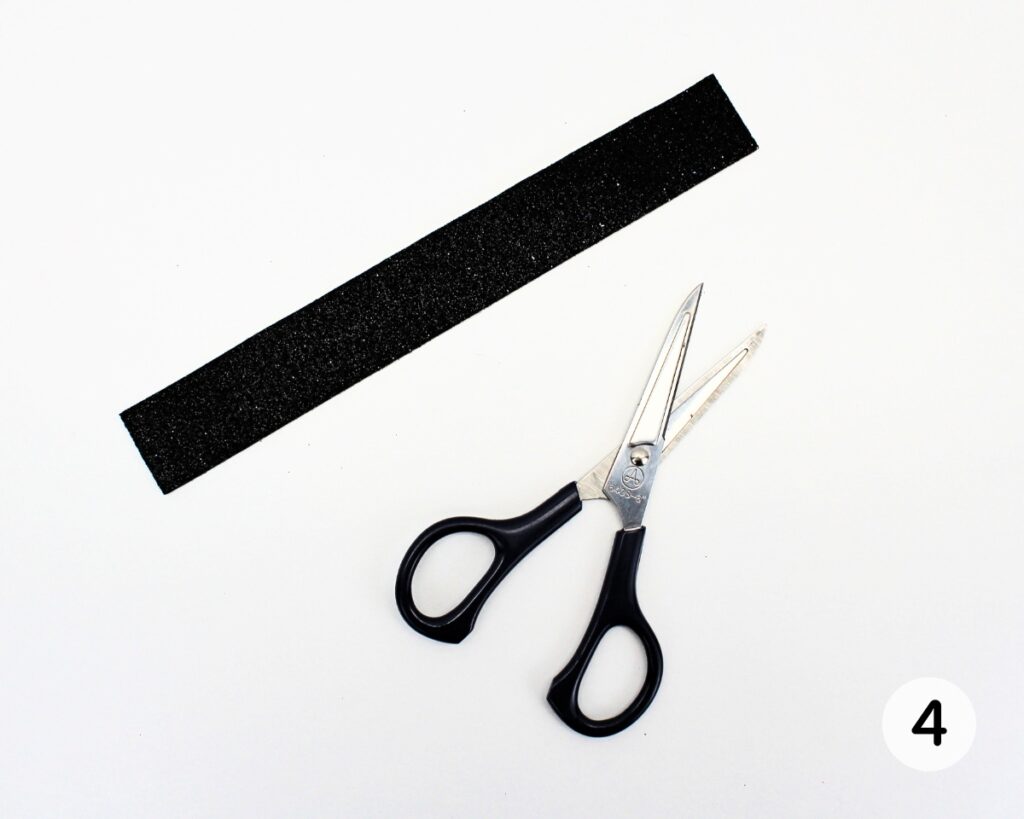
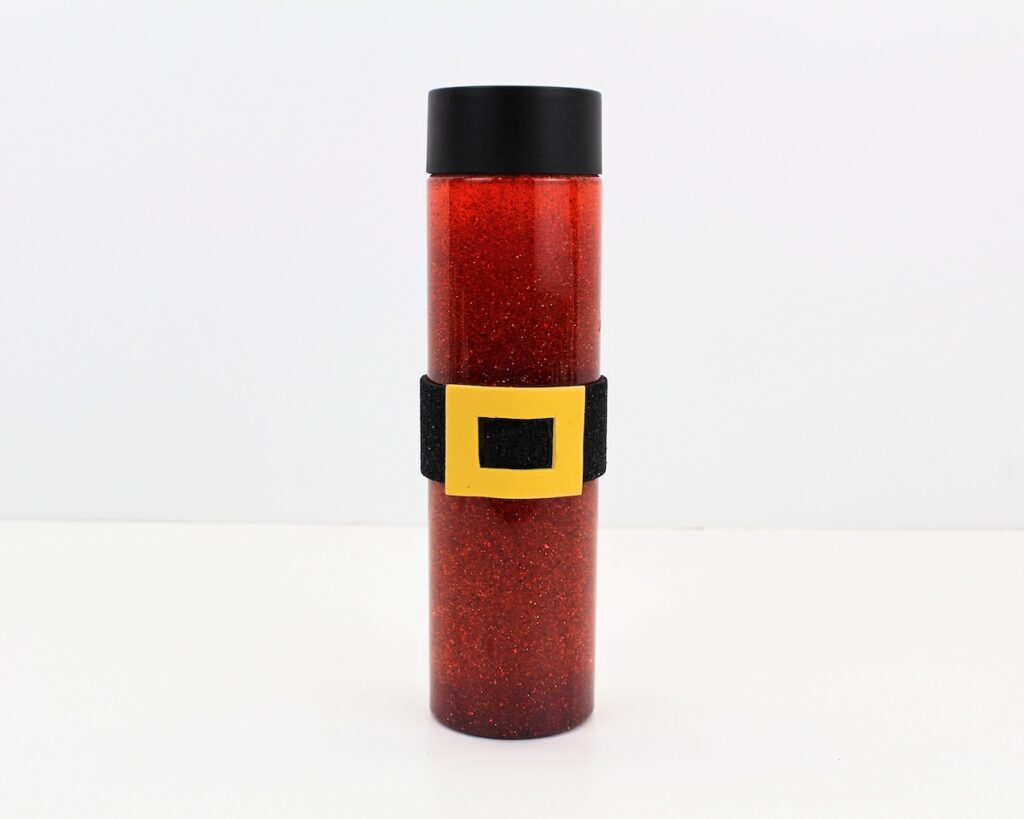
Step 4: Cut belt. Using a pencil and ruler if needed to trace a straight line along which to cut, use scissors to create a strip of self-adhesive black foam about one inch in width. Make sure it is long enough to wrap all the way around the bottle.
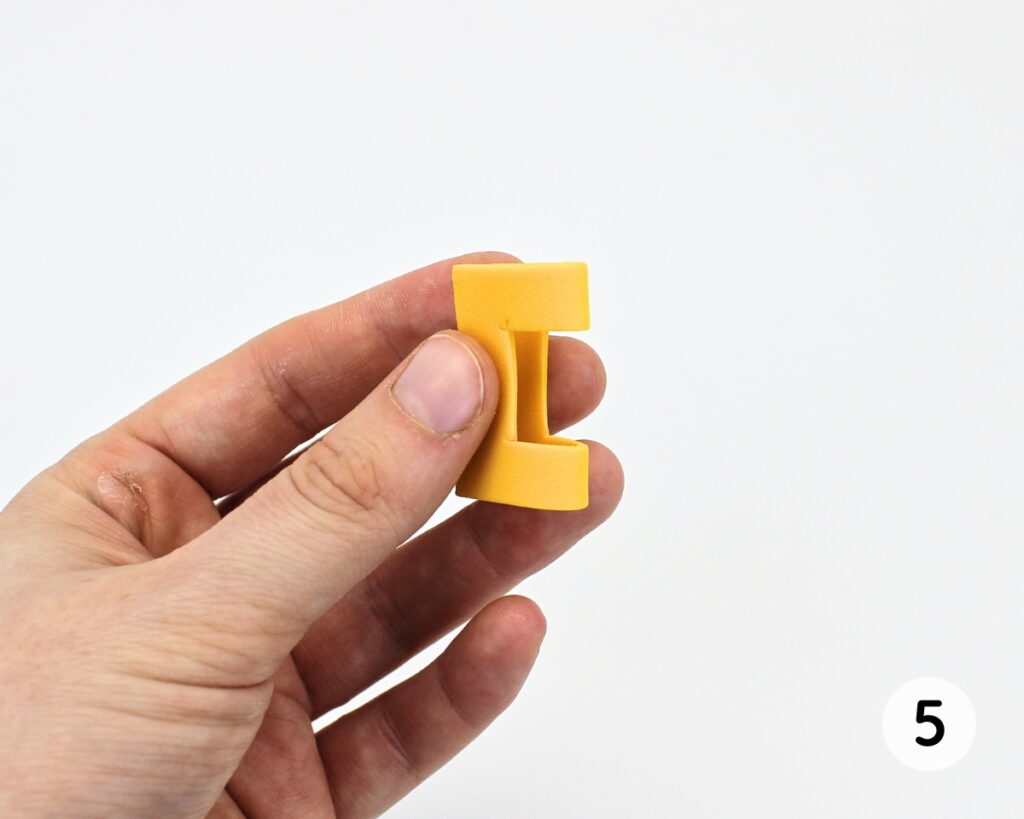
Step 5: Cut belt buckle. Cut a rectangle from yellow foam, then gently fold it in half and cut a smaller rectangle in the middle. Remove the excess foam from the middle to create a rectangular hole, and unfold the shape to reveal your buckle.
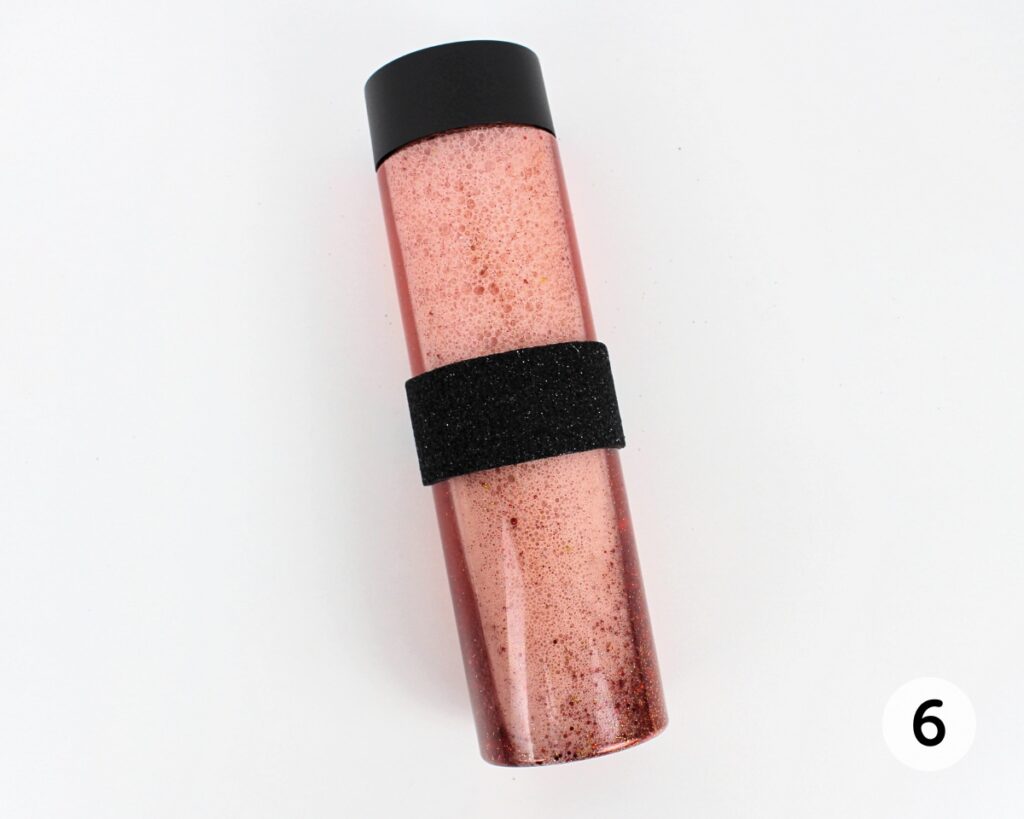
Step 6: Add belt to bottle. Without removing the paper from the self-adhesive backing, wrap the strip of black foam around the bottle to measure the correct length, and cut off any excess. Then, remove the paper and press the foam onto the middle of the bottle to create a belt. (While not ideal, you can also use a glue stick if the foam is not self-adhesive.)
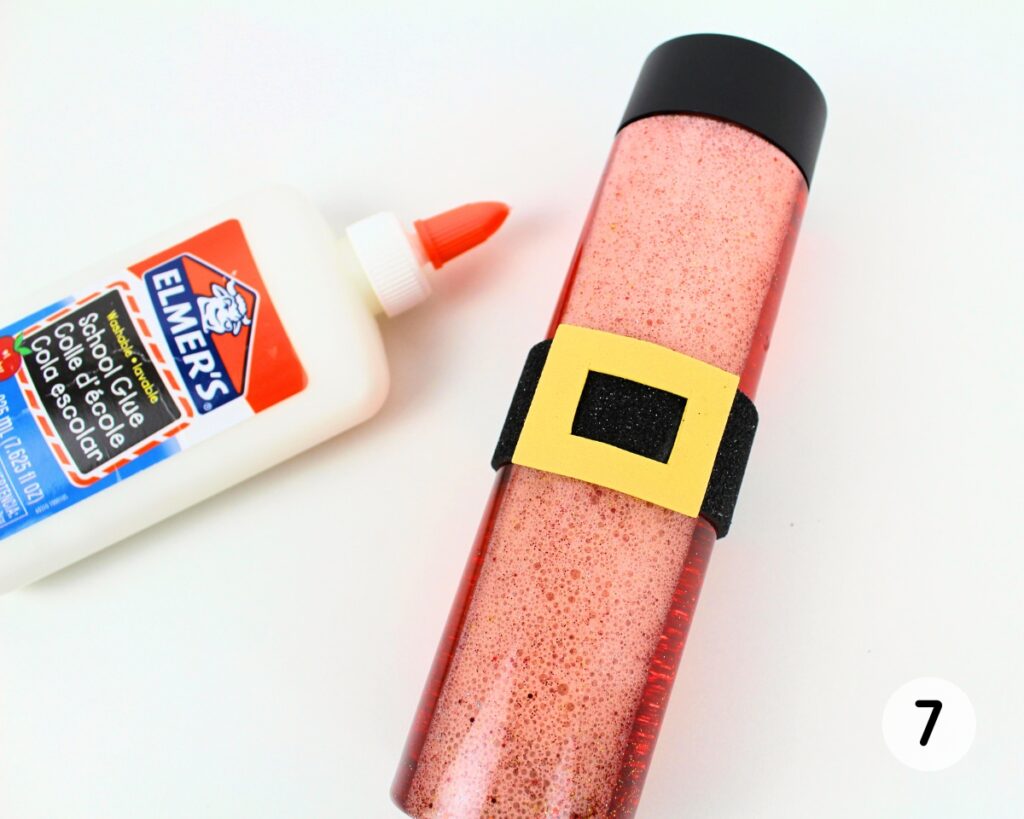
Step 7: Add belt buckle. Use liquid glue (or your yellow foam’s self-adhesive backing if it has one) to add the buckle to the belt. You may need to press down on the foam occasionally as the glue dries to help it adhere. Wait for the glue to dry fully before manipulating the bottle.
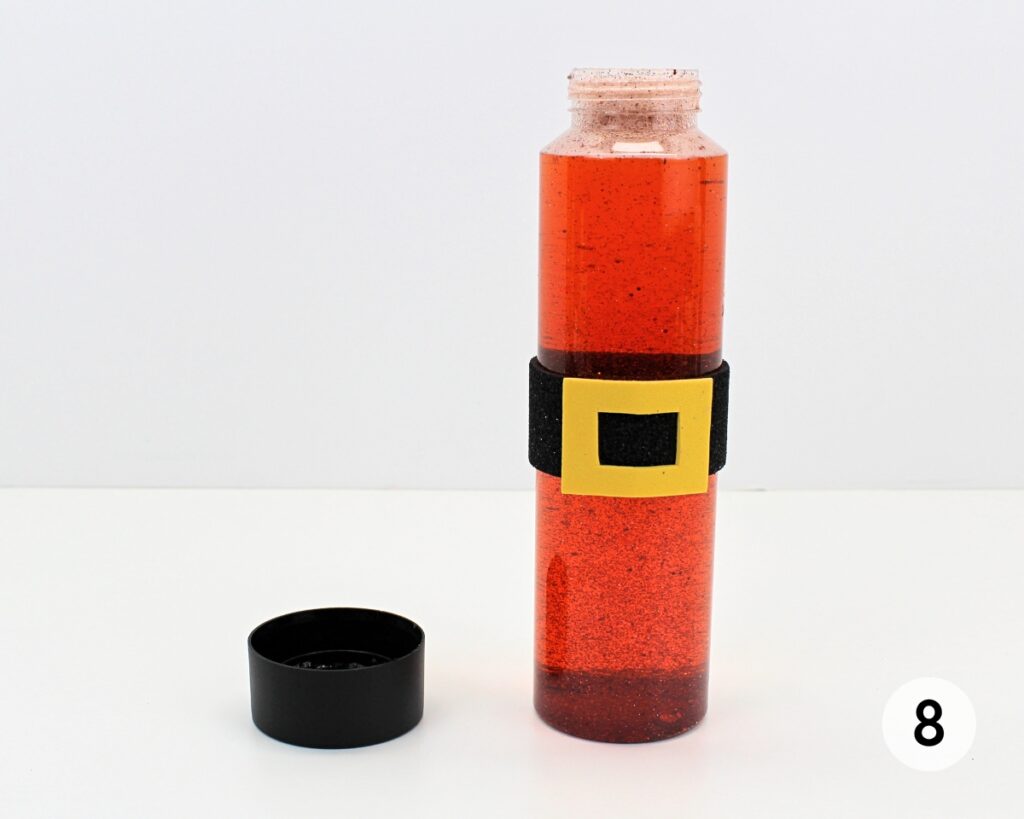
Step 8: Fill and seal bottle. Once the belt buckle is in place, open the bottle and fill it up to the top with water, scraping off any excess foam if needed. Seal the bottle by adding the lid. If you want to be sure it won’t open, you can use hot glue or super glue to the inside of the lid before you let your child play.
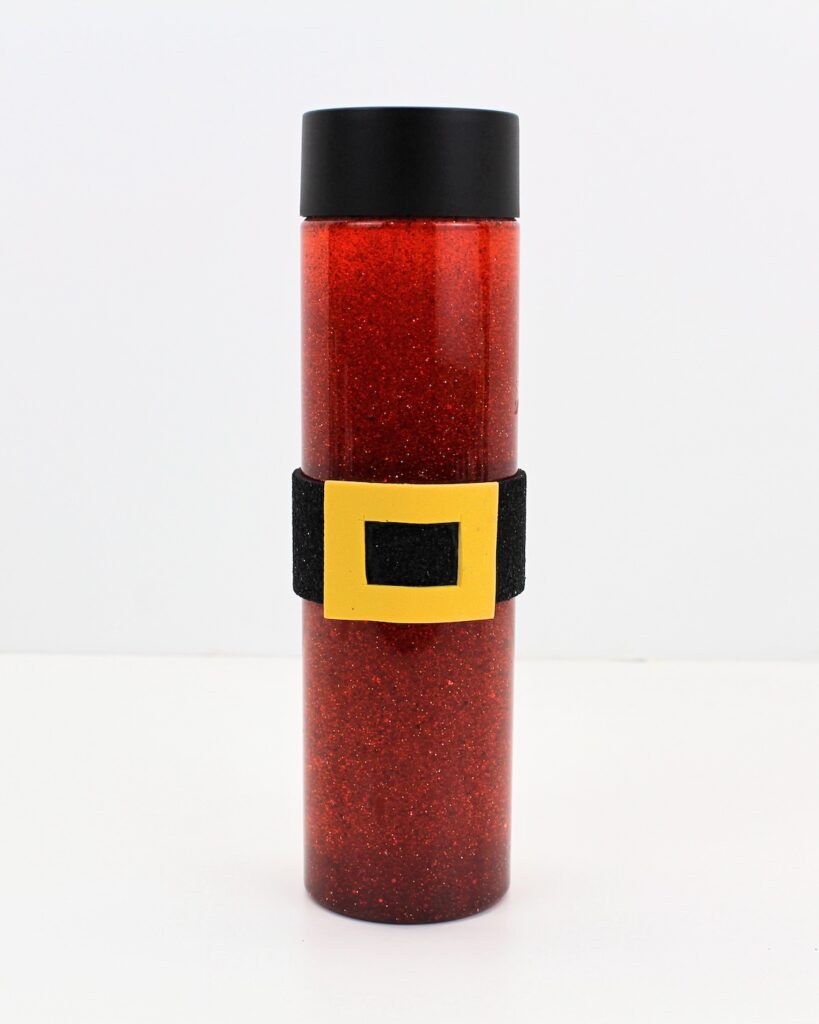
This craft was so simple to make, but my kids loved it! They recognized the theme immediately, and they all wanted a turn holding the “Santa bottle”.
Helpful Tips
- Remove sticky residue: Using a bottle from the recycling? If you’re having trouble removing the sticky residue from the label, try Goo Gone to remove it more easily.
- Play around with the quantities: Increasing the proportion of glue will make the glitter fall more slowly, while increasing the proportion of water will make it fall more quickly. If you’re not happy with the speed at which the glitter falls, dump out some of the liquid and replace it with more glitter or more water until you’re happy with how it flows.
- Mix up the glitter: For best results, use a combination of fine and chunky glitter. They fall at different speeds due to their difference in weight, which creates a fun visual effect.
- Don’t add too much coloring: When adding the food coloring, make sure you don’t make the liquid too dark—it should be light enough to create a noticeable contrast with the glitter as it falls. If you accidentally add too much coloring, dump out some of the liquid and replace it with more water or clear glue (ideally before adding the glitter).
- Replace the glue periodically: Glue weakens over time when it comes into contact with liquid. If you have chosen to seal the lid with hot glue or super glue, test the seal periodically by giving the lid a gently twist. If you feel any movement, seal it up again by adding more glue.
More DIY Sensory Bottle Ideas


If you have tried this Santa Sensory Bottle or any other project on my website, please let me know how it went in the comments below. I can’t wait to hear from you!
Santa Sensory Bottle
Materials
- 1 clear plastic bottle recycled or new
- clear liquid glue
- warm water
- red food coloring or liquid watercolor paint
- fine glitter red (required) + silver and/or gold (optional)
- red chunky glitter optional
- 1 sheet self-adhesive black craft foam glitter or regular
- 1 sheet yellow craft foam glitter or regular (optionally self-adhesive)
- 1 pencil optional
- 1 ruler optional
- 1 pair sharp scissors
- school glue if using non-adhesive craft foam
- hot glue or super glue optional
Instructions
- Fill the bottle about a third of the way with clear glue. Add warm water, filling the bottle almost (but not completely) to the top, then seal it with the lid and shake to combine.
- Add 5-10 drops of red food coloring, seal the bottle with the lid and shake to spread the color throughout. If needed, add more food coloring and repeat this process until you’re satisfied with the color.
- Open the bottle and add a bit of glitter (about ¼ teaspoon per color.) Seal the bottle and shake to combine.
- Using a pencil and ruler if needed to trace a straight line along which to cut, cut a strip of self-adhesive black foam about one inch in width. Make sure it is long enough to wrap all the way around the bottle.
- Cut a rectangle from yellow foam, then gently fold it in half and cut a smaller rectangle in the middle. Remove the excess foam from the middle to create a rectangular hole, and unfold to reveal the belt buckle.
- Without removing the paper from the self-adhesive backing, wrap the strip of black foam around the bottle to measure the correct length, and cut off any excess. Then, remove the paper and press the foam onto the bottle to create a belt. (While not ideal, you can also use a glue stick if the foam is not self-adhesive.)
- Use liquid glue, or your yellow foam’s self-adhesive backing, to add the buckle to the belt. If using glue, you may need to press down on the foam occasionally as it dries to help the foam adhere. Wait for the glue to dry fully before moving on to the next step or allowing your child to play with the bottle.
- Once the belt buckle is in place, open the bottle and fill it up to the top with water, scraping off any excess foam if needed. Seal the bottle by adding the lid. If you want to be sure it won’t open during play, use hot glue or super glue to the inside of the lid.
Video
Notes
- Play around with the quantities: Increasing the proportion of glue will make the glitter fall more slowly, while increasing the proportion of water will make it fall more quickly. If needed, keep dumping out liquid and replacing it until you are happy with the speed at which the glitter falls.
- Mix up the glitter: Use a mix of fine and chunky glitter to create a more interesting visual effect.
- Don’t add too much coloring: Keep the liquid light enough to create visual contrast with the glitter as it falls. If you add too much coloring, dump out some of the liquid and replace it with more water or clear glue.
Grab our 12 best sensory recipes!
By submitting your email address, you are agreeing to the terms of our Privacy Policy. You can unsubscribe at any time.
Only your name will be made public. Please note that by submitting your comment, you are agreeing to the terms of our Privacy Policy.