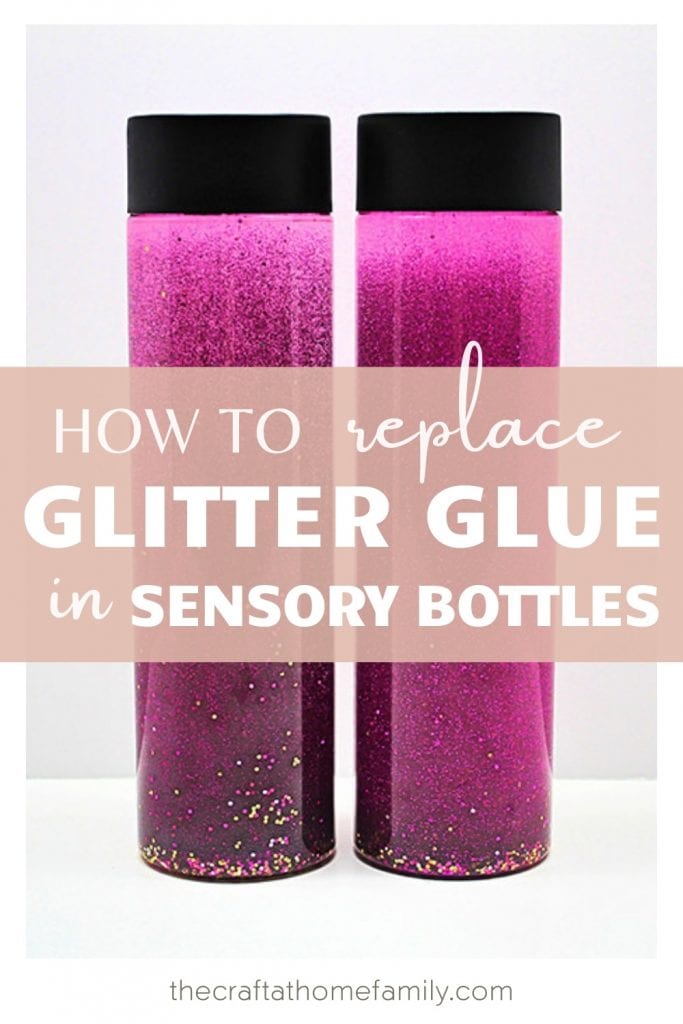
Sensory bottle recipes often call for glitter glue, but if you don’t have any on hand or are looking to cut costs, can you recreate its effect using fine glitter and clear glue? I tested it out so you don’t have to!
JUMP TO…
My kids and I can’t get enough of sensory bottles. They’re so simple to make and so gorgeous!
You can use them as a way to help your little ones manage their emotions, as a vehicle for mess-free sensory exploration, or even as a soothing timer for when your kids are on a time-out. My kids sometimes ask for them when they’re upset, then simply lie down in bed or on the couch and swish the contents around to calm down.
And to be perfectly honest, I find them so mesmerizing that even when the kids aren’t around, I’ve been known to place one on the counter and give it a shake so I can watch the glitter settle as I cook or clean up!

Get hundreds of pages of activities!
Get access to all our paid printables, as well as monthly activity planners, for just $5/month. (New printables added twice per month!)
Why this Experiment?
Recently, I’ve come across a few sensory bottle tutorials that call for regular clear glue and fine glitter. But when I first started making sensory bottles, it seemed that every tutorial I found called for glitter glue.
I didn’t have any glitter glue and found it pricey, so I tried to find information online about whether I could use clear glue and fine glitter as a substitute. When I didn’t find anything useful, I decided to try it out. And because it worked out just fine, I went on to use that method for all the bottles that I subsequently created.
But a part of me always wondered whether I was missing out by not using glitter glue!
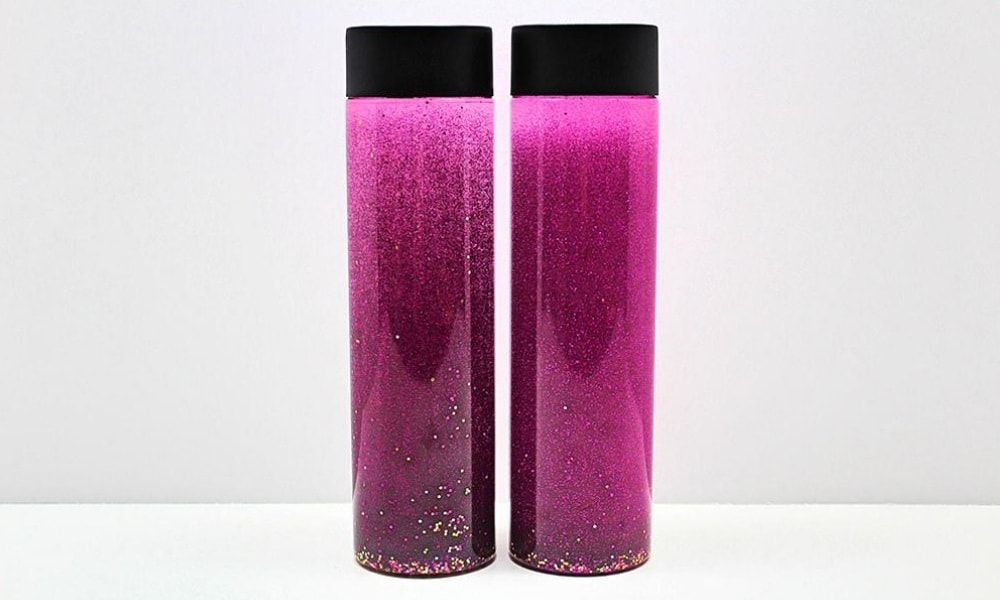
If you’ve been wondering the same thing, you’ve come to the right place. In this article, you’ll see my attempt at creating two identical sensory bottles: one with glitter glue and the other without.
I’ll discuss the differences between the bottles, compare the price of both methods and try to determine whether you can use clear glue and fine glitter to recreate the same effect as glitter glue in a sensory bottle.
Note: If you’re not interested in the experiment itself and only want to know the results, you can skip to the end. I’ve bolded the questions that I wanted to answer and summarized my conclusions!
Materials Used
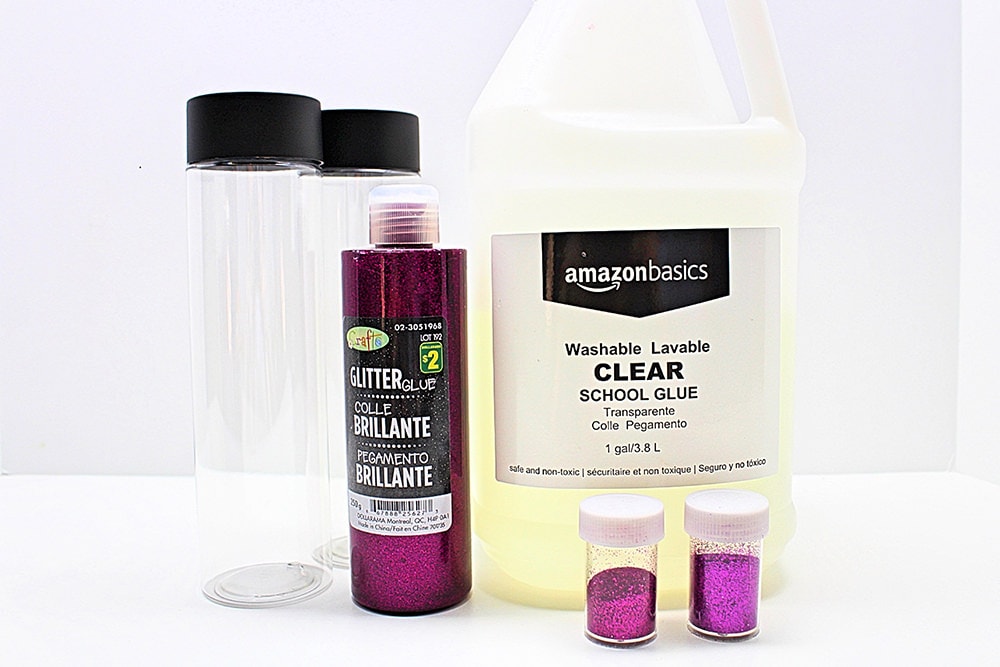
I started off my experiment with:
- Two empty bottles (I love the ones linked below)
- One bottle of glitter glue (I got mine at the dollar store)
- Clear glue
- Fine glitter (I tried to match the color of the glitter as closely as possible to that of the glitter glue so I could better compare the results!)

- Package included: 12 Pack 13.6 oz (400ml) plastic juice PET bottles with black lids
- Bottom Diameter x Height: 2.16 inch x 8.07 inch (5.5 cm x 20.5 cm). Opening size: (1.33”)3.4 cm

- All-purpose clear liquid glue (1-gallon bottle); ideal for making homemade slime; effectively adheres items together–bonds with paper, cardboard, wood and making slime, and more
- Non-runny formula for easy application; dries rapidly; can be adjusted before it dries completely (spread it around, wipe away excess)
Grab our 12 best sensory recipes!

By submitting your email address, you are agreeing to the terms of our Privacy Policy. You can unsubscribe at any time.
Sensory Bottle Experiment (Step-by-Step)
1. Add Glue to Bottles
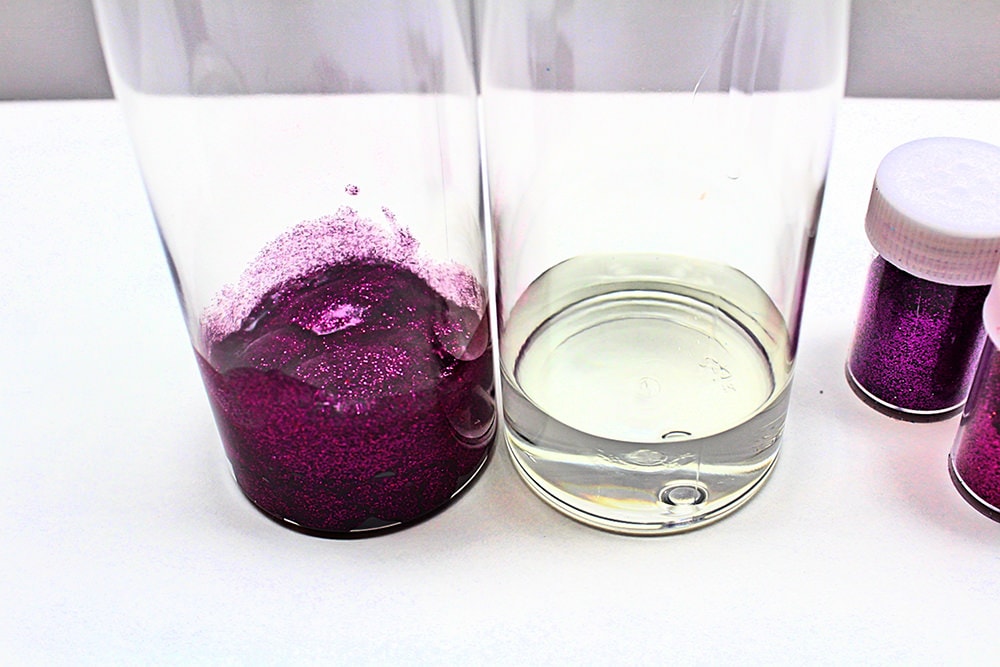
My first step was to pour a little bit of glitter glue into one of the bottles.
Note: This was actually my second attempt—the first time I tried to do this experiment, I used way too much glitter glue and ended up with a bottle full of diluted glue that wouldn’t settle! It’s been several weeks and the glitter is still suspended, even after I tried dividing it into two bottles and adding more water. Clearly I’m going to have to find another use for it!
I then poured the same quantity of clear glue into the second bottle.
2. Add Water & Glitter
Next, I topped off both bottles with hot water.
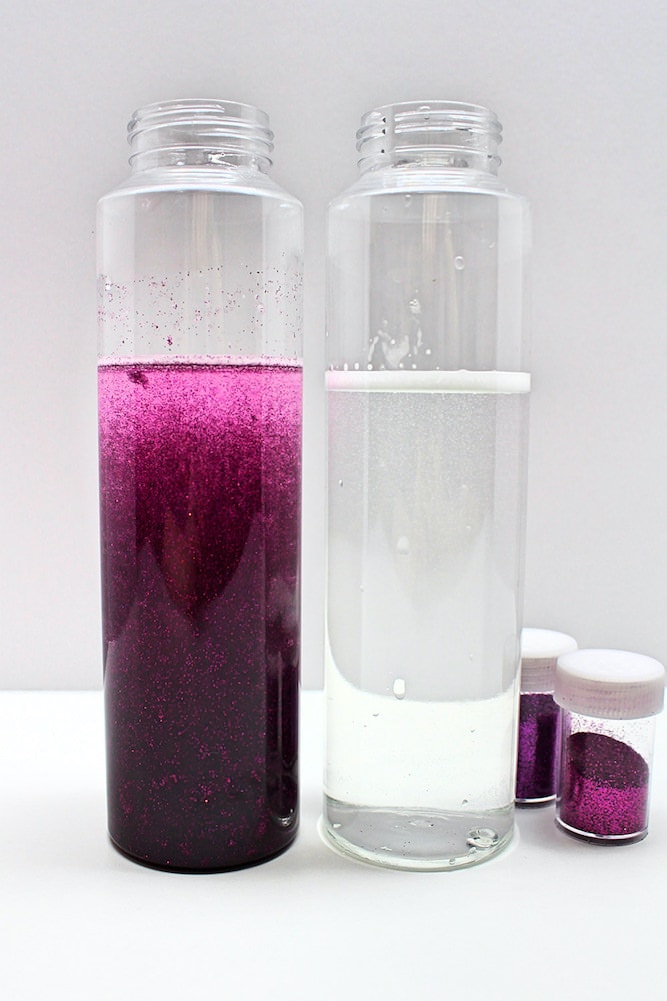
After stirring them both with a chopstick, I added 1 teaspoon of glitter to the second bottle. I really recommend adding glitter only once the glue is diluted with water. If you pour it right onto the glue, it has a tendency to form clumps that are really difficult to break up!
The first thing I noticed was that the consistency of the liquid was completely different. It was very thick in the glitter-glue bottle and very watery in the clear-glue bottle. Perhaps glitter glue is thicker than regular glue? The brand I bought certainly seemed to be.
3. Add Water/Glue
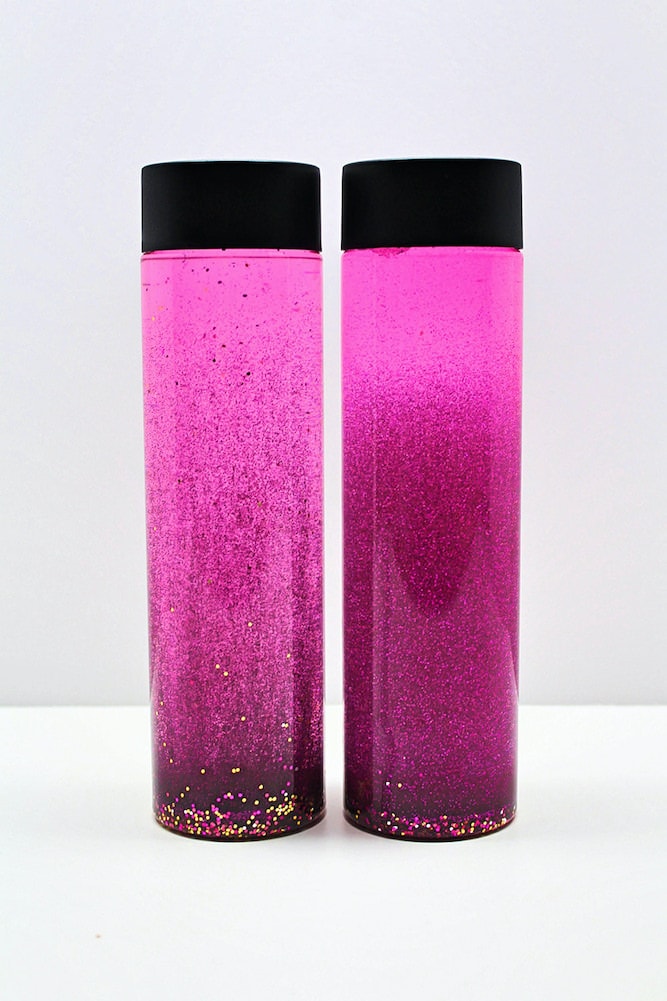
Since I was trying to make both bottles identical, I topped off the first bottle with water and the second, with more clear glue. That made the consistencies a little more similar. Then, I shook the bottles and watched as the glitter settled.
As you can see, the glitter-glue bottle (on the left) settled more slowly than the clear-glue bottle (on the right), which is consistent with my observation that the liquid seemed thicker. But all in all, there wasn’t a huge difference.
I did notice that the glitter in the glitter-glue bottle seemed to form spirals as it fell, whereas the glitter in the clear-glue bottle just fell gradually.
4. Add Chunky Glitter
Whenever I make sensory bottles, I always try to mix several sizes and colors of glitter. They don’t fall at the same speed and it makes the bottles more interesting to look at!
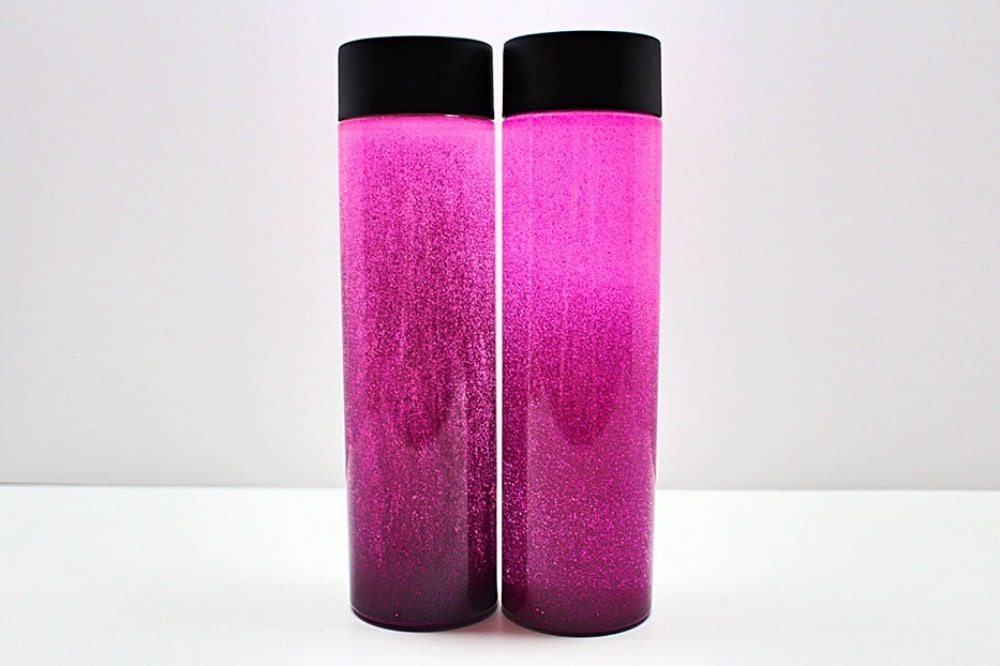
So I decided to add in some chunky glitter in pink, gold and silver, pouring about the same amount into each bottle.
For the purposes of my experiment, I also wanted to test how the chunkier glitter would behave, but there wasn’t a significant difference between the two bottles apart from what I had already noted.
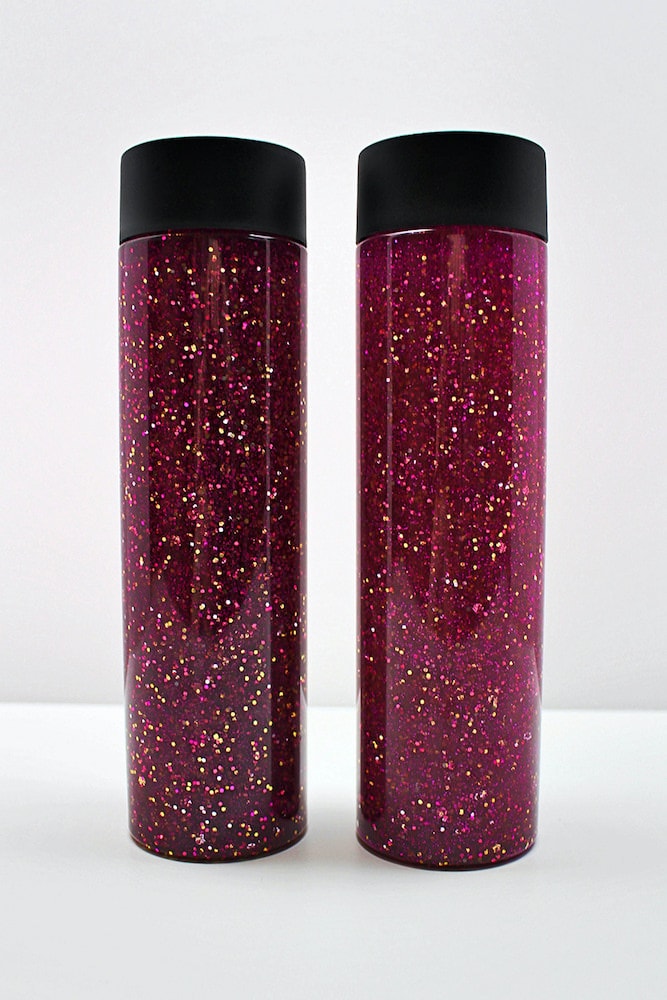
I had to pause the experiment at that point because it was time for dinner, bath time and bedtime. With three little ones, that takes several hours, and once it’s all said and done, there’s rarely enough time to do anything else.
But I knew I wanted to play around with the bottles some more the next day, because I had set out to create two identical bottles, so “similar” wasn’t going to cut it!
5. Adjust Liquid Consistency
I finally managed to get to it the next evening. At that point, I dumped a little bit of the liquid from the glitter-glue bottle to replace it with water, and dumped a little bit of the liquid from the clear-glue bottle to replace it with more clear glue.
What I didn’t notice was that the consistency of the liquid had changed overnight! The glitter-glue mixture had become more watery and the clear-glue mixture seemed thicker in comparison.
My guess is that since glitter glue is thicker than regular glue, it takes longer to dissolve, which is why the glitter had stayed suspended for longer the previous day. By replacing some of the liquid in both bottles, I ended up with a clear-glue bottle that kept the glitter suspended for way longer than the other. Oops!
I waited for it to settle, replaced some of the liquid in the clear-glue bottle with hot water, and ended up with this:
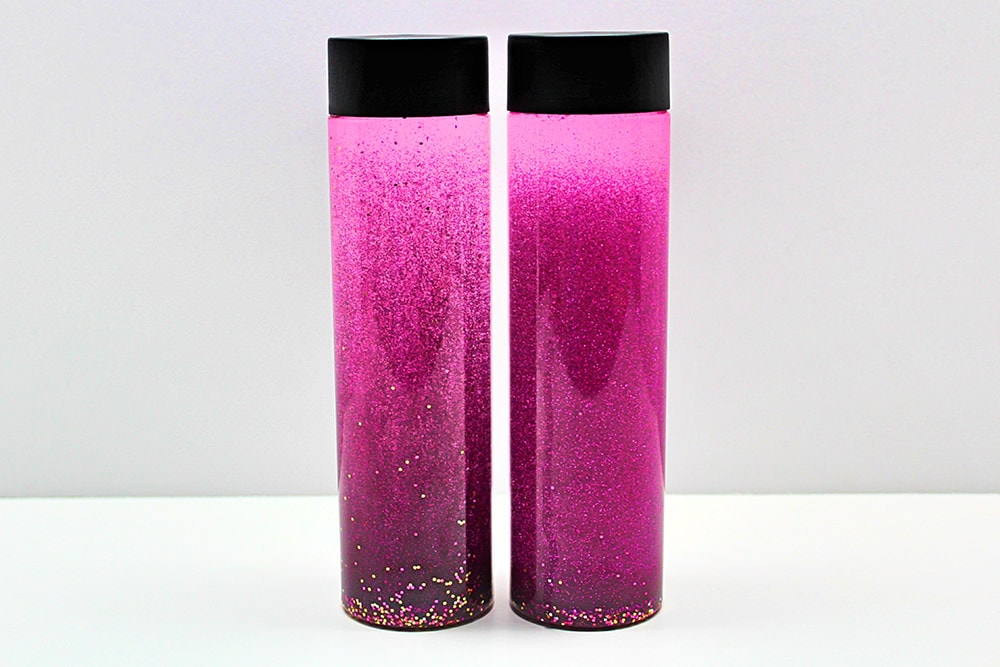
The glitter was settling at almost the same speed!
I did notice that, as it fell, the glitter in the glitter-glue bottle seemed a little more sparse, which was causing the bottles to look a bit different. I figured that maybe I had added a little too much fine glitter to the clear-glue bottle, so I added a little fine glitter to the glitter-glue bottle and watched.
In the glitter-glue bottle, the glitter seemed to disperse more as it fell. I was also able see little spirals, but they weren’t very noticeable. In the clear-glue bottle, the glitter seemed to fall more like a curtain instead of dispersing.
So as you can see, the bottles aren’t quite identical. Nevertheless, I felt comfortable enough stopping the experiment at that point to draw my conclusions!
Experiment Results
Were the Bottles Identical?
Not quite. Once I adjusted the amount of water and glue in the bottles, the glitter fell at about the same speed, but in the glitter-glue bottle, it dispersed more as it fell.
It’s possible that I added a little too much fine glitter to the clear-glue bottle and that this accounts for the difference, but it’s possible that it has something to do with the consistency of the glue.
I did notice that in the glitter-glue bottle, the liquid seemed to have a more even weight throughout (after a 24-hour resting period to allow it to properly dissolve), while the clear-glue bottle seemed heavier at the bottom, as if some of the glue hadn’t properly dissolved and was pooling there.
This might have something to do with the thicker consistency of the glitter glue. In order to make them both fall at the same rate, I had to add more glue to the clear-glue bottle, so it’s possible that it didn’t dissolve properly.
I might try to repeat this experiment using the same brand of glitter glue and clear glue to see if that changes anything. If I do, I will update this post with the results!
How Noticeable Were the Differences?
The differences were somewhat noticeable when the bottles were placed side-by-side, but in the grand scheme of things, the two bottles were pretty similar.
The glitter fell at a similar speed, but it dispersed more in the glitter-glue bottle and fell more like a curtain in the clear-glue bottle. (Perhaps it would have dispersed more if I had used less glitter in that particular bottle?)
If that’s something you consider important, then definitely choose the option that works better for you. Otherwise, just use whatever you have on hand!
Did You Use the Same Proportions?
No. I found the glitter glue to be much thicker than the clear glue, so I had to use much more glue in the second bottle in order to give the liquid a similar consistency.
I did notice, however, that the glitter glue took longer to dissolve, but stopped feeling as thick once it was done dissolving, so perhaps waiting until the glitter glue had completely dissolved before making the clear-glue bottle would have made the two easier to compare.
I’m sure other brands of glitter glue don’t have precisely the same consistency as the one I used, so I don’t think replacing it is an exact science. It really depends on the flow that you’re trying to achieve, and as long as you’re satisfied with the results, it doesn’t really matter how you got there!
Is Glitter Glue Really More Expensive?
That really depends on the price you pay for glitter glue, clear glue and fine glitter.
When I first started looking for glitter glue, I mostly just came across Elmer’s. Since it was pretty expensive, I wanted to find a cheaper alternative.
Since then, I’ve encountered many different brands and prices—perhaps as a result of the slime craze? The one I used for this experiment came from the dollar store, but it had a very similar consistency to the one I used in my first (unsuccessful) attempt, which you can find below and which is a lot pricier.

- Conforms to ASTM D 4236; non-toxic and safe
- Washable
- Perfect for crafters and artists
- Use at home, work or school
- Add jewels or appliqués for even more sparkling effects
Since I bought dollar-store glue and used only a small amount, the cost was probably about the same for both bottles, but using fine glitter might have saved me money if I had used more expensive glitter glue.
And since you’ll be needing more glue if you use clear glue and fine glitter, I highly recommend buying your clear glue in bulk so you don’t end up spending more on clear glue than you would have on glitter glue!
Which One Should I Use?
Taking into consideration the factors discussed above, the cost and results were pretty comparable, so I would suggest you just use whatever you have on hand!
No matter what you use, you’ll have to play around with the proportions until the bottle’s flow is to your liking. If you find that the glitter is falling too quickly, dump out some of the liquid and add clear glue. If you find it’s falling too slowly, add water instead.
You can also play around with the amount of glitter. In this case, I added more than I usually would have because I was trying to imitate the effect of the glitter-glue bottle, but I find that a little goes a long way, so I generally start with a lot less and add some as needed.
So it really depends on your preference! But if ever you find yourself wanting to make a sensory bottle and don’t have any glitter glue on hand, don’t sweat it. Regular glitter will work just fine—and depending on what’s available in your area, it might even save you money!
Related Sensory Bottle Articles
Love sensory bottles as much as we do? Check out this article:
- Starry Night Sensory Bottle (with Glow-in-the-Dark Stars!)
- Jack-o’-Lantern Sensory Bottle
- Winter Sensory Bottle (Inspired by Frozen)
- Musical Pom-Pom Sensory Bottle
Join my mailing list using the form below to receive 12 of the most popular sensory recipes on my site in PDF format! You’ll be the first to know when I publish new recipes, and you’ll also gain receive to lots of free printable activities for your kids.
Grab our 12 best sensory recipes!
By submitting your email address, you are agreeing to the terms of our Privacy Policy. You can unsubscribe at any time.
I used glitter glue, clear glue and warm water but after I shook the bottle to break up the glue I was left with a very cloudy bottle. Any suggestions?
Hi Marcia! In my experience, it’s actually pretty normal for the bottle to look cloudy right after it’s been made, but the liquid should become clearer with time. If it doesn’t, perhaps it has something to do with the brand of glitter glue you used? You might get better results if you skip the glitter glue and just use water, clear glue and fine glitter. You can also try adding a bit of food colouring of liquid watercolour paint to tint the liquid and mask the cloudiness.
It looks like the bottles you used are no longer available. 🙁
Nice project though!
I’ve seen them out of stock a few times, but they usually become available again within a few weeks. I use those particular ones because I like the way they look and feel, but you can use any bottle, including ones you would have otherwise thrown in the recycling! I recommend using sturdy plastic if young kids will be playing with them.