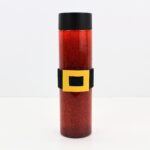
Santa Sensory Bottle
Have a young child at home? This Santa sensory bottle is super cute, simple to make, and great for babies and toddlers!
Servings: 1 bottle
Ingredients
- 1 clear plastic bottle recycled or new
- clear liquid glue
- warm water
- red food coloring or liquid watercolor paint
- fine glitter red (required) + silver and/or gold (optional)
- red chunky glitter optional
- 1 sheet self-adhesive black craft foam glitter or regular
- 1 sheet yellow craft foam glitter or regular (optionally self-adhesive)
- 1 pencil optional
- 1 ruler optional
- 1 pair sharp scissors
- school glue if using non-adhesive craft foam
- hot glue or super glue optional
Instructions
- Fill the bottle about a third of the way with clear glue. Add warm water, filling the bottle almost (but not completely) to the top, then seal it with the lid and shake to combine.
- Add 5-10 drops of red food coloring, seal the bottle with the lid and shake to spread the color throughout. If needed, add more food coloring and repeat this process until you’re satisfied with the color.
- Open the bottle and add a bit of glitter (about ¼ teaspoon per color.) Seal the bottle and shake to combine.
- Using a pencil and ruler if needed to trace a straight line along which to cut, cut a strip of self-adhesive black foam about one inch in width. Make sure it is long enough to wrap all the way around the bottle.
- Cut a rectangle from yellow foam, then gently fold it in half and cut a smaller rectangle in the middle. Remove the excess foam from the middle to create a rectangular hole, and unfold to reveal the belt buckle.
- Without removing the paper from the self-adhesive backing, wrap the strip of black foam around the bottle to measure the correct length, and cut off any excess. Then, remove the paper and press the foam onto the bottle to create a belt. (While not ideal, you can also use a glue stick if the foam is not self-adhesive.)
- Use liquid glue, or your yellow foam’s self-adhesive backing, to add the buckle to the belt. If using glue, you may need to press down on the foam occasionally as it dries to help the foam adhere. Wait for the glue to dry fully before moving on to the next step or allowing your child to play with the bottle.
- Once the belt buckle is in place, open the bottle and fill it up to the top with water, scraping off any excess foam if needed. Seal the bottle by adding the lid. If you want to be sure it won’t open during play, use hot glue or super glue to the inside of the lid.
Video
Notes
1. Remove sticky residue: If you are using a recycled bottle and you’re having trouble removing the sticky residue from the label, use Goo Gone to remove it more easily.
2. Replace the glue periodically: If you have chosen to seal the lid with hot glue or super glue, keep in mind that the glue will weaken over time. Test the seal periodically by giving the lid a gentle twist, and replace the glue if you feel any movement.
3. Helpful tips:
- Play around with the quantities: Increasing the proportion of glue will make the glitter fall more slowly, while increasing the proportion of water will make it fall more quickly. If needed, keep dumping out liquid and replacing it until you are happy with the speed at which the glitter falls.
- Mix up the glitter: Use a mix of fine and chunky glitter to create a more interesting visual effect.
- Don't add too much coloring: Keep the liquid light enough to create visual contrast with the glitter as it falls. If you add too much coloring, dump out some of the liquid and replace it with more water or clear glue.