

If convincing your kids to put on sunscreen is a struggle, this sunscreen painting experiment is the perfect way to keep them occupied while also teaching them about sun safety. Whether you want to encourage sunscreen use, or you’re simply looking for a way to pass the time, this simple sunscreen experiment is a must-try!
JUMP TO…
Have a child at home who is reluctant to wear sunscreen? This sunscreen painting activity is the perfect way to show them how sunscreen helps protect their skin from the Sun’s rays.
You’ll only need a few supplies to do this easy experiment at home, and it’s perfect for both younger and older kids. I’ve also included an explanation of the science behind this experiment, in case you want to discuss it with your little ones!
Need more preschool activities to entertain your little ones? Check out this Jell-O Dig Activity, this Muddy Farm Animal Sensory Bin (our kids’ all-time favorite!) or these 2-Ingredient Sensory Recipes.
Why You’ll Love This Activity
- Simple supplies: This project requires very few supplies, and you probably already have everything you need to do it at home, which means you won’t need to make a special run to the store before you can try it!
- Easy to do: Painting with sunscreen is just as quick and easy as painting with regular paint, which makes it perfect for children of all ages, including toddlers.
- Fun learning activity: If your child loves science experiments, this activity is a great way to lean into that interest! Make this your next STEM activity, and use it as a springboard to talk about what causes sunburns, and how sunscreen helps to prevent them.
- Concrete demonstration: Being told that sunscreen protects your skin is very different than actually seeing it in action. This experiment is a great way to illustrate the real-life effects or wearing (or not wearing) sunscreen, in a way that children will understand.
If your child loves science experiments, you can also try this Skittles Rainbow Experiment, this Floating Dry Erase Heart Trick or this Erupting Snow Volcano. My kids also love this Fizzing Paper Volcano Craft, which is a fun blend of art and science!
Get the “easy button” for summer!
Skip the planning and simplify summer break with this set of 280 activity cards that your child can pull out of a jar whenever they’re bored.
Required Supplies
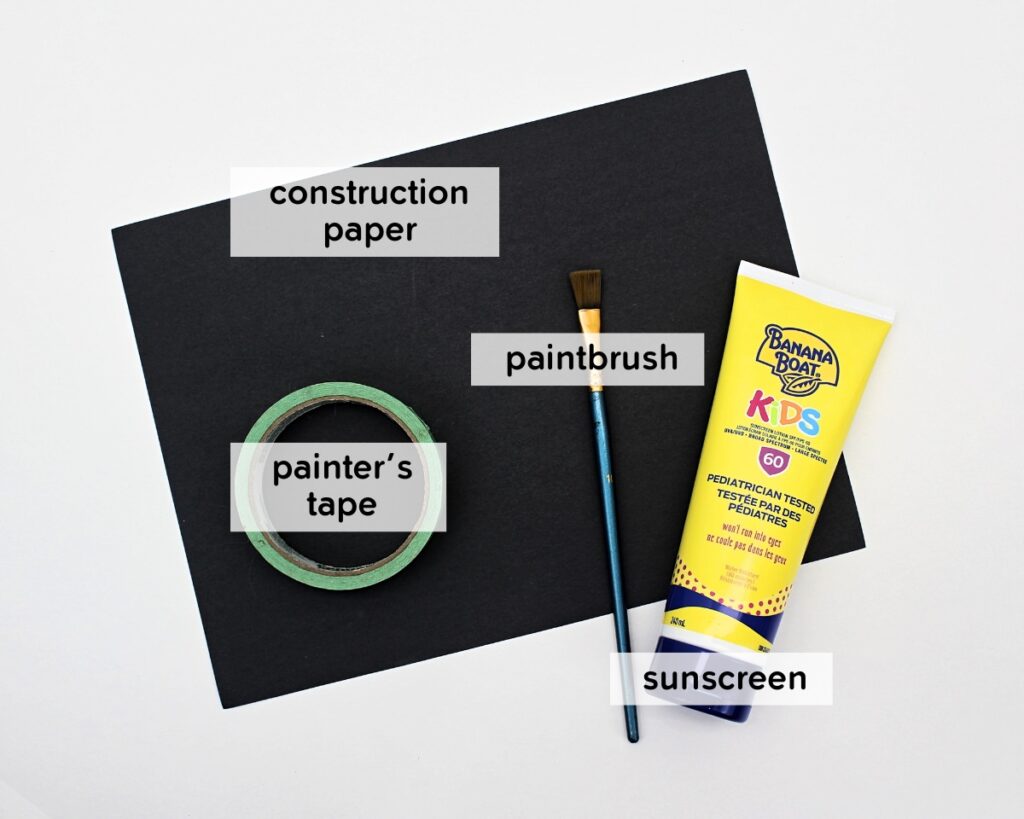
- Construction paper: I used black construction paper because I wanted the effects of the sun bleaching to be as obvious as possible, but this experiment will also work with other colors. For best results, stick with darker colors like black, purple or dark blue.
- Sunscreen: Any sunscreen you have at home will work, as long as it’s the lotion kind. (Other types, like aerosol sprays, might be more difficult to paint with.)
- Paintbrush: The one we used was pretty thick, but a thin paintbrush will work too if you want to create more intricate details.
- Painter’s tape (optional): We used this to tape the construction paper to a large plastic tray so it wouldn’t fly away in the wind. I prefer painter’s tape because it made the bleaching obvious and was easy to peel off without damaging the construction paper, but you can also place regular adhesive tape on the back of the paper, or simply weigh it down by placing small objects in the corners.
The full supply list and instructions can be found in the how-to card.
How to Make Sunscreen Paintings (Step-by-Step)

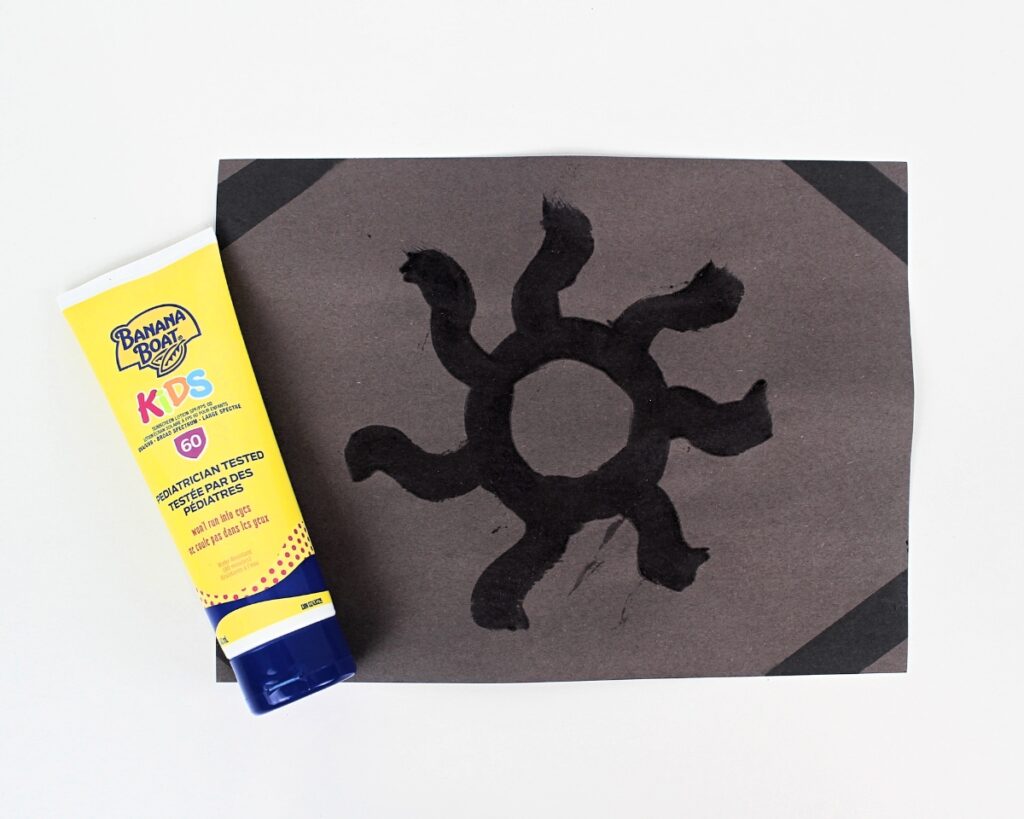
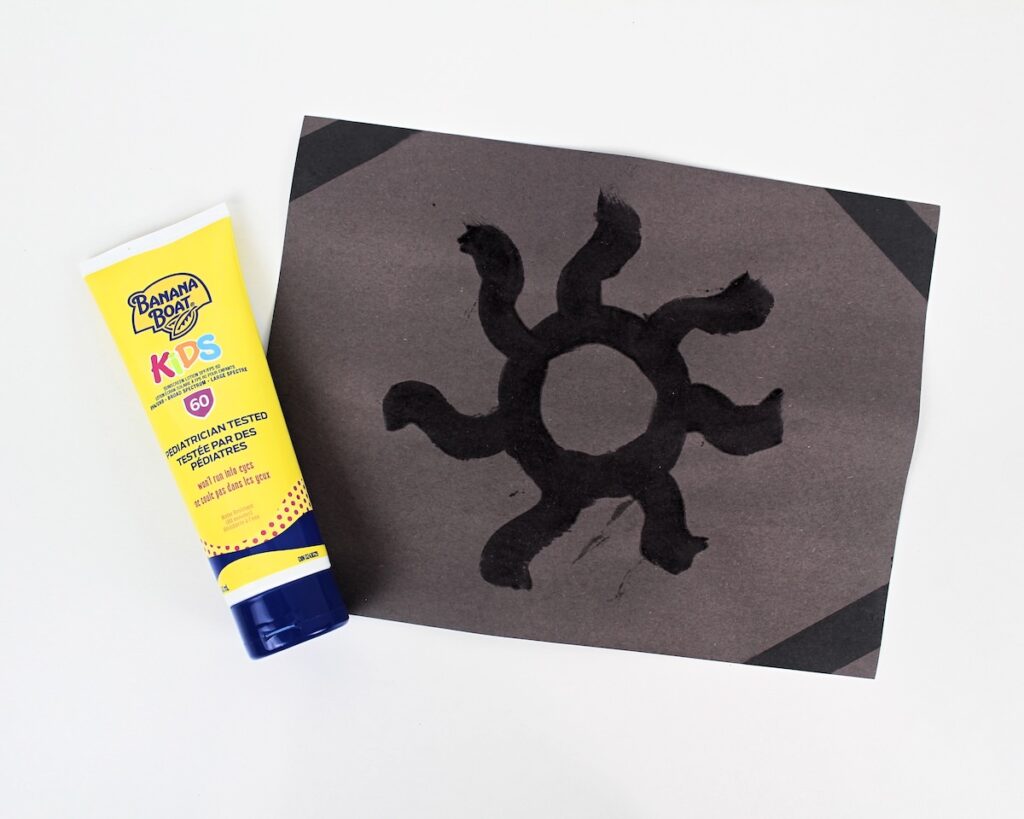
Step 1: Paint a picture. Pour some sunscreen into a paint palette or small bowl. Then, paint a design on a sheet of dark-colored construction paper using the sunscreen as paint.

Step 2: Tape down painting (optional). Use painter’s tape to tape the paper to a plastic tray, baking sheet, cardboard box, or any other portable surface that you’ll be able to leave outdoors for a few hours.

Step 3: Leave out in the sun. Place your painting outside and let it sit under direct sunlight for at least 2 hours. If you chose not to tape down the painting, place some rocks or other small items in the corners to hold it and prevent it from flying away.

Step 4: Reveal your design. After a few hours, take the painting back indoors and remove the painter’s tape. Most of the construction paper will be sun-bleached, but any area that was covered with sunscreen or tape (or small objects) will retain its original color.
My kids thought this activity was so cool! They loved seeing how the sun made the colors fade around the designs they painted.
Helpful Tips
- Stick with construction paper: I tried doing this activity with both construction paper and cardstock, and the construction paper bleached a lot more quickly, and produced a much more striking effect, than the cardstock did.
- Pick a warm sunny day: The effects of the sun-bleaching will be a lot more obvious if you pick a day where the sun is shining very brightly, and place the painting outside under direct sunlight.
- Avoid the shade: When choosing where to place your painting, make sure you pick a spot that will be under direct sunlight for the whole time it’s outside.
- Secure your painting in place: To prevent it from flying away in the wind, secure the construction paper in place by placing painter’s tape or small objects in the corners, or by taping the back of it to a tray using regular adhesive tape. (If there is too much wind, you may want to save this experiment for another day.)
- Get the full effect: For maximum effect, stick with darker shades of construction paper, and compare the bleached paper to an unbleached one to see how much the color has changed. Covering the corners with painter’s tape will make it doubly obvious which areas were exposed to sunlight, since the areas covered with tape won’t fade.
Frequently Asked Questions
Have a question that wasn’t answered here? Let me know in the comments and I’ll be happy to help!
More Summer Crafts for Kids


If you have tried this Sunscreen Painting Experiment or any other project on my website, please let me know how it went in the comments below. I can’t wait to hear from you!

Sunscreen Painting
Materials
- sunscreen lotion as needed
- 1 paintbrush
- 1 sheet black or dark-colored construction paper
- painter's tape optional
Instructions
- Paint a design on the sheet of construction paper using sunscreen.
- If desired, use painter’s tape to tape the painting to a plastic tray, baking sheet, cardboard box, or any other portable surface that you’ll be able to leave outdoors for a few hours.
- Place the painting outside and let it sit under direct sunlight for at least 2 hours. If you chose not to tape down the painting, place some items in the corners to hold the paper down in case of wind.
- After a few hours, take the painting back indoors and remove the painter’s tape. Most of the construction paper will be sun-bleached, but any area that was covered with sunscreen or tape will retain its original color!
Video
Notes
- Stick with construction paper: Construction paper bleaches much more quickly than cardstock and will produce a more striking contrast.
- Avoid the shade: Place your painting in a spot that will be under direct sunlight for the whole time it’s outside.
- Get the full effect: Once your painting is done bleaching, compare the bleached paper to an unbleached one to see how much the color has changed. (Taping the corners also emphasizes the contrast because it protects part of the paper from the sun.)
Only your name will be made public. Please note that by submitting your comment, you are agreeing to the terms of our Privacy Policy.