
Does your child love science experiments? If so, they’ll love this super simple dry erase marker experiment that creates floating hearts in water for Valentine’s Day! This easy floating ink trick can be customized to suit any holiday or theme, and it only requires a couple inexpensive supplies.

JUMP TO…
Do your kids love science experiments? Ours do, and the simplest ones always seem to be the biggest hits.
We have done multiple variations on the Magic Paper Towel Experiment and my kids always think it’s amazing. I personally love how easy the setup is and how simple the materials are.
And if you’re as big a fan of simple science experiments as I am, you’ll love the one I’m sharing today… because this floating hearts science experiment is, if possible, even simpler than the paper towel one! In fact, all you’ll need for this experiment is a spoon, a dry erase marker and water.
So if you’ve seen the videos on Instagram but have never tried this floating ink trick yourself before, scroll down to see just how easy it is to make your drawings float on water!

Get hundreds of pages of activities!
Get access to all our paid printables, as well as monthly activity planners, for just $5/month. (New printables added twice per month!)
How Does the Dry Erase Marker Experiment Work?
It’s definitely a fun STEM activity to do with kids, but how exactly does this floating ink experiment work?
Well, while permanent marker ink contains an acrylic polymer that makes it stick to the surface it’s on, dry erase markers contain an oily silicone polymer that makes their ink slippery.
For this reason, drawings made using dry erase markers do not stick to the surface they’re on. This makes it easy to erase them from a whiteboard—or from any other non-porous surface they’re on (like a spoon).
The ink’s slipperiness, along with the fact that it doesn’t dissolve in water, means that when you submerge your spoon in water, the water is able to slip underneath the drawing.
And since the oily polymer in the ink prevents it from sticking to the surface of the spoon, when the water slips underneath the drawing, it causes it to detach completely from the spoon.
At that point, because the ink is less dense than the water, it will stay on its surface and begin to float. How cool is that?!
Required Materials
Here is what you’ll need in order to do this neat floating marker trick with your kids:

- Spoon
- Dry erase markers (Expo or another brand—I used the U Brands double-ended markers I had leftover from when I was a teacher)
- Small container or dish
- Tap water
- Paper (optional)
Note: Please keep in mind that this experiment will work best will new whiteboard markers. If your markers are old and dried out, the experiment will likely fail.
(Having trouble getting this dry erase trick to work? Read to the end of the article for some troubleshooting tips!)
How to Make Dry Erase Marker Hearts Float in Water (Step-by-Step)
1. Draw Heart on Back of Spoon
Start by grabbing a spoon and a dry erase marker in the color of you choice. Use the marker to draw a heart on the back of the spoon and fill it in.

Note: Filling in the hearts isn’t absolutely necessary, but hearts that are filled in will hold their shape better when they’re floating in water.
2. Let Ink Dry for 10-15 Seconds
This may depend on the brand of markers you’re using and on how new the markers are, but I have found that this floating ink experiment works best when you let the shape dry a little—but not too much—before you try to submerge it in water.
The shapes I made with my U Brands markers seemed to hold up best when I let them dry for about 10-15 seconds before I moved on to the next step. If you’re using Expo markers or another brand, you may have to experiment a bit to figure out what works best for you.
The drying time may also depend on the individual marker as markers that are more dried out to begin with won’t need as much time to dry.
3. Place Spoon in Water
Now comes the fun part!
Fill a shallow dish with water (I used a square casserole dish) and, holding your spoon at an angle so that only one edge of the heart you drew touches the water, gently drop your spoon into the water to see if the heart begins to peel off.

If the heart doesn’t peel off, try inserting the spoon at a different angle to see if that helps. If not, your shape may be too dry… or not dry enough. Erase the heart, thoroughly dry off the spoon and try again, letting the ink dry for a different amount of time to see if it works better.
If the heart does start to peel off, gently rotate your spoon to help it along.
Keep doing this, gently tilting and rotating your spoon as needed until the heart detaches itself completely. This may take a bit of practice the first time you do it, but you should get the hang of it pretty quickly.
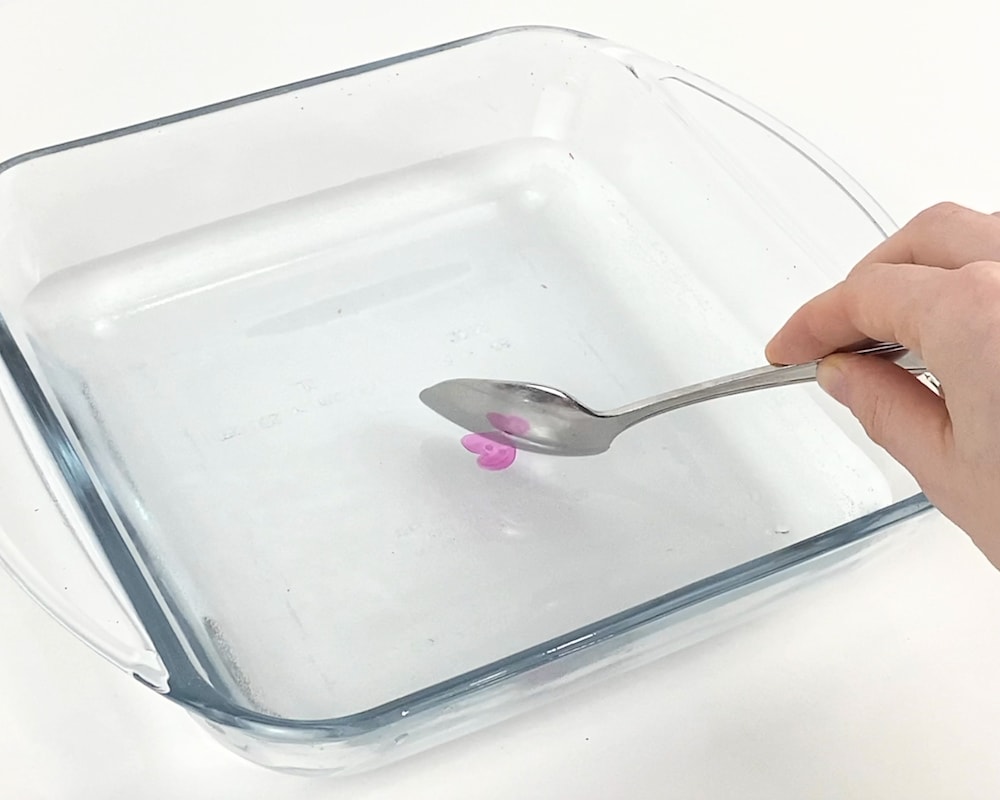
Once the heart has completely peeled off, quickly remove your spoon from the water to prevent the heart from latching onto its surface again.
4. Repeat Previous Steps
Using the same shallow dish, repeat the three previous steps as many times as you like to create more floating hearts.

Feel free to stick with Valentine’s Day colors like pink, purple and red or use rainbow colors like we did! (Every activity is better with rainbow colors, wouldn’t you agree?)
5. Catch Floating Hearts (Optional)
This last step is totally optional, but it’s fun to do and extends the activity a little once your hearts are floating around and you’re done creating more. My kids really enjoy this step and always ask to do it.
To “catch” the floating hearts, simply cut a sheet of regular white printer paper into small pieces. Then, place each piece of paper on top of a floating heart.
If your piece of paper is dry, the dry erase heart should adhere to the paper and you’ll be able to lift it right out of the water. So fun!

This can also be a good way to clean up your dish partway through the experiment if any of the hearts have broken apart.
Other Floating Dry Erase Marker Experiments
Because Valentine’s Day is coming up, we decided to make floating Valentine hearts for the purposes of this article. But there are lots of different ways to customize this activity depending on the current season or on the theme you’re working on at the moment:
- Floating Dry Erase Letters: Spell out your name or write all the letters of the alphabet and watch them float in water!
- Floating Dry Erase Snowflakes: Turn this floating ink experiment into a floating snowflake experiment by drawing little blue snowflakes on the back of a spoon and watching them dance around in the water.
- Floating Dry Erase Spiders: Is Halloween coming up? Draw little black spiders on the back of a spoon and watch them come to life!
There are SO many ways to switch up this experiment… Let your imagination loose and see what you can come up with!
Just make sure that if you use multiple colors within the same design, all the lines are fully touching. Drawings containing multiple colors tend to come apart more easily. (We’ve tried making floating rainbows multiple times and they’re pretty tricky to get right.)
Help! My Dry Erase Experiment Is Not Working!
There are several reasons why this experiment may not be working for you, but I’ve outlined the most common reasons below.
The first possible explanation could be that your marker ink is too dried out. This experiment works better with new dry erase markers, or dry erase markers that have not been previously used much. If you think this may be the issue, try repeating the same steps with a newer marker to see if that works better for you.
The second possible explanation could be that you didn’t let the ink dry enough before placing the spoon in the water—or that you let it dry too long, which doesn’t work as well. I have found that 10-15 seconds of wait time tends to do the trick, but the ideal wait time may be a little different for you, so don’t be afraid to experiment.
If all else fails, you can also try drawing the hearts directly onto the bottom of the (empty) dish you’re using and slowly pouring the water into the corner of the dish. If you have allowed the hearts sufficient time to dry, the water you add should be able slip underneath the drawings and lift them off the bottom of the dish!
More Valentine Science Experiments for Kids
Looking for more fun “sciency” things to do with your kids for Valentine’s Day? Check out these articles:
- Fizzy Baking Soda Hearts (Easy Valentine’s Day Science)
- Valentine’s Day Magic Paper Towel Experiment
My kids are going to love this! I can’t wait to try it with them! Thank you!! Do you think a plastic spoon would work too?
I haven’t tried it, but it probably would! What’s important is for the dry erase marker to be used on a non-porous surface, and plastic is non-porous. 🙂