


Love crafts made with recycled materials? This recycled puff container snowman is an adorable way to repurpose empty baby puff containers, and you probably already have everything you need to make it at home.

JUMP TO…
If you have a young child at home, you may have a few empty puff containers lying around the house. And if you’ve been looking for something fun and creative to do with them, this simple snowman craft is a great way to reuse them.
You’ll only need a couple recycled materials and a few additional supplies to make this adorable winter craft at home!
Why You’ll Love This Craft
- Easy and cute: How adorable did this craft turn out?! The puff container was the perfect size and shape to make a snowman, and all the steps to make it were very simple and straightforward.
- Recycled materials: This craft is a fun way to repurpose not only an empty baby puff container, but also the small medicine cup that comes with Children’s Tylenol.
- Simple supplies: Once you have gathered your recycled materials, you’ll only need a few more items in order to complete the craft. You may already have everything you need at home!
Looking for more winter craft ideas? Check out this Melted Puffy Paint Snowman, these Color-Changing Snowflake Window Clings or this list of Easy Snowflake Crafts!
GRAB OUR FREE 30-PAGE ACTIVITY BUNDLE!
By submitting your email address, you are agreeing to the terms of our Privacy Policy. You can unsubscribe at any time.
Required Materials
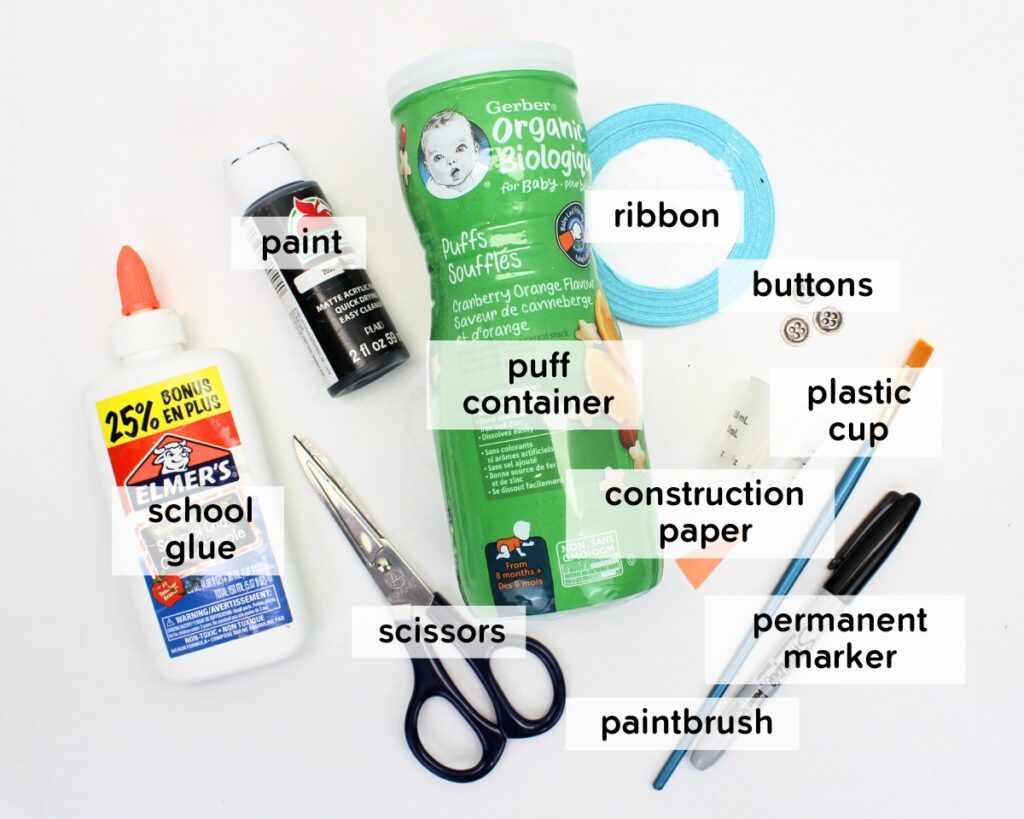
- Baby puff container: You’ll be using a tall baby puff container to create the snowman’s body. I used the Gerber one, but as long as the container is a similar shape, any brand will do.
- Small plastic cup: The one I used came from Children’s Tylenol. You can use any kind as long as it’s small enough to create a top hat when glued on top of the puff container lid.
- Paint: Acrylic paint or multi-surface craft paint are best, because they are less likely to come off when painted onto plastic. Watercolor paint, tempera paint and washable kids’ paint probably won’t give the best results.
- Paintbrush: I recommend using a brush with soft, flat bristles to get proper paint coverage on plastic.
- Ribbon: I used a thin, blue satin ribbon to create the snowman’s scarf, but any type will do as long as it’s long enough and not too thick. A holiday-themed pattern could add a fun touch to this craft!
- Buttons: The ones I used were made from textured metal, but black plastic buttons would also work great. Make sure they’re not too big and have a flat back that will allow them to stick to the puff container.
- Glue: Any type of liquid glue, such as white school glue or Elmer’s Glue-All, will work for this project.
- Construction paper: You’ll only need a bit of orange construction paper for the snowman’s nose. If ever you don’t have any, you can try painting the nose instead, or drawing it with an orange permanent marker.
- Scissors: Stick with metal—you’ll be using them to cut construction paper as well as the ribbon and plastic.
- Permanent marker: A black fine point permanent marker (not ultra fine point) is best.
The full supply list and instructions can be found in the how-to card.
How to Make a Puff Container Snowman (Step-by-Step)

Step 1: Remove plastic from puff container. Using scissors if needed, remove the label from the baby puff container to reveal the white plastic underneath.

Step 2: Paint snowman’s hat. Use black paint to completely cover the top of the puff container lid as well as the outside of the plastic cup. (You may need to apply several coats or paint the inside of the cup.)

Step 3: Add scarf. Wrap a piece of ribbon around the part of the puff container that curves inward (near the middle), then carefully press the excess ribbon onto the puff container and glue it in place.

Step 4: Add buttons. Use glue to add three buttons in the middle of the snowman’s body, allowing time for the glue to fully dry before you move on to the next step.

Step 5: Add nose. Use scissors to cut an orange triangle from construction paper and glue it to the snowman’s face.

Step 6: Draw eyes and mouth. Using a black permanent marker, draw two large dots for the snowman’s eyes, and several small dots for its mouth.

Step 7: Glue hat. Once the glue has fully dried, assemble the snowman’s hat by glueing the rim of the plastic cup to the puff container lid.

Step 8: Assemble snowman. Finish off your snowman by placing the hat on top of its head.
This project was so fun, and I loved that it was a cute way to repurpose those empty baby puff containers that so many parents have lying around! Make sure you save the next one instead of tossing it in the recycling.

Helpful Tips
- Use the right type of paint: Because you’ll be painting plastic rather than paper, you’ll need to use thick paint that won’t come off too easily once you start manipulating the hat—I recommend acrylic paint or multi-surface craft paint. (You can also use spray paint, but that might get a little messy.)
- Give the glue time to dry: Make sure you give the glue enough time to dry before you set the snowman upright and start moving it around. I kept the puff container in a horizontal position until the buttons were no longer at risk of sliding down, and let the hat dry fully before I added it to the snowman’s body.
- Wipe off permanent marker: Not happy with the eyes or mouth you drew? Keep some alcohol wipes or rubbing alcohol on hand so you can wipe off the permanent marker ink and start over. (Rubbing alcohol and acetone dissolve permanent marker ink.)
More Winter Crafts for Kids


If you have tried this Puff Container Snowman Craft or any other project on my website, please let me know how it went in the comments below. I can’t wait to hear from you!

Puff Container Snowman
Materials
- 1 baby puff container e.g. Gerber, Parent's Choice
- 1 small plastic cup from Children's Tylenol or similar
- black acrylic or craft paint as needed
- 1 paintbrush
- 1 ribbon
- 3 buttons
- liquid school glue or Elmer's Glue-All as needed
- 1 sheet orange construction paper
- 1 pair scissors
- 1 black permanent marker fine point
Instructions
- Using scissors if needed, remove the label from the puff container to reveal the white plastic underneath.
- Use black paint to completely cover the top of the puff container lid as well as the outside of the plastic cup. (You may need to apply several coats or paint the inside of the cup.)
- Wrap a piece of ribbon around the part of the puff container that curves inward, then carefully press the excess ribbon onto the puff container and glue it in place.
- Use glue to add three buttons in the middle of the snowman’s body, allowing time for the glue to fully dry before you move on to the next step.
- Cut an orange triangle from construction paper and glue it to the snowman’s face. Using a black permanent marker, draw two large dots for the snowman’s eyes, and several small dots for its mouth.
- Once the glue has fully dried, assemble the snowman’s hat by glueing the rim of the plastic cup to the puff container lid. Finish off your snowman by placing the hat on top of its head.
Video
Notes
- Use the right type of paint: Acrylic paint, or multi-surface craft paint designed for use on plastic, will hold up best.
- Give the glue time to dry: To prevent the buttons from sliding down and the hat from coming apart, make sure you give the glue adequate time to dry before placing the puff container upright and assembling your snowman.

Only your name will be made public. Please note that by submitting your comment, you are agreeing to the terms of our Privacy Policy.