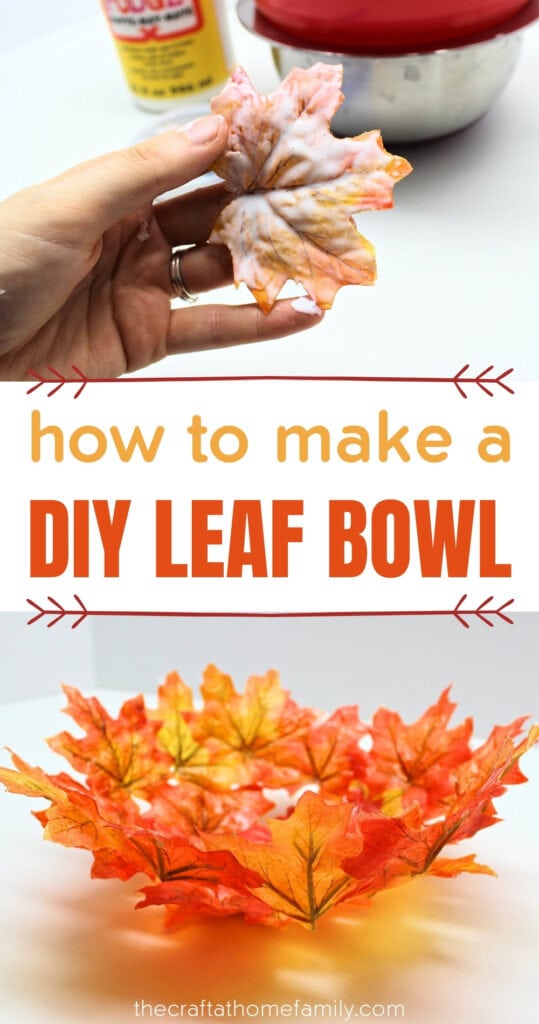
Looking for a fun craft to celebrate autumn? Try making a DIY leaf bowl using real or artificial fall leaves. So simple, yet so gorgeous… and perfect for both kids and adults!

JUMP TO…
It’s been almost exactly two years since my kids stopped going to daycare and started staying home with me full-time.
We’d been planning it for a while, and my head was swirling with all sorts of craft and activity ideas that I’d been wanting to try with them. Unfortunately, I’d never found the time for most of those project in between changing diapers, cooking meals and grading my students’ papers.
So when we finally picked them up from daycare for the very last time, I immediately started planning the first few activities we would try. And because the ground was covered in colorful fall leaves that the kids insisted on picking up every time we went for a walk, I thought this project would be the perfect one to start with!
I loved that this craft was a way for us to preserve all the leaves we’d been collecting, and I was impressed that it was easy enough for my then two- and three-year-old to help with.
Two years later, that bowl is still sitting on top of a credenza in our living room, perfectly preserved. And since the kids have had plenty of time to forget that they ever did this project, I thought now would be a great time to revisit it!
P.S. Love fall leaf crafts? Try this Bundled Q-Tip & Leaf Print Sunflower or these Glue & Chalk Pastel Fall Leaves.

Get hundreds of pages of activities!
Get access to all our paid printables, as well as monthly activity planners, for just $5/month. (New printables added twice per month!)
Should You Use Real or Artificial Leaves?
This project can work with both real and artificial leaves, and they both have advantages and disadvantages.
The first time we tried it, we used real fall leaves that had been freshly collected from the ground. Because the leaves came straight from outside, they were soft and pliable, which made them easy to craft with—especially with young kids participating.
Using real leaves also meant that this project cost us next to nothing, and it gave us an opportunity to spend time outdoors and craft with nature!
However, because the leaves were real, they did eventually go brown and lose their bright fall hues. Here is what that bowl looks like today, two years after it was made:
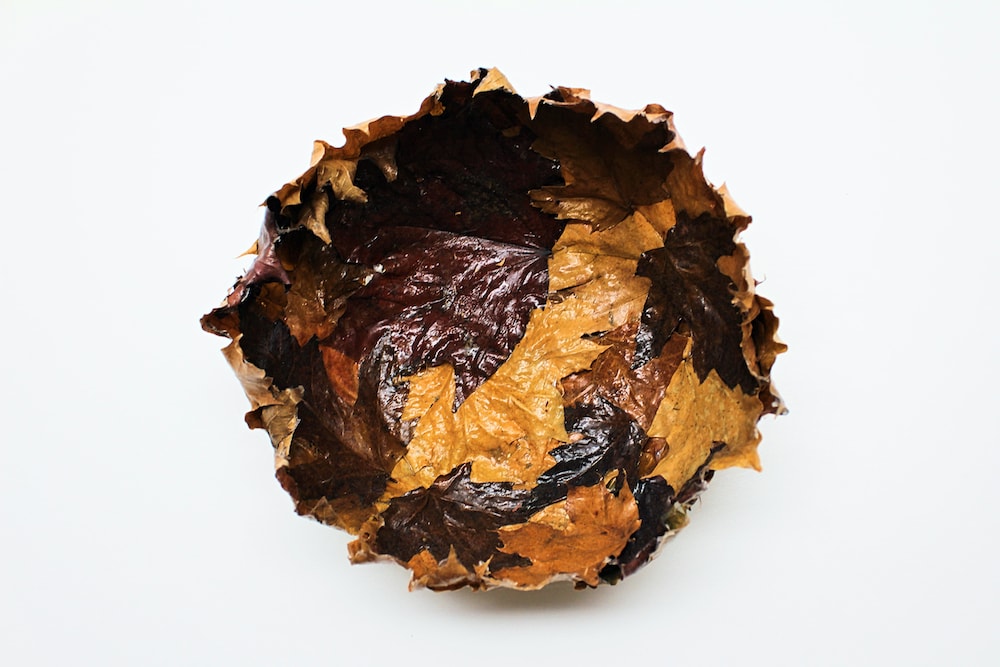
If you want your bowl to stay bright and colorful, you’d be better off using artificial leaves, which is what I used for the purposes of this tutorial.
The first thing to keep in mind is that if at all possible, you should use fabric leaves rather than plastic ones. This will make things so much easier for you as their textures is a lot closer to that of real leaves.
That being said, it’s still possible to use plastic leaves. I bought an artificial leaf garland on clearance at Michaels (apparently September is on the late side to purchase fall craft supplies), but I’ve also seen them in the seasonal section at the dollar store.
When deciding which to use, keep in mind that plastic artificial leaves will be a little less pliable, a little heavier and a little harder to work with. For this reason, you may need to make your bowl a little smaller to accommodate the heavier leaves.
Therefore, unless you can find fabric artificial leaves that are very thin and light, I recommend only using them if you’re not making this project with young kids.
But if you do decide to use artificial leaves (whether you’re crafting with kids or not), be sure to read all the way to the end as I’ve included all my best tips at the bottom of this article!
Required Materials
Here’s what you’ll need to craft a gorgeous fall leaf bowl at home:
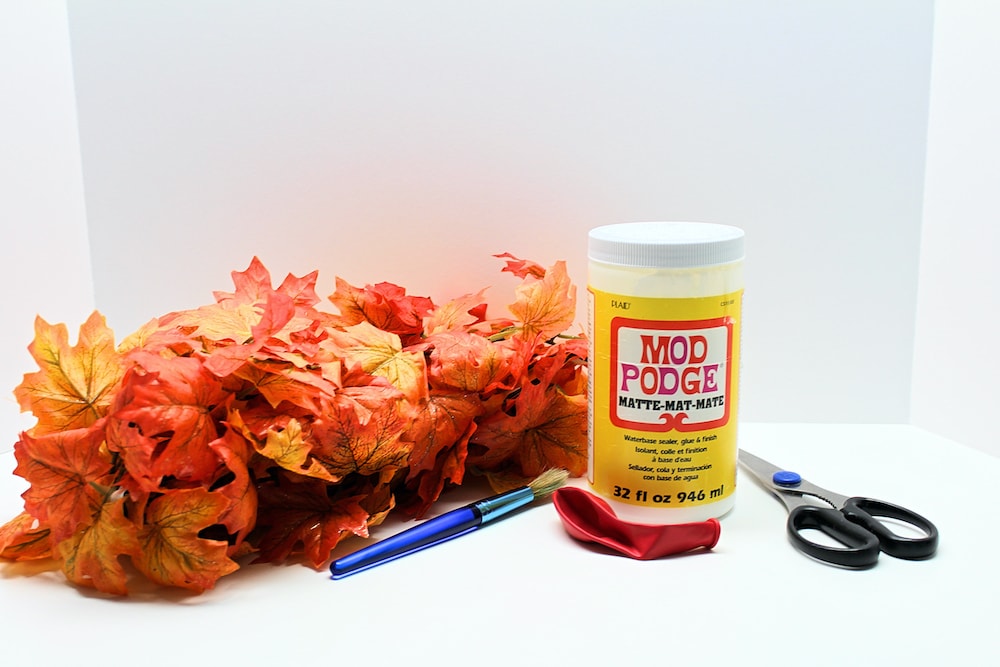
- Real fall leaves (make sure they’re still fresh and pliable as this project won’t work with leaves that are already dry) or artificial fall leaves (you can purchase a leaf garland if ever you can’t find loose leaves)
- Balloon (or plastic mixing bowl in the size that you want to make your leaf bowl)
- Mod Podge (matte or glossy—I prefer to use matte)
- Scissors
- Large paintbrush or sponge brush
- Plastic wrap (optional)
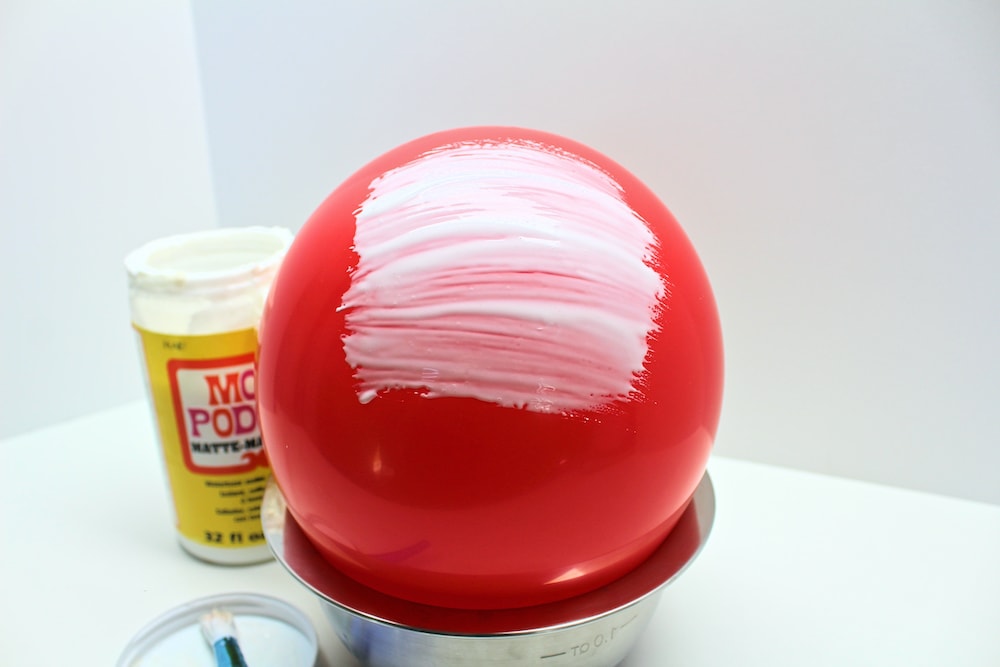
Note: I used a red balloon because I thought it would make nice pictures, but it occurred to me as I was making the leaf bowl that a much better choice would have been to use a balloon in a color that contrasted well with the fall leaves. This would have made it much easier to spot the parts of the balloon that weren’t covered with Mod Podge or leaves, allowing me to fill in those gaps much more quickly.
How to Make a DIY Leaf Bowl (Step-by-Step)
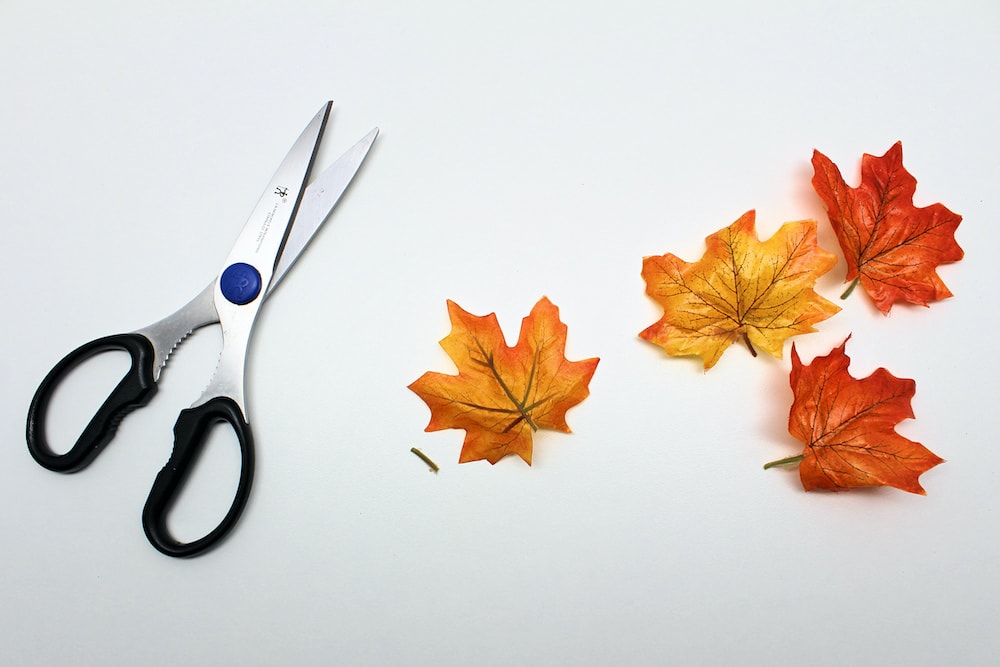
1. Remove Leaf Stems
Whether you’ve chosen to use real or artificial fall leaves, your bowl will look much nicer and come together much better if you remove the leaf stems. Use scissors to cut off the stems so that only the leaf remains.
2. Inflate Balloon
Once you’ve cut off the leaf stems, blow up a balloon to the size of your choosing. The size of the balloon will determine the size of the leaf bowl.
If you’re using artificial leaves, I recommend sticking with a smaller size. The humidity in real leaves makes them stick to the balloon a lot better, even if its size is larger, but artificial leaves are a lot stiffer and they may simply slide right off if the balloon is too big.
Note: Skip this step if you’re planning on using a plastic bowl instead of a balloon as the base for your leaf bowl.
3. Place Balloon in Bowl
Take your inflated balloon and place it neck-down in an appropriately-sized mixing bowl to keep it in place while you go through the rest of the steps.

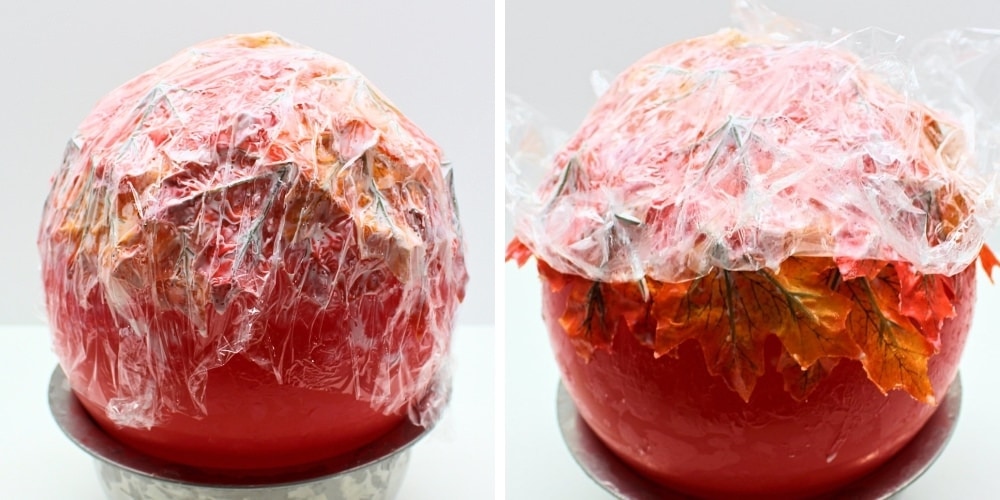
4. Add Plastic Wrap (Optional)
Because you’ll be using the balloon to create the shape of the leaf bowl, you’ll need to glue the leaves to the balloon using Mod Podge and let the Mod Podge dry before you can peel them off.
If ever you’re worried that the leaves will stay stuck or won’t peel off properly, feel free to cover the balloon in a layer of plastic wrap before you get started.
Note: This step is optional if you’re using a balloon, but if you’ve chosen to use a plastic mixing bowl to create the shape of your leaf bowl instead, I highly recommend you cover it with plastic wrap as this will both protect your bowl and make the leaves a lot easier to peel off.
5. Add Mod Podge
Use a large paintbrush or sponge brush to cover some of the balloon’s surface with Mod Podge. Make sure the area you cover is larger than the leaves you’ll be using, as you’ll be layering them and will need the entire area beneath them to be covered with Mod Podge.
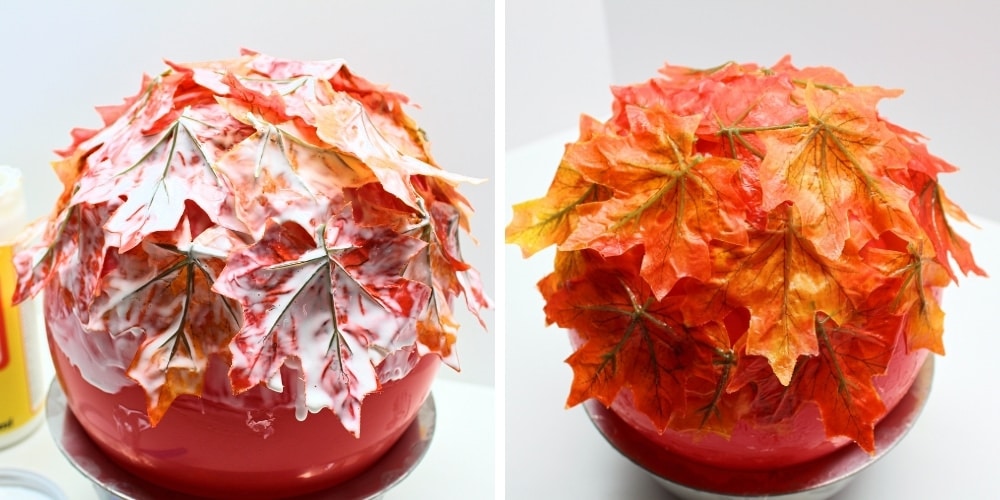
6. Cover Balloon with Leaves
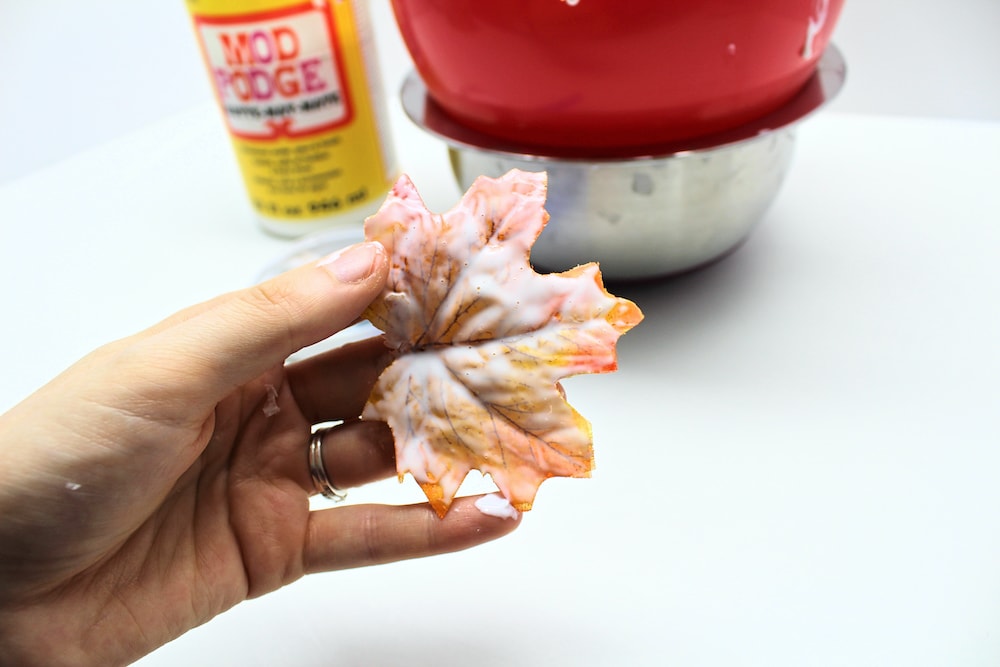
Press a leaf face-down onto the balloon, then cover it with Mod Podge as well.

Continue doing this until you’ve covered as much of the surface of the balloon as you wish to in order to create your bowl, covering each new leaf with more Mod Podge as you work.
If needed, brush the Mod Podge directly onto the surface of the leaf before pressing it onto the balloon.
As mentioned above, choosing a balloon in a color that contrasts with the color of the leaves (such as blue, green or purple) will make it a lot easier to see the spots that still need to be covered with leaves.
7. Let Dry
When you’ve added all the leaves you wish to add and can no longer see any parts of the balloon that have been left uncovered, put away the Mod Podge and let your project dry completely before moving on to the next step.
If your leaves keep sliding down the surface of the balloon instead of staying in place while the Mod Podge dries (which will probably happen if you’re using plastic leaves), try covering the entire balloon in plastic wrap and peeling it off a little bit at a time, allowing each uncovered section to dry before uncovering the next section.
8. Peel Off Leaf Bowl
Once the entire surface of the leaves is completely dry, carefully peel the leaf bowl off the balloon and place it on a flat surface.
The Mod Podge on the inside of the bowl may still be a little wet; if that’s the case, simply let it sit for a while uncovered to allow its entire surface to dry.
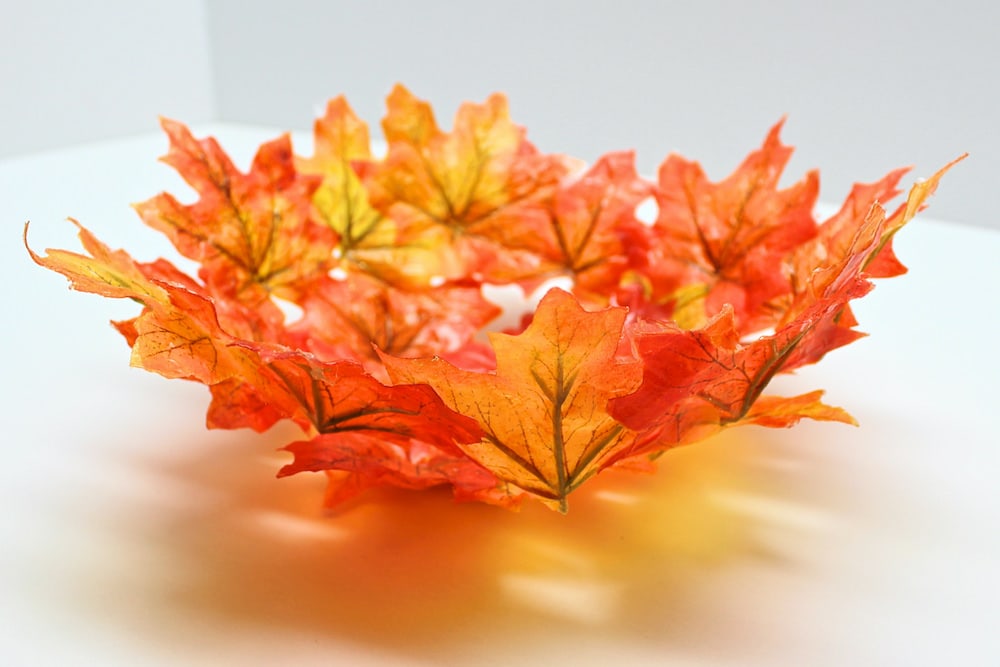
Once all the Mod Podge is dry, your bowl is ready to use. Isn’t it just gorgeous?!
Tips for Using Artificial Leaves
The first time I made this craft with my kids, we used real leaves that we had collected from the ground outside. Everything worked perfectly for us and we still have that bowl today.
When I tried making this project using (plastic) artificial leaves, I had to do a lot more experimenting because I kept running into problems that I hadn’t encountered when using real leaves. So I thought I’d include all the information that helped me in case you encounter those issues, too.
Most of the issues I ran into were due to the fact that the artificial leaves I used were both heavier and stiffer than natural leaves. The ones I bought also seemed to be naturally bent outward instead of inward.
Here are some things that may help if you’re facing the same issues:
- When purchasing the leaves, try to buy the thinnest and most pliable ones you can find (if possible, choose fabric over plastic)
- If your leaves are bent outward, try soaking them in warm water, patting them dry and gently pressing them into an inward-facing ball before opening them up and glueing them to the balloon (make sure the water is warm as it’s the temperature that will help will plastic leaves, not the water itself)
- If you can’t get the leaves to stay in place when pressing them onto the balloon, try using a smaller balloon
- If the leaves are heavy and keep sliding down the balloon during the drying process, try covering the entire balloon in plastic wrap and peeling it off a little bit at a time, allowing each uncovered portion to dry before uncovering the next section (this worked great for me!)
Even though artificial leaves do pose certain challenges, they make beautiful leaf bowls since unlike with real leaves, their color doesn’t fade—so I hope these tips can help you create your leaf bowl more easily!
Related Fall Crafts
Looking for more fun crafts to make this fall? Check out these articles (both of which include free templates):
how long do the leaf bowls usually last?
If you make sure not to get them wet/filthy or damage them, they can last for years! Especially if they’re made using artificial leaves. The ones made from real leaves can last a long time too (we kept one of ours for 3 years), but the colours fade pretty quickly and the leaves turn brown, which isn’t as pretty. So if you want to keep it for a long time, I recommend using artificial leaves.