
Who knew you could paint a fall tree using nothing but bundled Q-tips? This gorgeous autumn craft is surprisingly easy to make, and it even includes a free template that you can download and print at home!
This post may contain affiliate links, which means I may receive a commission, at no extra cost to you, if you make a purchase through a link. As an Amazon Associate, I earn from qualifying purchases. Please see my full disclosure for further information.
JUMP TO…
I can’t believe fall is already (almost) here!
The school year has begun—our eldest just entered kindergarten—and we’ve been spending as much time as possible riding bicycles and roasting marshmallows before the cold weather sets in.
It may seem weird that we’re already thinking about the cold weather when we’re only a few days into September, but fall tends to come pretty quickly here in Canada. By the time Halloween comes around, we’re usually busy trying to find costumes that are both cute and warm enough to get our kids through trick-or-treating without giving them pneumonia.
But despite the less-than-summery weather, one of the things we haven’t seen yet this year are colourful autumn leaves on the ground.
So while we’re waiting for the leaves to cover the ground in a thick carpet of orange, red and purple, we figured we would nonetheless start celebrating fall with some colourful crafts of our own. I knew this one would be a hit!
And while I usually just draw the tree trunk and branches for my kids, I thought I’d create a handy template for you to download and print at home—that way, you can start crafting right away instead of worrying about how your tree looks!
Required Materials
Here’s what you’ll need to create a colourful autumn tree using bundled cotton swabs:

- My free tree template, which you can download using the form at the bottom of this article
- Blue cardstock or regular printer paper (I prefer to use cardstock because it’s sturdier)
- Wooden pencil or marker (to fill in the tree trunk and branches)
- Cotton swabs
- Small elastic or loom band
- Washable kids’ paint in green, yellow, orange and red (or any other type of thick paint)
How to Paint a Fall Tree with Bundled Q-Tips (Step-by-Step)
1. Print Template
Start by downloading and printing the free tree template on Letter-sized (8.5”x11”) cardstock or regular printer paper. I know the template may seem a little creepy, but it will look great with leaves!
I decided to use blue cardstock because I wanted the sky to be visible behind my tree. Also, cardstock is thicker than regular printer paper, so it holds up better when it’s wet with paint.
But if ever you don’t have any cardstock at home, you can simply print the template on regular paper and it should work just fine!
2. Fill in Template
Grab a brown pencil, marker or any other tool you’d rather use and fill in the tree trunk and branches. You can even just dip a paintbrush or Q-tip in brown paint and use that to fill in the template!

(Note: If you choose to use brown paint, you’ll need to let it dry before you move on to the next step.)
3. Bundle Q-Tips
Grab about 15 cotton swabs and use a small elastic to tie them together.

Once they’re bundled together, press the ends down onto a flat surface to make sure the Q-tips are properly aligned.
4. Paint Grass
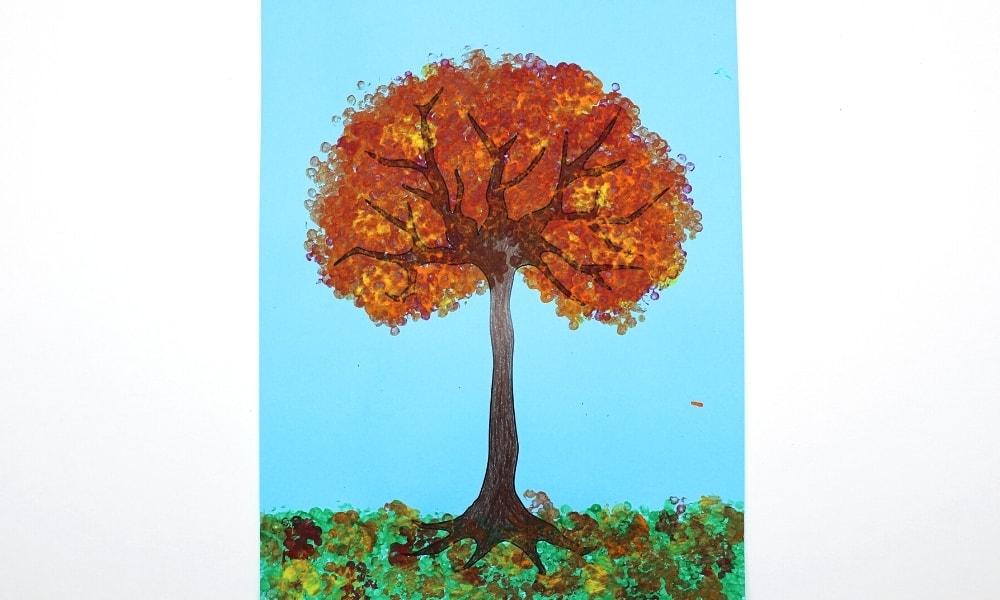
Pour some green paint onto a small plate or paint palette. Dip the bundled Q-tips into the paint and press them all around the tree roots multiple times to form grass, dipping the Q-tips back into the paint as needed.

5. Paint Tree Leaves
Pour red, orange and yellow paint onto the plate or paint palette and dip the other end of the Q-tip bundle into one of the colours. I decided to start with red.
Once again, press the Q-tips onto the cardstock, but this time around the branches.

Cover the branches completely, then do the same with another colour, and once more with the third colour. I decided to go from darkest to lightest, starting with red and ending with yellow.

6. Paint Fallen Leaves
When you’re done painting the leaves around the branches, add some fallen leaves on the ground by dipping the Q-tips into the red, orange and yellow paint again and pressing them randomly onto the green grass. (But make sure you don’t cover up all the green.)

When you’re done painting the foliage (fallen and otherwise), all you need to do is let the paint dry! Doesn’t it just look gorgeous once it’s done?!

This is one of those projects that looks really impressive while also being extremely easy to make. It would look so great hanging on the fridge or framed up on a wall!
And if your kids really enjoy it, why not switch up the colours and try making a set of colourful trees for every season?
Related Fall Crafts & Activities
Looking for more fun ideas to try with your kids this autumn? Check out these articles:
Join my mailing list using the form below to receive your free tree template as a welcome gift! Subscribers gain access to my free printables library as well as to exclusive content that may never be published on my site!
Could I get the Fall Tree Painting with Bundled Q-Tips printables?
Hi Janet, the template will be sent straight to your inbox if you enter your email address in the form in the article!