
Want to get your kids excited for school? Find out how to make the cutest DIY pencil toppers using nothing but air dry clay. These adorable homemade pencil toppers are the perfect back-to-school craft to let your child’s creativity shine!

JUMP TO…
In just a few weeks’ time, we will officially have two kids in school—and that means double the school supplies!
We’ll be working on getting all the items on their school supply list shortly. But in the meantime, what better way to get them excited for school than by making our own school supplies at home?
Since our kids love molding their play dough into all sorts of shapes, I thought that now would be the perfect time to introduce them to air dry clay. And because we’ve on the lookout for easy back-to-school craft ideas, DIY clay pencil toppers seemed like the perfect use for it.
Not only are these handmade pencil toppers are super cute, but they are also super easy to make, and they require very few supplies.
Also, while I’ve provided a few specific ideas below, this craft is perfect for kids with lots of extra creativity who want to come up with their own designs! There is no limit to how you can shape your DIY pencil toppers.
So if you’ve been looking for an adorable way to decorate your pens or pencils, simply grab some clay and get crafting!
(P.S. Looking for more DIY pencil topper ideas? Check out this list of 23 adorable pencil topper crafts that you can make at home!)

Get hundreds of pages of activities!
Get access to all our paid printables, as well as monthly activity planners, for just $5/month. (New printables added twice per month!)
Required Materials
Here’s what you’ll need to make your own DIY pencil toppers using air dry clay:

- Air dry clay (you can use Model Magic or another brand, as long as it hasn’t started drying yet—I used this one)
- Pencils
- Plastic wrap
Note: Depending on what you’re making, you may also need paint and a paintbrush to add details after the clay has dried. I didn’t need any to create the designs pictured below.
How to Make a DIY Clay Pencil Toppers (Step-By-Step)
1. Create Clay Design
Start by creating the main body of your air dry clay pen topper. This will be the part of the pencil topper where the pen or pencil gets inserted, so make sure it’s big enough to accommodate that.

I used a teardrop shape for the toadstool, a cube for the cupcake and a round ball for the octopus. The instructions below will show you how to make the exact pencil toppers I made, but feel free to come up with your own unique designs instead!
Once you’ve created the base, it’s time to add any other elements you’ll need to create the basic shape of your pencil topper.

For me, this meant creating a little cup for the top of the toadstool, twisting a thin cylinder of clay into some frosting for the cupcake, and attaching eight small balls of clay to the bottom of the octopus’s body.
Finally, add any decorative accents you need in order to finish your clay figurine.

The cupcake didn’t require any additional details, but I did flatten some little balls of clay and use them to decorate the toadstool and create eyes for the octopus.
In case you need them, here are the detailed instructions to make all three of the designs pictured in this article—though like I said, you are also totally welcome to create your own designs!
How to Make a Clay Toadstool (Step-by-Step):
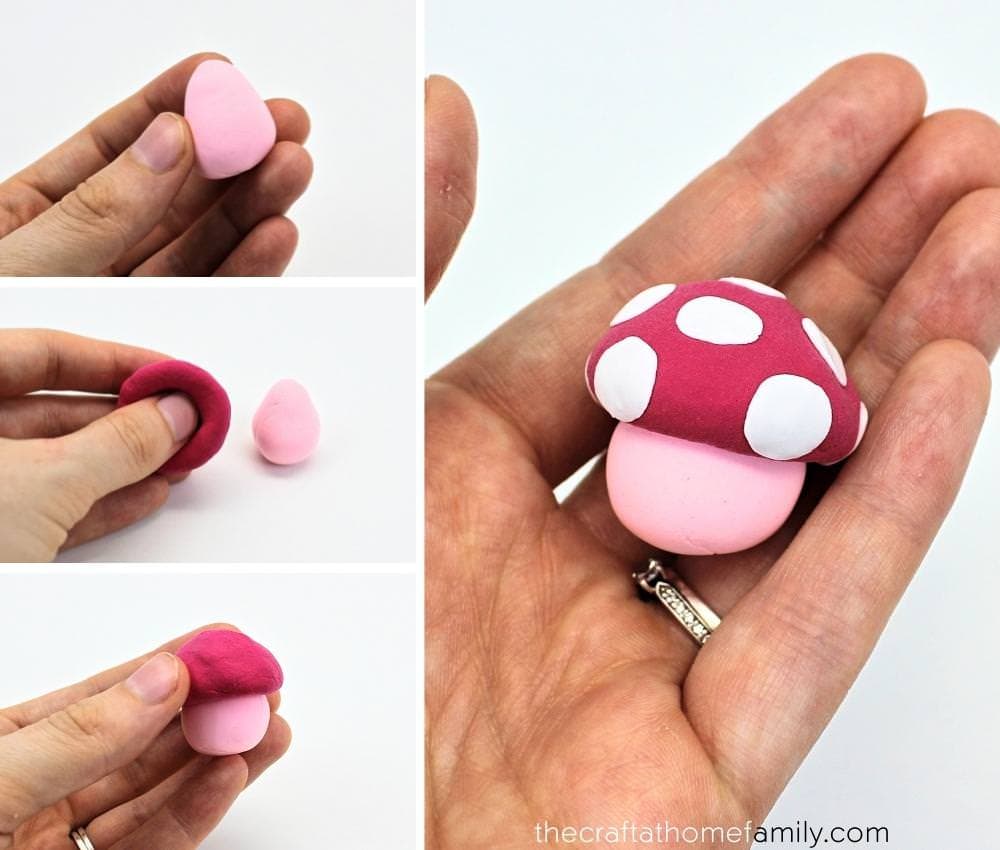
- Create a teardrop-shaped toadstool base
- Roll some clay into a ball, flatten it between them palms of your hands, then push your thumb into its center to create the shape of a bowl
- Turn the “bowl” upside down and press it onto the narrow end of the teardrop to create the top of the toadstool
- Create a few tiny balls of white clay, then flatten them between your fingers and use the small, flat circles to decorate the top of the toadstool
How to Make a Clay Cupcake (Step-by-Step):

- Create a cube-shaped cupcake base
- Roll some clay into a long, cylindrical shape
- Press one end of the clay cylinder onto the base of the cupcake, then twirl it around to create the shape of frosting on top of the cupcake base
- Press the top end of the “frosting” into the shape of a point
How to Make a Clay Octopus (Step-by-Step):

- Shape some clay into a round ball to create the body of the octopus
- Roll eight pieces of clay into smaller balls (these will become the legs of the octopus)
- Use your fingers or a shaping tool to attach the legs to the bottom of the octopus’s body
- Roll two pieces of white clay into small balls, then flatten them between your fingers and press them onto the octopus’ head to create eyes
- Roll two pieces of black clay into smaller balls, then flatten them between your fingers and press them into the center of the white circles to create the pupils of the eyes
2. Cover Pencil Eraser with Plastic Wrap
Once you are done creating your clay design, grab a small piece of plastic wrap and wrap it around the end of the pencil, where the eraser is. This will help protect the eraser during the next step.

3. Press Clay Onto Pencil
Grab your clay design and gently press it onto the end of the pencil that is covered with plastic wrap. Make sure not to squish the clay too much—you wouldn’t want to ruin the design you created.

That being said, it’s possible that your design will change slightly when the pencil is pushed in. If that’s the case, gently mold it back into its intended shape.
Note: You’ll definitely want to wait until your design is finished BEFORE you push the pencil in. It may get slightly deformed, but that is easily fixed. I can say from experience that trying to create your design with the pencil already pushed in does NOT work.
4. Let Clay Dry
Gently pull your clay pencil topper off the pencil and place it on a flat surface to dry. (If you’re concerned that pulling it off will make it deformed, you can always wait a little and let the outside dry before you remove it from the pencil.)

After a few hours, once the clay is fully dry, your homemade pencil topper will be ready to use. Didn’t they turn out so cute?!

I’d love to hear which designs you create below in the comments. There are so many cute crafts you could make using this technique!
Related Back-to-School Activities
Looking for more crafts and activities to get your little ones excited about school? Check out this article:
- 30+ Cutest Recycled & Upcycled Pencil Holders
- Free Back-to-School Word Search Puzzles (with Answer Keys)
- Free Back-to-School Coloring Pages
- Free Back-to-School Tracing Worksheets
How durable are these? Does the air-dry clay hold up to much use?
Ours held up really well! As long as they’re being stored under reasonable conditions and they aren’t being left on the bottom of a bag where they can get crushed by school books, etc., they should last quite a while.