
If your child enjoys science, they’ll love this Valentine’s Day Skittles experiment! This fun activity only requires two simple supplies, and it’s easy enough for younger kids to do all on their own.
JUMP TO…
Love simple science experiments? This fun Valentine’s Day twist on the classic Skittles Rainbow is sure to impress your kids, and it only requires a couple simple supplies!
This Valentine’s Day science experiment is super simple to set up, and both younger and older kids should be able to participate. We’ll definitely be doing this one again!
Why You’ll Love This Activity
- Simple supplies: This easy experiment only requires two supplies—Skittles and water. You may even have some leftover Halloween candy that you can use to do it!
- Easy to do: Even younger kids should be able to do most, if not all, of this experiment without the help of an adult.
- Fun for kids: This activity may be simple to set up, but it’s really fun to do. My kids loved seeing the colors spread out after they added the water!
Looking for more Valentine’s Day science experiments? Check out this Floating Heart Experiment, this Valentine’s Day Magic Paper Towel Experiment or these Fizzy Baking Soda Hearts!

Get hundreds of pages of activities!
Get access to all our paid printables, as well as monthly activity planners, for just $5/month. (New printables added twice per month!)
Required Materials
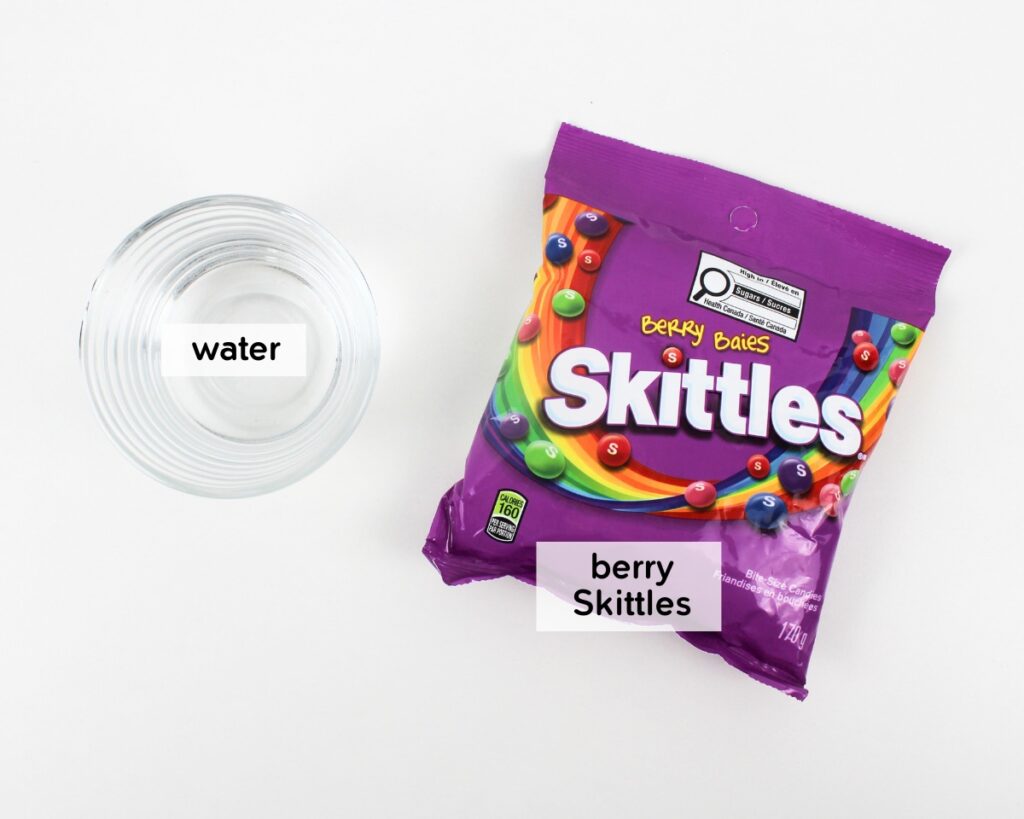
- Skittles: For this Valentine’s Day twist, I used pink and red Skittles, both of which are included in the Skittles Berry mix. (You can also get red Skittles in the Original mix, and pink Skittles in the Tropical mix.) If desired, you can use purple as well.
- Warm water: Tap water is fine for this experiment.
The full supply list and instructions can be found in the how-to card.
GRAB OUR FREE 30-PAGE ACTIVITY BUNDLE!
By submitting your email address, you are agreeing to the terms of our Privacy Policy. You can unsubscribe at any time.
How to Do Valentine Skittles Science (Step-by-Step)
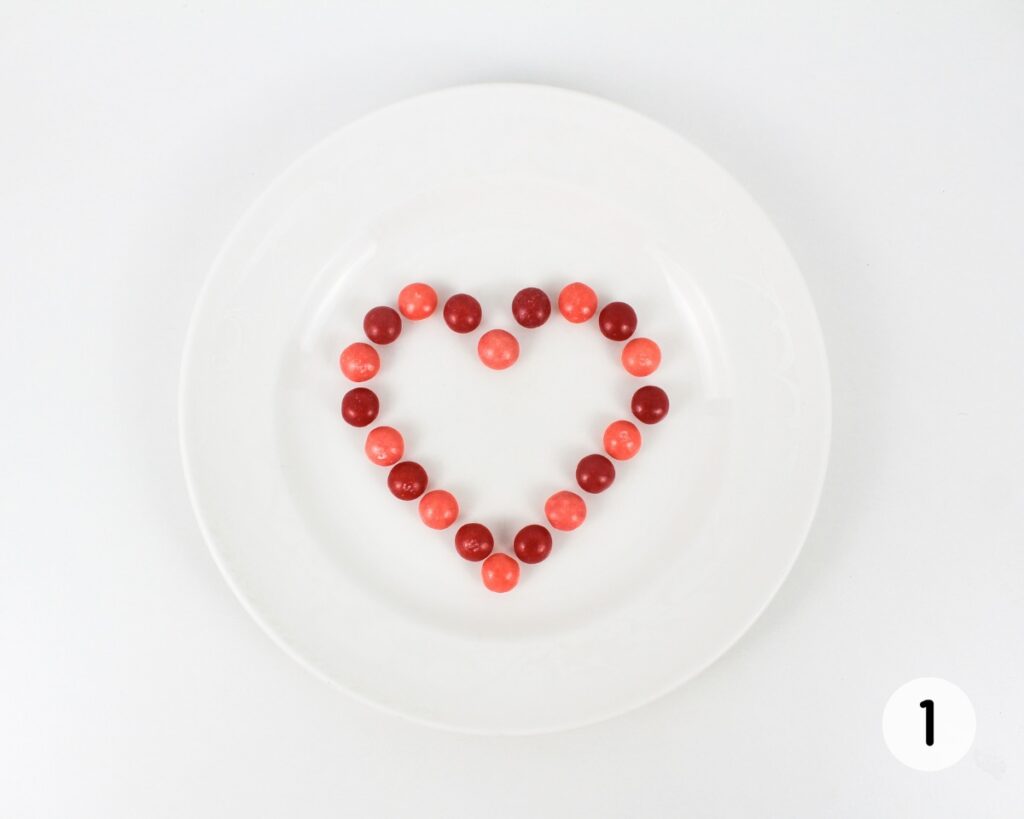
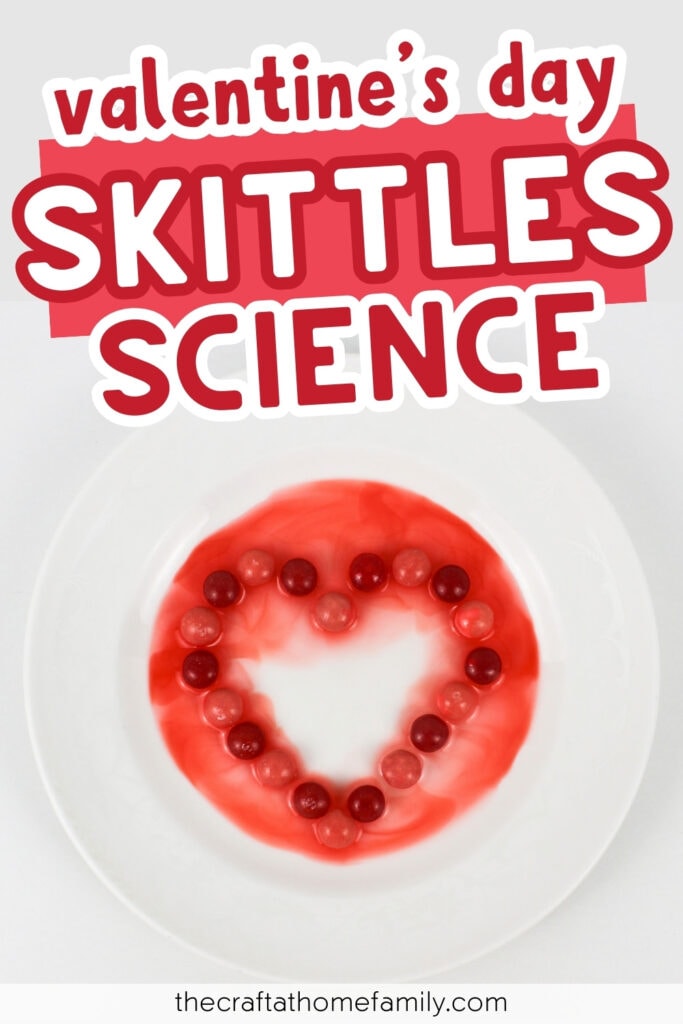
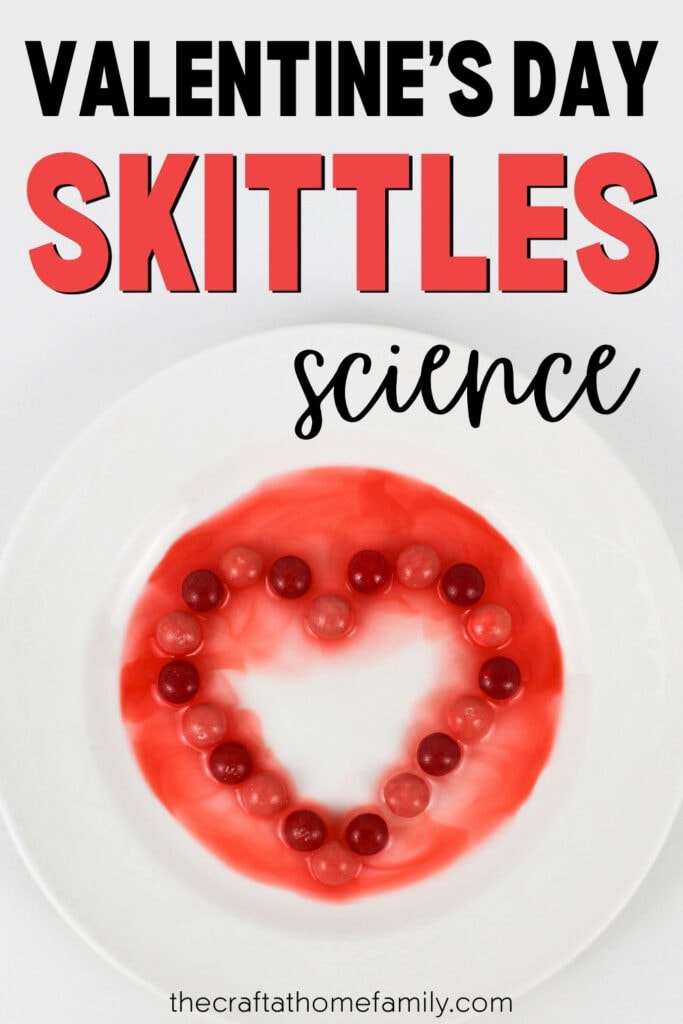
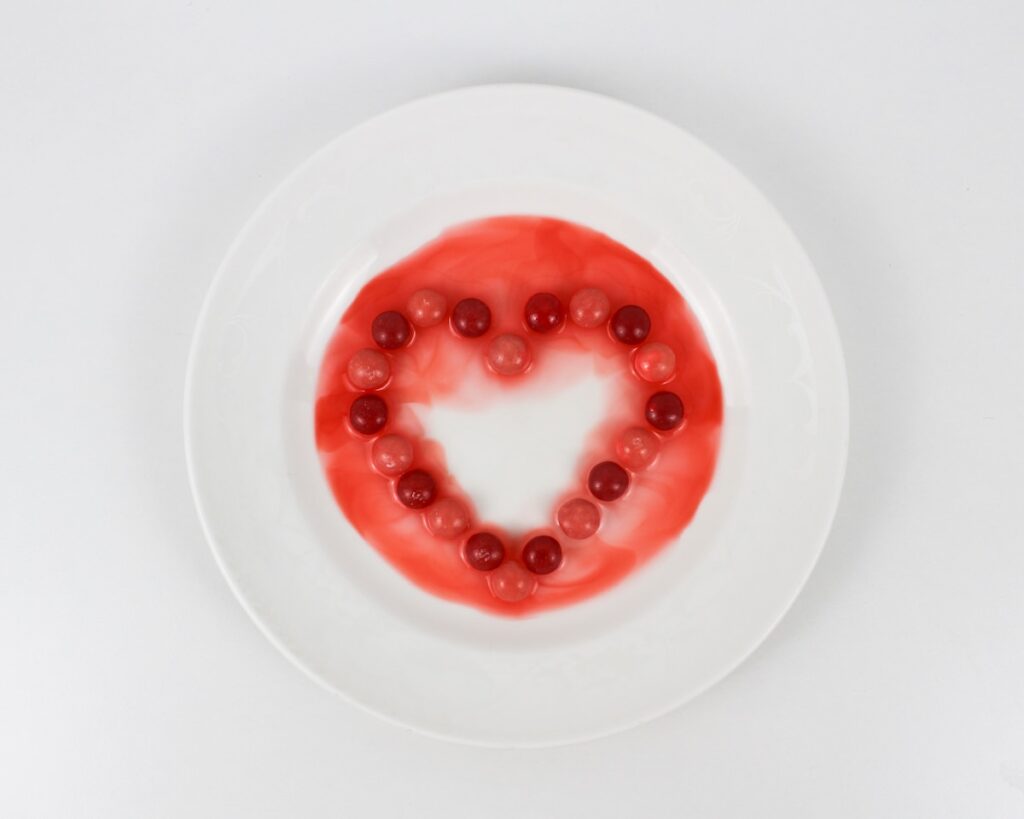
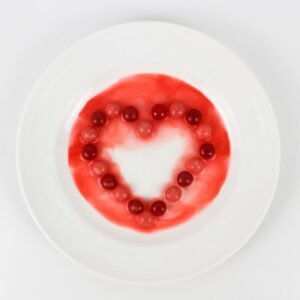
Step 1: Sort & position Skittles. Take 10 pink Skittles and 10 red Skittles out of the bag, setting the other colors aside. Alternating between pink and red, arrange the Skittles in the shape of a heart in the middle of a small round plate. (If desired, you can also add a small heart-shaped cookie cutter in the middle of the Skittles heart—this will help contain the colors during step 2.)
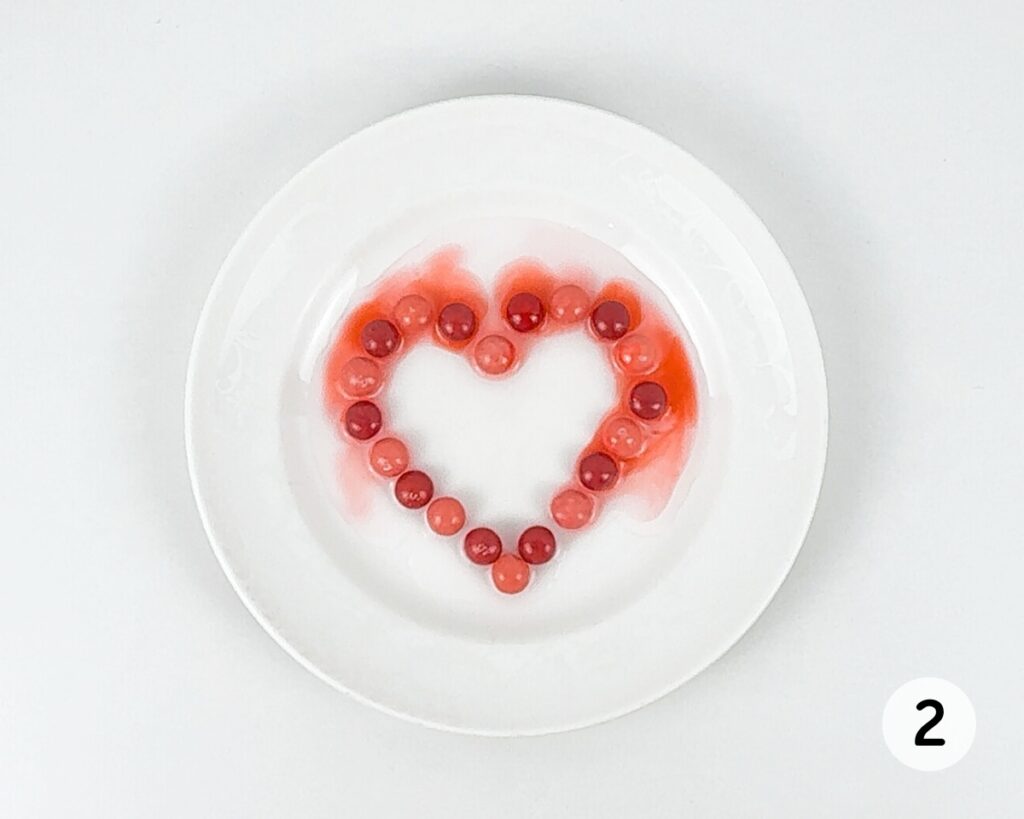
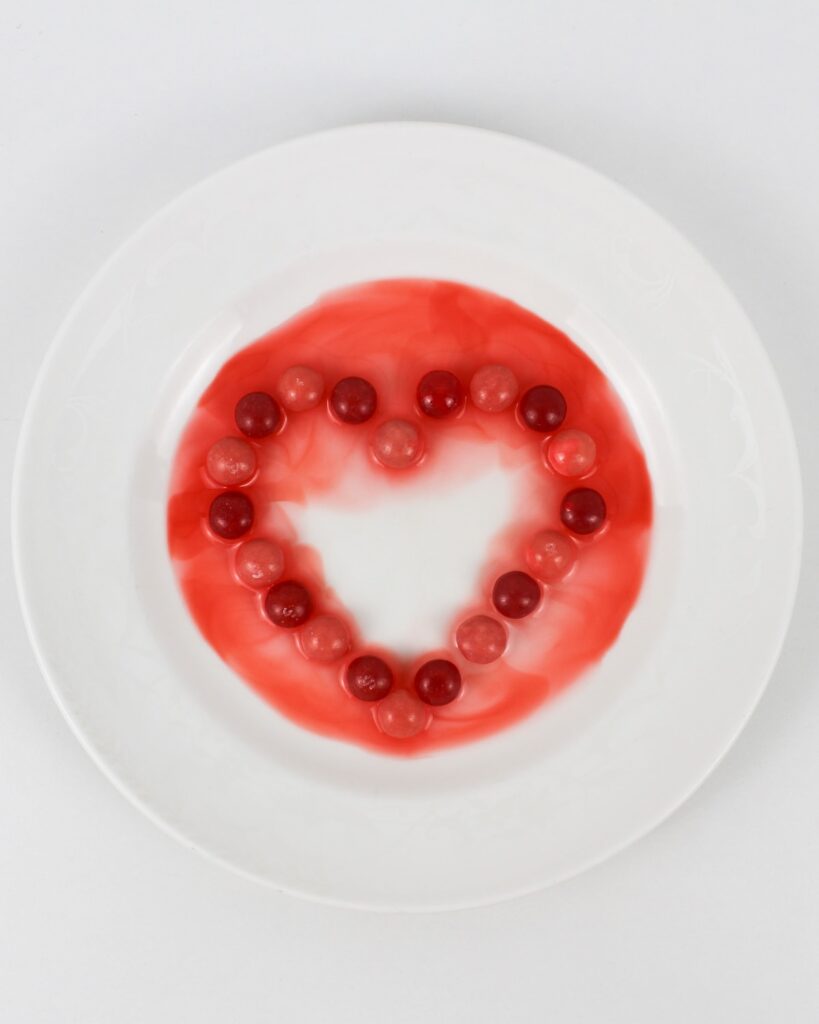
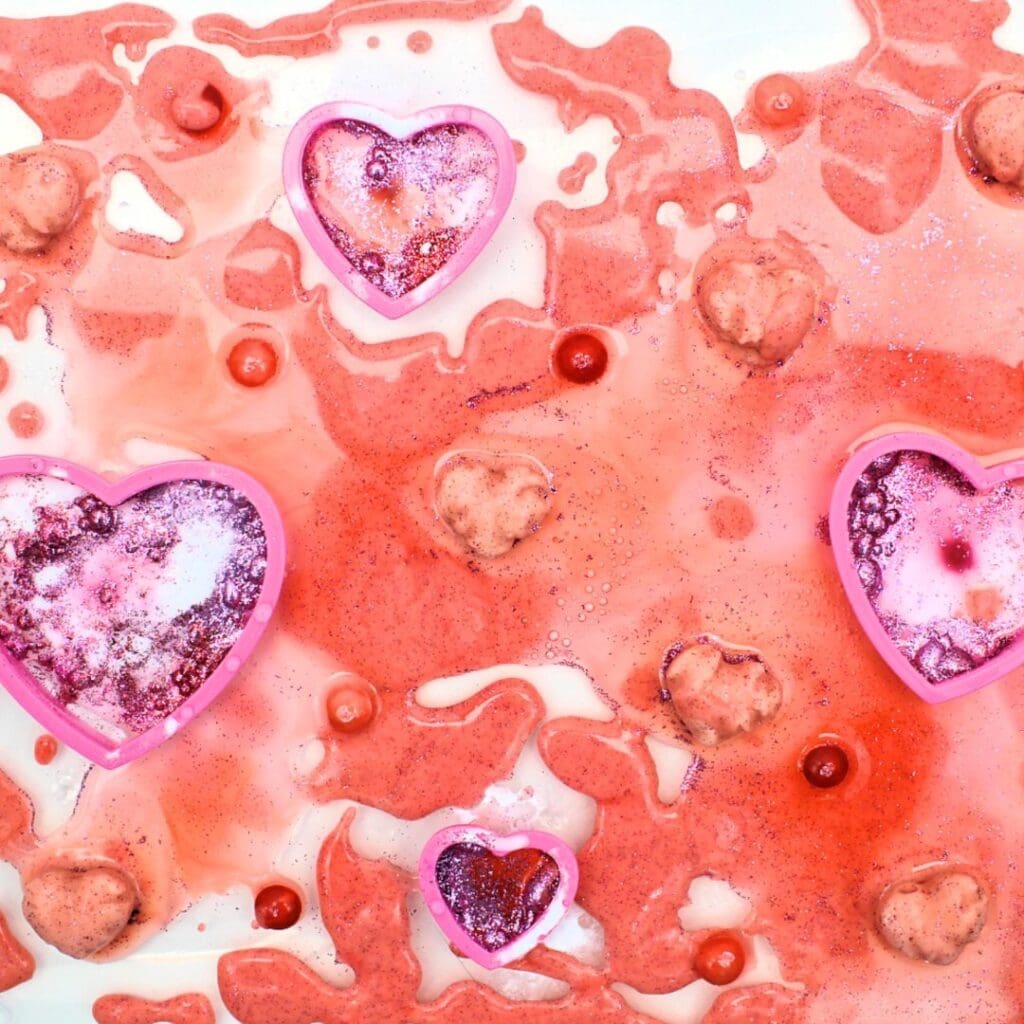
Step 2: Add water. Gently pour some water into the center of the plate, adding just enough for it to spread outward beyond the Skittles. (If you used a cookie cutter, pour the water on the outside of the heart instead.) Watch as the color from the candy coating leaches into the water and spreads outward, away from the Skittles, tinting the water red.
This super simple science experiment was a hit with my kids! If you’ve ever made a Skittles Rainbow with your kids, like we have, try discusssing the differences in what you observe—you’ll notice that in this case, the color first spreads outward, not inward (though it will eventually spread in both directions).
Helpful Tips
- Use a level surface: Make sure that the table you’re using to do this experiment is properly levelled. Mine wasn’t at first, and after I poured the water, it all pooled on one side, which ruined the effect of the colors spreading.
- Don’t add too much water: To prevent the color from getting too muddy, make sure you add just enough water to cover the bottom of the plate, and no more. If you’re unsure how much you need, start with less and add more later if needed to help the colors spread.
- Add a heart-shaped cookie cutter: We found that the color spread outward, then inward. To keep it contained once it starts to spread inward, place a small heart-shaped cookie cutter inside the Skittles heart—this will prevent the color from reaching the center of the plate and create a cool effect.
- Test and compare: Try creating different shapes with the Skittles, and making a Skittles Rainbow, so that you can compare what happens and share theories about what’s causing the differences!
Frequently Asked Questions
Have a question that wasn’t answered here? Let me know in the comments and I’ll be happy to help!
More Valentine Activities for Kids

If you have tried this Valentine’s Day Skittles Experiment or any other project on my website, please let me know how it went in the comments below. I can’t wait to hear from you!
Valentine’s Day Skittles Experiment
Materials
- 10 red Skittles (from Berry or Original mix)
- 10 pink Skittles (from Berry or Tropical mix)
- warm water as needed
Instructions
- Alternating between pink and red, arrange the Skittles in the shape of a heart in the middle of a small round plate. (If desired, you can also add a small heart-shaped cookie cutter in the middle of the Skittles heart—this will help contain the colors during step 2.)
- Gently pour some water into the center of the plate, adding just enough for it to spread outward beyond the Skittles. (If you used a cookie cutter, pour the water on the outside of the heart instead.) Watch as the color from the candy coating leaches into the water and spreads outward, away from the Skittles, tinting the water red.
Video
Notes
- Use a level surface: Make sure the plate is placed on a level surface, to prevent the water from pooling on one side.
- Don’t add too much water: Add just enough water to cover the bottom of the plate.
- Add a cookie cutter: The color will spread outward, then inward—you can place a small heart-shaped cookie cutter inside the Skittles heart to keep the color contained and prevent it from reaching the center of the plate.
Only your name will be made public. Please note that by submitting your comment, you are agreeing to the terms of our Privacy Policy.