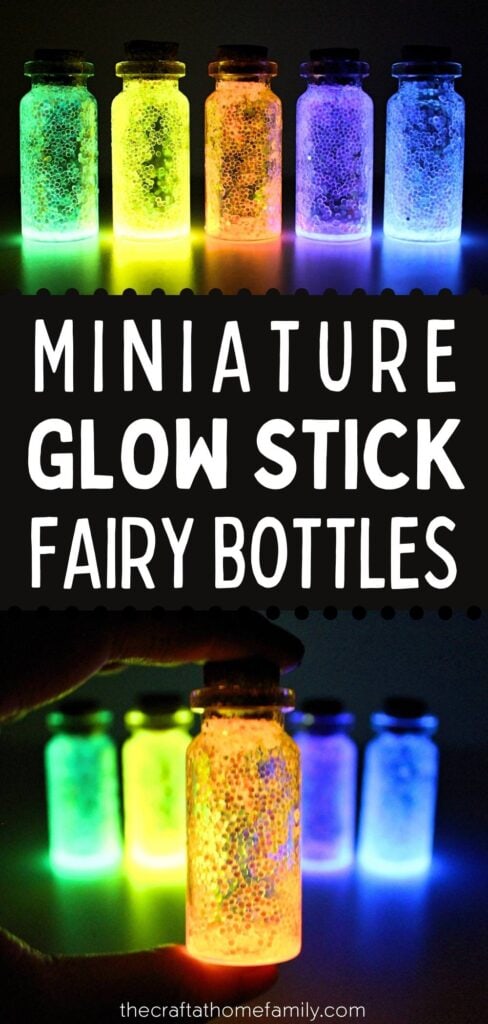


Do your little ones love fairies? Delight them with these super simple glow stick fairy jars! These miniature glow jars come together in under five minutes, and they make great DIY night lights or fairy garden lanterns. Such a magical craft to make for your kids!

JUMP TO…
Never made glowing fairy jars before? If so, you have to try it at least once. Not only is this craft incredibly cool, but it only requires a few minutes and a few simple supplies.
If you’re looking for a way to make bedtime more fun for your little ones, you can use these easy glow jars as DIY night lights. The glow will start out strong, but slowly fade as your kids fall asleep.
Why You’ll Love This Craft
- Easy to make: This craft may look fancy, but it comes together in under 5 minutes and requires minimal effort to make.
- Dollar store supplies: You won’t need any pricey or complicated supplies to do this project—in fact, you should be able to find everything you need at your local dollar store!
- Totally magical: This craft is one of my kids’ all-time favorites, and although we have made it dozens of time, they are still just as amazed by it now as they were the very first time.
Safety Tip
While this craft is meant for kids to enjoy, all manipulations should be done by an adult. This project is meant to be looked at, not touched—my kids love it when I leave the jar on a shelf in their bedroom so they can look at it as they fall asleep.
If your child loves this craft and you are looking for something similar that your child can manipulate, this Glow-in-the-Dark Sensory Bottle and this Glow-in-the-Dark Sensory Bag are also perfect for bedtime. They make great calming activities, and like the fairy bottles, they have a glow that slowly fades.


Get hundreds of pages of activities!
Get access to all our paid printables, as well as monthly activity planners, for just $5/month. (New printables added twice per month!)
Required Materials

- Small glass jar or bottle: I bought a pack of mini glass bottles in the craft section at my local dollar store. You can also do this project with a regular-sized jar, but it will require more glow stick liquid.
- Glow stick: Because I was making tiny fairy bottles, I used miniature glow sticks that were 8 inches in length. If you are using a regular-sized bottle or mason jar, you’ll need to use larger glow sticks (or several smaller ones).
- Iridescent glitter: Make sure to use chunky iridescent glitter. Unlike regular glitter, iridescent glitter is translucent, which will allow the light from the glow stick liquid to shine through. We bought ours at Walmart, but you can also get it on Amazon.
The full supply list and instructions can be found in the how-to card.
Choosing the Size of Your Jar
We like to use miniature bottles for practical reasons, but larger bottles and mason jars work too. Just make sure you use larger glow sticks, or several smaller ones, so that the inside of the jar is completely covered with liquid.
(P.S. Have leftover mason jars that you’re looking for something to do with? Check out this adorable Thumbprint Candle Holder. It would make a great Mother’s Day gift!)
How to Make a Glowing Fairy Jar (Step-by-Step)

Step 1: Crack a glow stick. Grab a glow stick and crack it to make it glow. Wait until it is glowing at full strength before you move on to the next step.

Step 2: Cut open the glow stick. Use sharp scissors to cut off the tip of the glow stick. If you are using a regular-sized glow stick, cut off one end; for miniature glow sticks, cut off both ends.

Step 3: Pour the glow stick liquid into a bottle. Tilt the glow stick and pour its contents into the bottle. You can discard the empty glow stick when you’re done with it.

Step 4: Add iridescent glitter. Use the back of small spoon to add iridescent glitter to the bottle. I added three or four tiny scoops, but the exact amount will depend on the size of your bottle.

Step 5: Shake the bottle. Seal the bottle and gently shake it in every direction to cover the sides with glitter. If there isn’t enough glitter, open up the bottle to add a bit more, then seal it up and continue shaking.

Step 6: Turn off the lights. Once all the sides of the jar have been covered, the fairy jar is ready to use! Turn off the lights and watch the magic happen.
Our kids can’t get enough of these simple little fairy lanterns. They are so easy to make, but they look totally magical—like having actual glowing fairies in a jar.
They are perfect for fairy gardens, and they also make great night lights, because they glow brightly at first, then slowly fade as your little ones fall asleep.

Helpful Tips
- Cut off both ends of the glow stick: When using miniature glow sticks, cutting off both ends will make the liquid a lot easier to pour. (This isn’t as necessary for regular-sized ones.)
- Keep the glow stick horizontal: If you aren’t careful, cutting off the tip(s) of the glow stick can get a little messy. Make sure you keep it horizontal and move it very carefully in order to limit the mess.
- Don’t add too much glitter: Start with a little bit of glitter and add more as needed. You can always add more if it’s not sufficient, but if you add too much, you’ll need to dump out the contents of the bottle and start over with a new glow stick.
- Experiment with different colors: Different shades of glow stick liquid will create different colors of fairy jars, so have fun experimenting! We bought a pack of glow sticks in assorted colors and used them to create a whole rainbow.
Frequently Asked Questions
Have a question that wasn’t answered here? Let me know in the comments and I’ll be happy to help!
More Simple Crafts for Kids


If you have made these DIY Glowing Fairy Jars or any other project on my website, please let me know how it went in the comments below. I can’t wait to hear from you!

DIY Glow Stick Fairy Jar
Materials
- 1 glass jar or bottle
- 1 glow stick
- chunky iridescent glitter as needed
Instructions
- Crack the glow stick to make it glow.
- Once the glow stick is glowing at full strength, use sharp scissors to carefully cut it open, holding it horizontally to avoid spilling the liquid. If you are using a regular-sized glow stick and glass jar, cut off one end; for miniature glow sticks and jars, cut off both ends.
- Tilt the glow stick and pour its contents into the bottle. (The empty glow stick can be discarded.)
- Use the back of small spoon to add iridescent glitter to the bottle.
- Seal the bottle and gently shake it in every direction to cover the sides with glitter. If there isn’t enough glitter, open up the bottle to add a bit more, then seal it up and continue shaking.
- Once all the sides of the jar have been covered, turn off the lights and watch the bottle glow!
Video
Notes
- Cut off both ends of the glow stick: If using a miniature glow stick, cut off both ends to make the liquid easier to pour.
- Keep the glow stick horizontal: This will help limit the mess when cutting open the glow stick.
- Don’t add too much glitter: Start with a little bit and add more as needed. You can always add more, but once it has come into contact with the glow stick liquid, you won’t be able to remove it without dumping out the contents of the bottle and starting over.
is it possible to open the jar and add another glow stick when the the light fades??
I’ve never tried adding another glow stick after the light fades, but I imagine it might work. I do have a couple thoughts I thought I would share:
a) The glow stick liquid makes the whole bottle glow because it sticks to the iridescent glitter. If the glitter is already covered with liquid, you may need to add a bit more glitter. That should be fine to do once, but I wouldn’t do it too much or the bottle will become cloudy.
b) If you are planning on reusing the bottle, adding more glow stick liquid instead of quickly washing the bottle may make it more difficult to get the glitter off.
If you try it, I’d love it if you would come back and let us know whether it worked!
Great hobby for daddy and daughter day. Thanks!
I just came across this post and it’s amazing. Have you found a way to make them last for more than 30 minutes? I plan on making them either way but wanted to ask anyways!!!
Unfortunately I haven’t found a way to make them last longer than a glow stick would last… though it occurred to me recently that you can reuse glow sticks by throwing them in the freezer before they stop glowing, and then pulling them out again when you’re ready for the next use. So I wonder whether you could place one of these bottles in the freezer while it’s still glowing and then take it out again another day? I’ll probably give it a try to see if it works and update the article if it does!
Cool, I love it! My little one and myself love anything lights or glowing. Thanks for this. We’re definitely trying this, this weekend 😊
So glad to hear that, I hope your little one loves it!!