

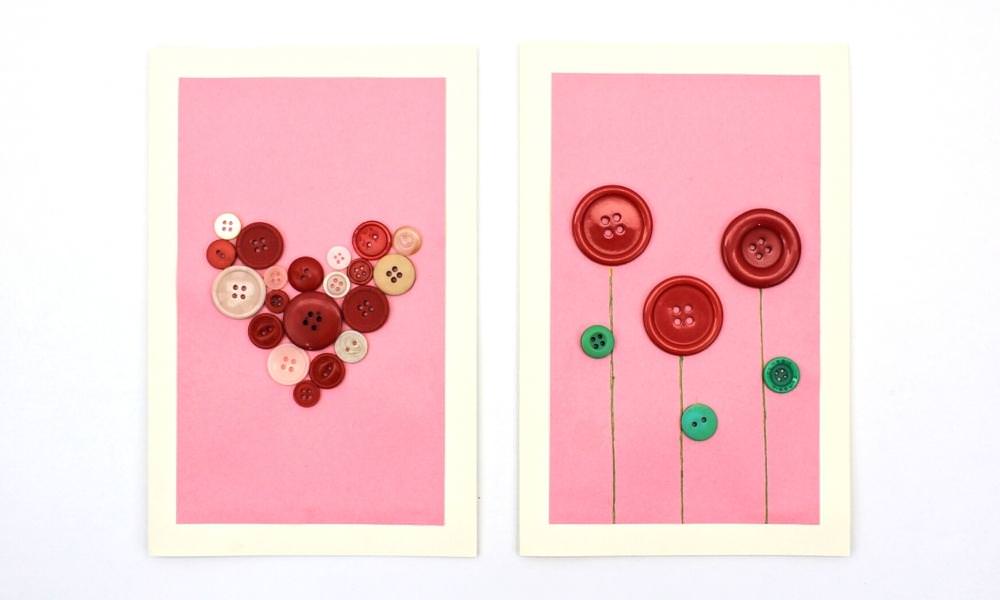
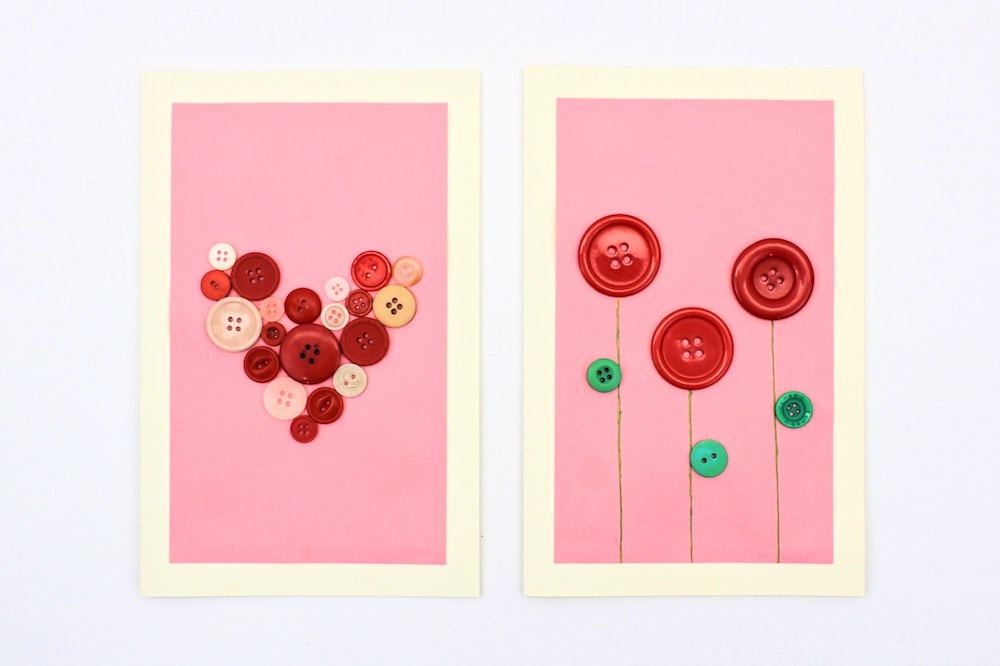
Looking for a cute Valentine’s Day or Mother’s Day project that’s easy enough for kids to make? These adorable button cards come in two simple designs that are perfect for both younger and older children!
JUMP TO…
Our five-year-old loves making homemade cards for friends and relatives.
She loves it so much, in fact, that she’s gotten into the habit of making more than she needs. That way, she always has extra cards on hand whenever a special event happens or someone celebrates a birthday.
With Valentine’s Day coming up, she’ll start making pink and red cards any day now. And since she loves playing with my craft buttons and making button art, I thought this card would be right up her alley.
We made two of these cards and one was definitely easier than the other, so you may want to choose one or the other depending on how old your kids are.
But they both turned out so cute that assuming your kids are old enough, I totally encourage you to make both. I’m sure there are many people in your child’s life who would love to hear, “Happy Valentine’s Day” in the form of a handmade greeting card!

Get hundreds of pages of activities!
Get access to all our paid printables, as well as monthly activity planners, for just $5/month. (New printables added twice per month!)
Required Materials
Here’s what you’ll need to make these cute DIY button Valentine’s Day cards at home:

- Beige cardstock
- Pink construction paper
- Scissors
- Ruler
- Strong glue (we used Elmer’s Glue-All)
- Craft buttons in various colors and sizes (I used various shades of beige and red along with a few small green buttons for the leaves of the flowers)
- Green fine-point washable or permanent marker
Note: Feel free to change up the colors of the cardstock and construction paper!
How to Make a Button Valentine Card (Step-by-Step)
1. Fold Cardstock
Start by folding two pieces of beige cardstock in half.

If you want your cards to measure 5 x 7 inches and fit inside standard A7 envelopes, you can first cut down the cardstock so that each sheet measures 10 x 7 inches, but this will reduce the available space for your button design.
3. Cut Construction Paper
Cut a piece of construction paper into two rectangles measuring 5 x 7.5 inches. This should create a half-inch border all around when you glue the construction paper to the cardstock during step 5 (pictured below).

If you’ve chosen to cut the cardstock down to 10 x 7 inches, the construction paper rectangles should measure 4 x 6 inches instead.
Note: I used a paper trimmer to cut the construction paper because I love how clean the cuts are and how easy it is to cut several sheets at once, but scissors and a ruler should work just fine if that’s what you have at home.
4. Add Buttons
Start by positioning the buttons on top of a piece of construction paper to get an idea of where you’ll need to glue them.
Once you’re happy with how the buttons are positioned, use strong liquid glue to glue them in place. We used Elmer’s Glue-All because it’s non-toxic and therefore safe for children to use. (You can also use hot glue if you’re doing this step yourself.)
As far as positioning the buttons goes, the button heart can be a little tricky to make because you’ll need to arrange buttons of various sizes into the shape of heart. You may have to experiment with different placements and sizes before you get it right.

On the other hand, the button flowers are quite simple to make since each flower consists only of one large red button, a green stem traced with a marker, and a small green button for the leaf.

Because it’s so much simpler to make, this card is the one I recommend you choose if you’re making this craft with a toddler or preschooler.
4. Let Glue Dry
Wait a few hours until the glue is fully dry before moving on to the next step.
5. Glue Construction Paper to Cardstock
Position each construction paper rectangle on top of one of the cards, making sure that the border is even all around, and glue it on using liquid school glue or Elmer’s Glue-All.
Once the glue is dry, the cards are ready to send. Write a message on the inside and give them to Mom or Dad on February 14th… or save one of them for Mother’s Day!
Related Valentine-Themed Crafts
Looking for more DIY Valentine’s Day cards to make with your kids? Check out these articles:
- Sponge-Stamped Valentine’s Day Card
- Bubble-Painted Valentine’s Day Card
- Glitter Handprint Valentine’s Day Card
Only your name will be made public. Please note that by submitting your comment, you are agreeing to the terms of our Privacy Policy.