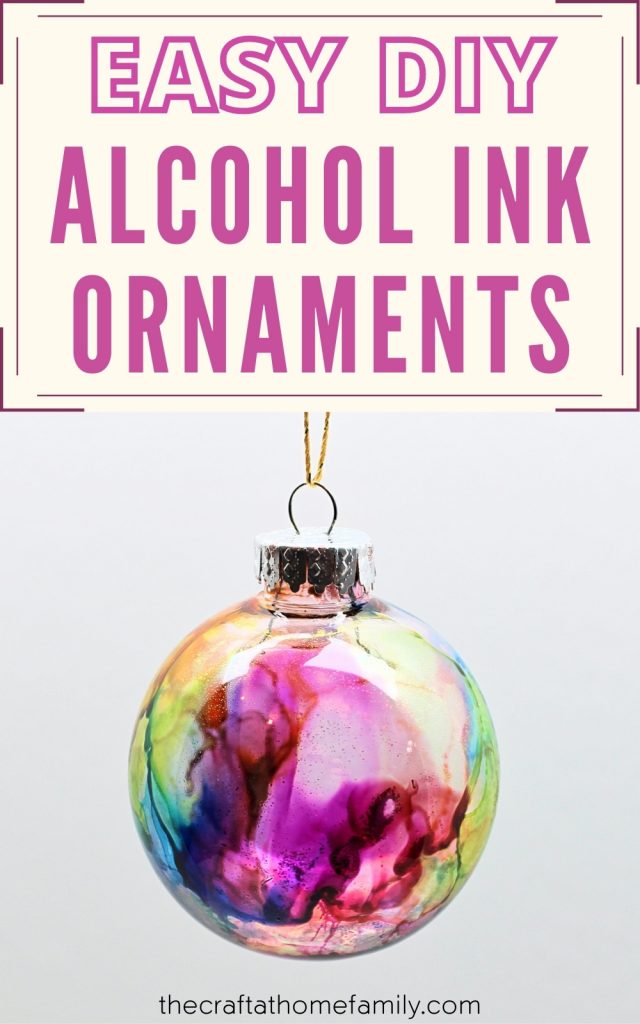
These DIY watercolor-effect alcohol ink ornaments are so easy to make, and they’ll look gorgeous on your Christmas tree! And if you’ve never worked with alcohol ink before, don’t worry—I’ve included a bunch of helpful tips to get you started!
JUMP TO…
Have you ever worked with alcohol ink before? I discovered it last year and I’m completely in love with it.
I was actually surprised at how much I loved it. It’s difficult to control exactly what it does, and I’m a huge perfectionist. But once I tried it, I loved it so much that I started using it to create abstract pieces for my Etsy shop and pretty homemade coasters to gift to friends and family!
If you’ve never worked with alcohol ink, I really recommend trying it at least once. And this project is a great way to get a feel for it! It doesn’t require a huge investment or any fancy equipment, and the resulting ornaments are so pretty!
Plus, because we chose to use plastic ornaments rather than glass, we don’t need to worry about our kids breaking them!
Note: If you’ve never used alcohol ink before, be sure to read all the way to the bottom. I’ve included an entire section full of helpful alcohol ink tips right below the tutorial!

Get hundreds of pages of activities!
Get access to all our paid printables, as well as monthly activity planners, for just $5/month. (New printables added twice per month!)
Required Materials
Here’s what you’ll need to make pretty homemade alcohol ink ornaments at home:
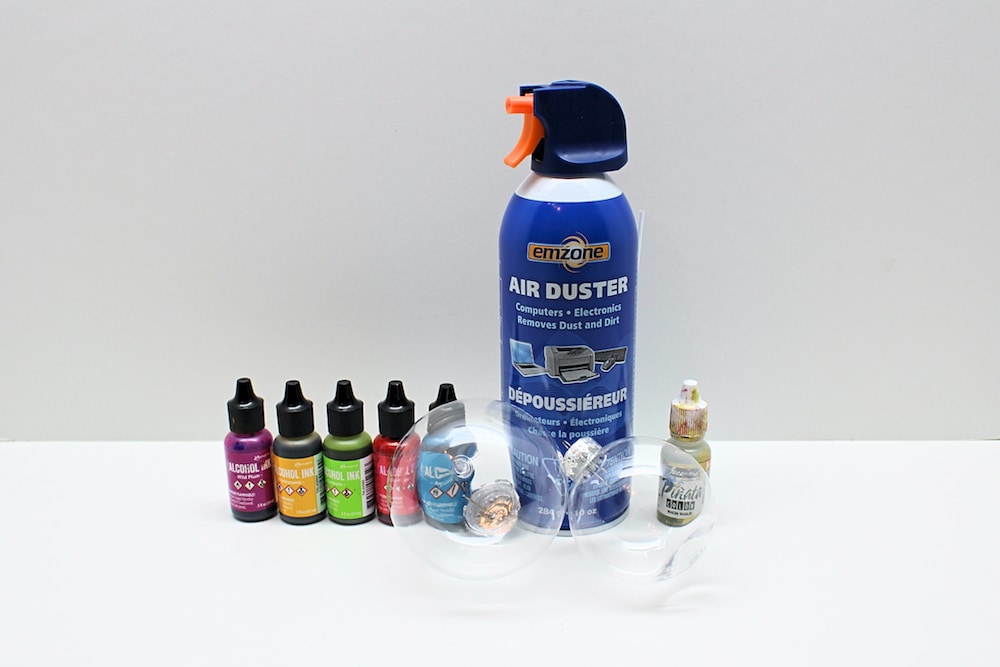
- Clear fillable plastic ornaments (if ever you can’t find the size you want online, they can also be found in craft stores and sometimes even at the dollar store)
- Alcohol ink in several colors
- Compressed air (you could probably even use a straw)
- Alcohol ink gold mixative (optional)
Alcohol ink is a little pricey, so if you’ve never used it, I wouldn’t recommend buying more than one pack until you know you like it. I recommend the Nature Walk, Beach Deco or Spring Break packs by Ranger—the colors are lovely and they make great starter sets! (They also tend to be cheaper than some of the others.)
Also, keep in mind that you really won’t need much for any given project. Unless you’re painting huge canvases (which is not something that beginners should be tackling as there’s a lot of prep work involved), you’ll literally only need a few drops of each color.
So there’s really no need to buy a whole bunch of them unless you fall in love with them like I did!
Note: If you don’t have young kids and aren’t worried about your ornaments shattering, feel free to use glass ornaments instead of plastic. But we’re about to welcome our fourth child under the age of five, so as you can imagine, we try to stay far away from anything breakable!
Recommended Materials
Above are the materials you’ll absolutely need to make these ornaments, but I’d also recommend a few additional supplies:
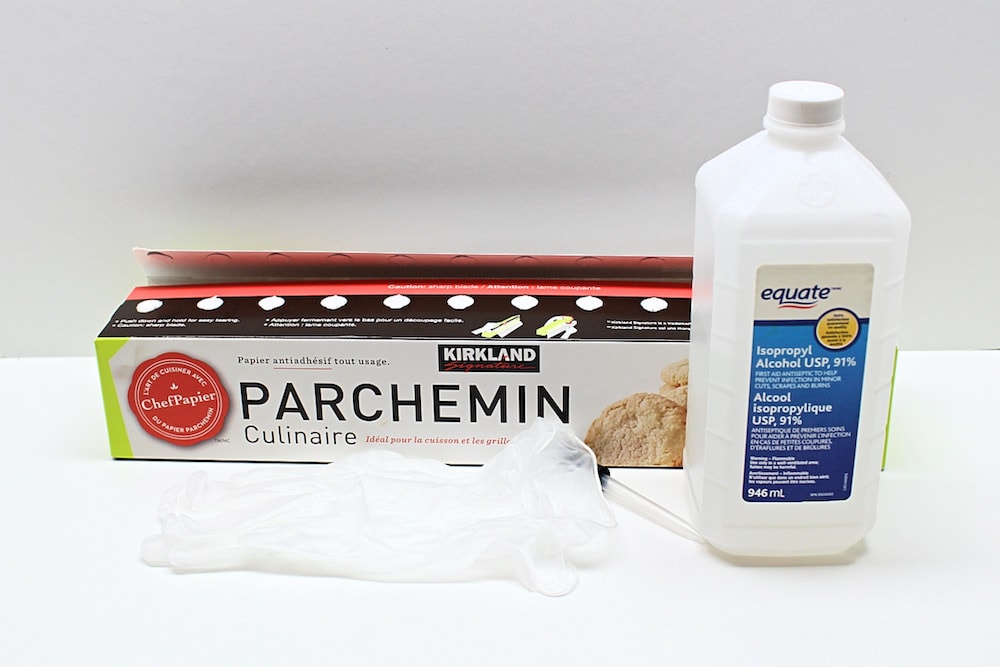
- Parchment paper (to protect your work surface)
- Vinyl/latex/nitrile gloves (to avoid staining your hands)
- Isopropyl alcohol
- Dropper (for the isopropyl alcohol)
I’ll go more in detail about the isopropyl alcohol in the tips section at the end of this article!
How to Make Alcohol Ink Christmas Ornaments (Step-by-Step)
1. Remove Ornament Top
Start by removing the top of your fillable ornament. For this project, we’ll be using alcohol ink on the inside of the ornaments to prevent staining and make them kid-friendly!
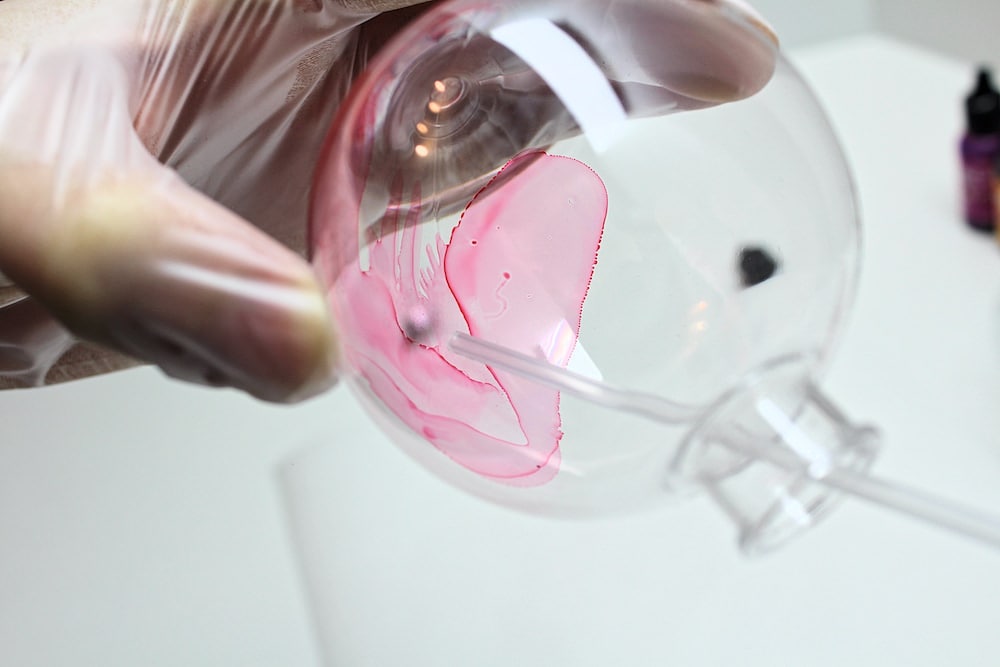
2. Add Alcohol Ink
Open one bottle of alcohol ink and pour a single drop into the ornament.
3. Add Air
Once you’ve added a drop of alcohol ink to the ornament, quickly use the compressed air to spread it out and help it dry. If this is your first time using alcohol ink, make a note of how it behaves—this will help you do the rest of the project!
Note: I didn’t try it for this particular project, but if you don’t have any compressed air, you could probably do this step with a straw. I rarely use compressed air when creating abstract pieces because I find that the air flow is much easier to control with a straw!
4. Repeat Previous Steps
Repeat the two previous steps as many times as you like, with as many different colors as you like! (I used Wild Plum, Honeycomb, Limeade, Flamingo and Aquamarine by Ranger.)
Dry each drop of alcohol ink before adding the next, and try to place all your drops in different locations in order to cover the entire surface of the ornament. You’ll notice that the colors don’t mix anyway—if a new drop is added on top of an old one, it will likely push it out of the way.
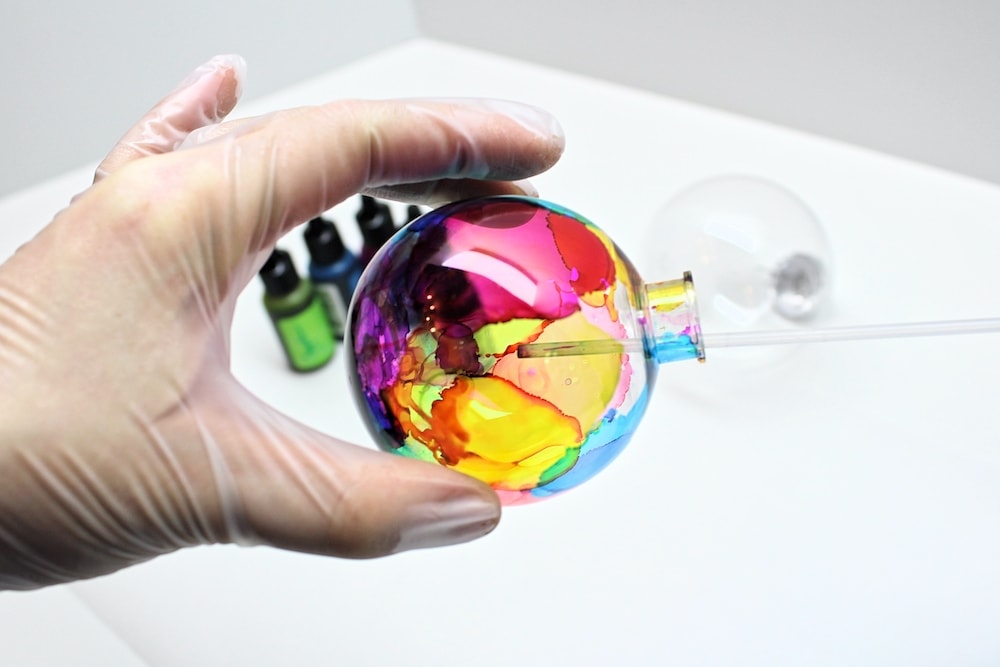
Have fun and experiment! And if ever you’re not happy with the result, no need to worry—simply scroll down to the tips section to find out how to fix it!
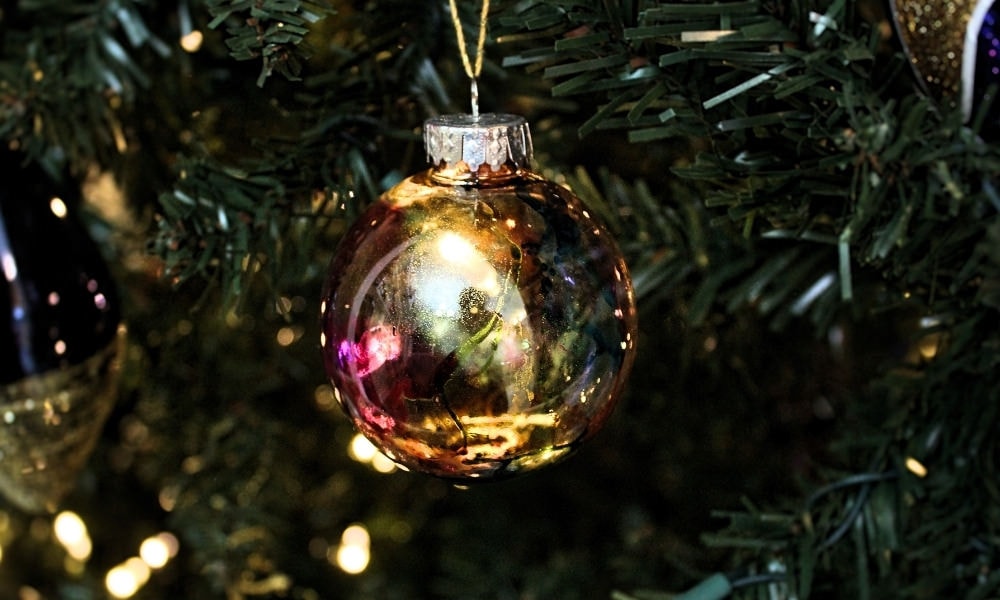
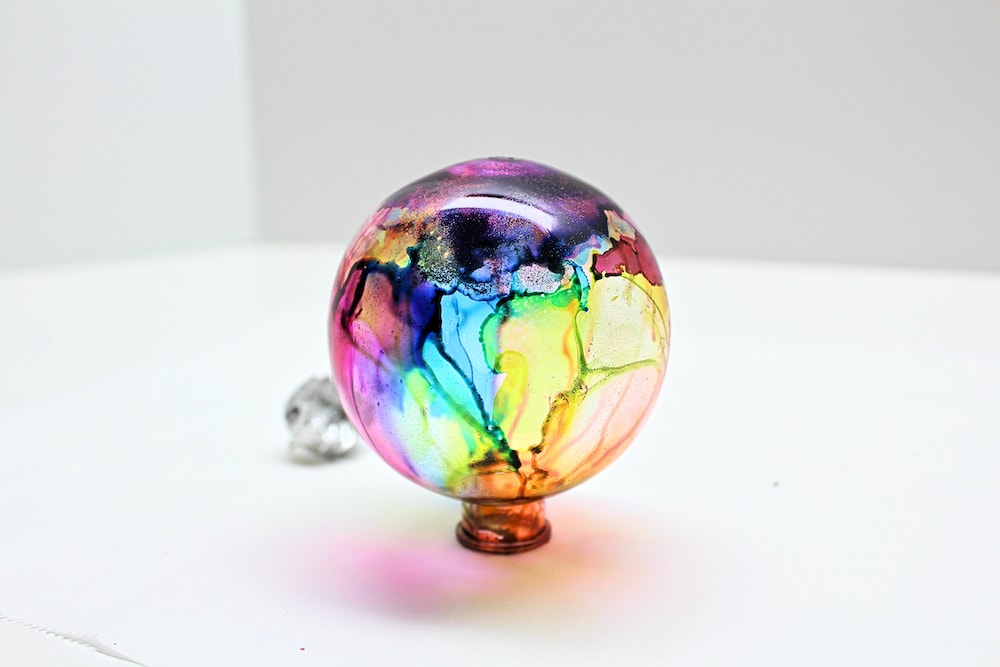
5. Add Gold Mixative (Optional)
Adding a gold mixative is totally optional—your ornaments will still look lovely if you only use solid colors to create a watercolor effect. But I loved the way the gold shimmered when the lights of the Christmas tree were turned on!
Gold mixative doesn’t behave quite the same way as regular alcohol ink, so don’t add too much to start with. It’s meant to be mixed with a solid color, so it will probably work best if you pour a drop of color onto it before spreading it out with the compressed air.
You can also experiment with simply swishing it around the ornament and forgoing the compressed air altogether to leave tiny specks of gold all over!
6. Let Dry
Once you’re happy with the way your ornament looks, place it upside down on some parchment paper for a few minutes. Alcohol ink dries pretty quickly—especially if you use compressed air to help it along—but this will prevent any ink that’s not dry from pooling at the bottom of the ornament.
7. Hang Ornament
Once you’re satisfied that all the ink is dry (this shouldn’t take long), place the top back on your ornament and use your favorite method to hang it on your tree! We like to use gold thread to hang all of ours.
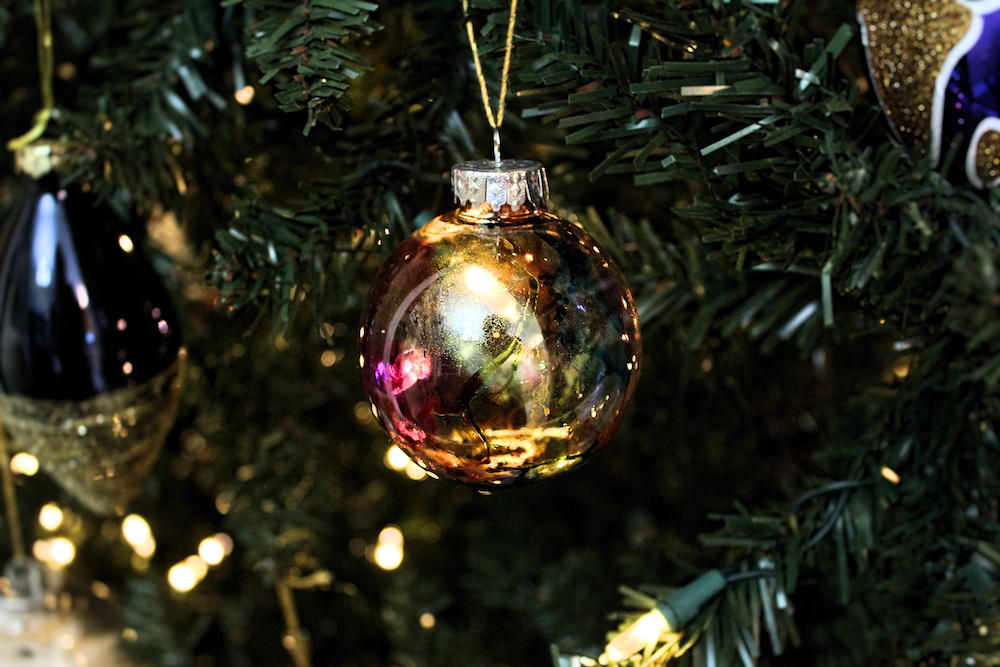
And that’s it! I just love the way the gold specks look when we turn on our Christmas lights!
Alcohol Ink Tips & Troubleshooting
Since not everyone has worked with alcohol ink before, I’ve put together a little troubleshooting guide below to help you out!
And since I’m obsessed with alcohol ink and have worked with it far more extensively than what’s required for this project, feel free to comment with any questions that I haven’t answered!
Where Can I Buy It?
Alcohol ink can typically be found in craft stores or online. Most of mine was ordered from Amazon, but I’ve also purchased a few sets from Michaels because they were overpriced or difficult to find online.
Which Surfaces Can I Use It On?
Unlike most paints, alcohol ink is meant to be used on non-porous surfaces such as plastic, metal, ceramic or glass. You can’t even use it on canvas unless the canvas has been specially prepared with a latex primer!
With that in mind, remember that alcohol ink will not work on regular paper. So if you want to test things out before doing this project, use a spare piece of clear plastic from the recycling or an extra tile that you have lying around from your latest renovation project!
(And if this project gets you hooked on alcohol ink, consider buying Yupo paper to experiment with it further! It’s a special type of synthetic paper that is non-porous and perfect for alcohol ink.)
How Do I Clean It?
It’s quite possible that even if you protect your work surface with parchment paper, you’ll still end up with a few small droplets of alcohol ink in places you don’t want them.
Your first instinct may be to try cleaning up the ink with a wet cloth—and panic when it doesn’t come off. So I wanted to reassure you that it can indeed be cleaned. It just can’t be cleaned with water!
If you find any droplets of alcohol ink on your counter, table or floor, simply pour a little bit of isopropyl alcohol onto it and use a cloth or paper towel to wipe it up. The alcohol should make the ink come right off!
How Can I Fix My Mistakes?
If you go through all the steps listed in the tutorial and aren’t happy with the result, there’s no need to worry! Even when it seems dry, alcohol ink art is never permanent unless you add a special fixative to it that prevents it from being reactivated by alcohol.
So if ever you’re unhappy with how your ornament looks, simply pour a little bit of isopropyl alcohol into it to reactivate the alcohol ink. Depending on how much alcohol you add, you can use this trick to modify certain portions of your design, or even to restart the whole project from scratch!
Related Homemade Christmas Decorations
Looking for more fun DIY Christmas ornament ideas? Check out these articles:
- Easy Feather Ornaments (2 Ways!)
- DIY Santa’s Clothesline (with Free Template!)
- Easy Twine-Wrapped Ornaments
- Dollar-Store Ribbed Glitter Ornaments
Your ornaments are beautiful! I tried to make them as a first timer to alcohol ink…let’s just say clearly I’m an amateur! I put a drop in but it eventually just evaporated leaving little dots. I then used a straw and at first it was really pretty but the ball filled with moisture from my breath. So now I’ve got 12 balls with one drop each sitting on cups to dry out. Any suggestions? Thanks in advance.
Hi Angie! One of the things I love above alcohol ink is that unless you decide you’re happy with the results and intentionally add a specific type of varnish to make the ink set, you can always erase your design and start over if you’re not happy with the results. So if you have 12 balls with one drop that you’re not happy with, and you would like to try again, just add a bit of isopropyl alcohol and swish it around inside the ball. This will cause the ink to turn back to liquid, and you’ll be able to dissolve it and pour any remaining liquid out of the balls. Once the inside of the balls has dried, you can start over with the same ones instead of using more!
When you read the back of the gold and silver mixatives, it says use with a blending solution. You said to just add a drop of 2 of colour, I believe. So we don’t need the mixatives?
Blending solution and isopropyl alcohol help make alcohol ink and metallic mixatives easier to move around and blend together, and if you are making alcohol ink art on a flat surface like canvas or Yupo paper, then you’ll get better results if you use them. But for this particular project, because you’re moving the ink around inside a spherical ball instead of on a flat surface, using blending solution or alcohol is likely to cause all the colours to run and pool at the bottom of the ornament. You would have to use them very, very sparingly (only a couple drops) and even that might produce unwanted effects. So instead, I recommend immediately adding a couple drops of colour on top of the mixative, before it has a chance to dry, and then using air to spread it around. This will allow it to move around and blend with the ink you’re adding without ruining the colours that are already there.
Thank you! I just wanted to let you know when I went through this blog again, the adds were covering some of your writing.
Oh no! I am so sorry about that, thanks for letting me know. If ever you notice something like that again, I would really appreciate it if you could take a screenshot and email it to me at sacha(at)thecraftathomefamily(dot)com so I can share it with the company that I work with for the ad placement. The ads aren’t supposed to ever cover the content, but specific examples/screenshots are needed in order to troubleshoot.
I would like to add something.
Alcohol ink is very potent, so it should be used in a well ventilated area. I ALWAYS work in a room with a fan or ceiling fan.
I’ve seen advertisements for it being for kids, but I question that. I have tried to use it outside, but then you have to worry about wind gusts.
Yes, absolutely! Thanks for bringing that up! I thought I had mentioned that in the post but looking back at it, it doesn’t look like I did, so I’ll definitely be adding it.
I’ve never seen alcohol ink advertised as being for kids, but I would definitely find it questionable. I took a 9-month break from alcohol ink during each of my pregnancies because I wasn’t convinced that the fumes would be safe to inhale, so I can’t imagine letting kids use it.
I looked at the alcohol ink and most say for resin and don’t really mention glass. Is there a special kind I should be looking for?
Thanks for bringing that up. Just noticed those on Amazon! Alcohol ink must have gained in popularity in the years since I bought mine, because there seem to be a lot more options available now (and more affordable, too). I can’t say for sure, but from what I can tell, the ones marketed as “alcohol ink for resin” should work. Most of the descriptions on Amazon mention “Yupo” as well, which is a special non-porous paper that you can use for alcohol ink, so even though the descriptions don’t specifically mention glass or plastic, I’m guessing the resin alcohol inks work on all non-porous surfaces, just like regular alcohol ink. I personally use the Ranger/Tim Holtz ones (and sometimes the Jacquard Piñata ones) because they used to be one of the only options and they’re what I’m used to… but it sounds like the ones marketed for resin would work too, if you want to try those!
Thank you
Glad I could help!
Fantastic directions and helpful hints. Thank yo
So glad you found it helpful!!
What is the best way to seal your alcohol ink on a ceramic tile?
Hi Michelle,
There are detailed instructions on that in this article: https://thecraftathomefamily.com/diy-alcohol-ink-coasters/
Hope that helps!
Love your ornaments! The tips are extremely helpful as I’m brand new to alcohol inks! I had a gift card for Michaels that I hadn’t used and the Ranger Rick inks were buy one three pack and get the 2nd one free. I started playing with the inks on glossy paper and ended up making some fun Christmas cards! Now I want to try it on the plastic bulbs I have left from years ago.
That’s awesome!! I’m so glad that you found the tips useful and that you’ve enjoyed playing around with alcohol ink! I have tried a lot of different ways to make art and alcohol ink is one of my absolute favourites!!