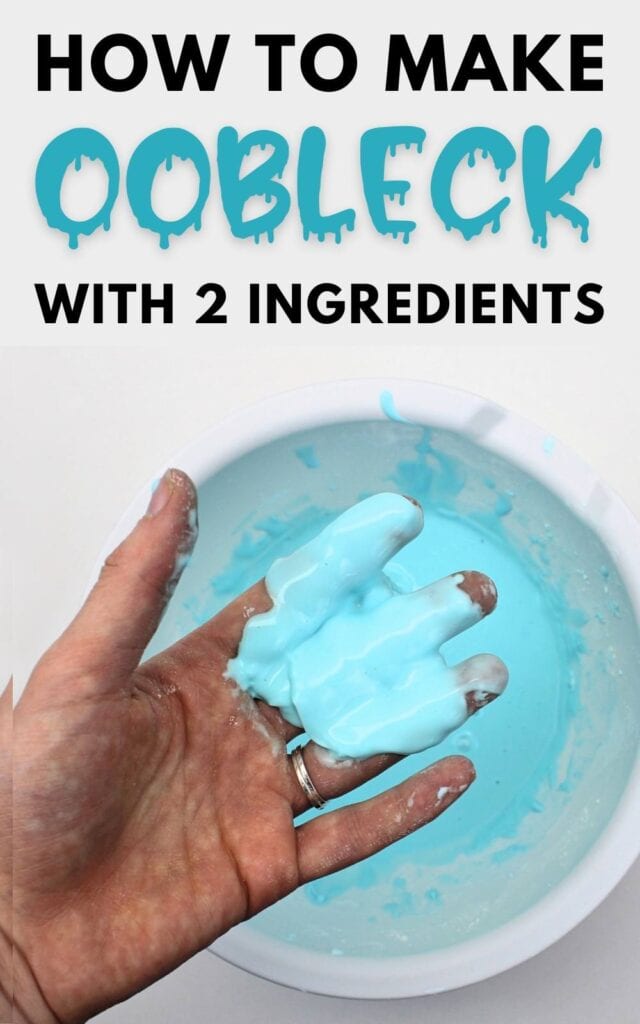
Have you ever made oobleck? Prepping this awesome sensory activity couldn’t be easier, and because it’s taste-safe, it’s also suitable for babies and toddlers. Find out how to use household ingredients to create a non-Newtonian fluid that acts like both a liquid and a solid—such a cool science experiment for kids!
This post may contain affiliate links, which means I may receive a commission, at no extra cost to you, if you make a purchase through a link. As an Amazon Associate, I earn from qualifying purchases. Please see my full disclosure for further information.
JUMP TO…
Have you ever tried making oobleck at home?
We made it for the first time a few years ago, and the first thing I noticed was how different it was from all our usual sensory materials.
Sure, we’ve done our fair share of cool sensory activities—Edible Water Beads and Rainbow Marshmallow Slime are the first to come to mind. But oobleck is in its own category because its texture seems almost magical.
I’m serious. If you’ve never tried it, you have to do it at least once. I can’t believe how cool it is while still being super easy to make.
And if ever you still have young kids at home, no problem! This easy recipe also happens totally taste-safe. (But it doesn’t taste good, so your little ones won’t be encouraged to eat large quantities of it.)
Oobleck is goopy. And messy (but not too messy). And it’s great for kids of all ages, including babies, toddlers, and preschoolers.
To be perfectly honest, I had a lot of fun with it too even though it was made for my children.
So whether you’re a parent or grandparent looking for fun activities to do at home, or you’re a teacher looking for fun things to do in your classroom, you should definitely give this one a try!
What Is Oobleck?
Oobleck is a non-Newtonian fluid. This means that it does not follow Newton’s law of viscosity, which states that viscosity (i.e. how easily the fluid flows) stays constant independent of stress.
In practice, this means that oobleck changes its consistency when force is applied.
When oobleck is allowed to flow freely, it behaves like a liquid. But if you apply rapid pressure to it, all the cornstarch particles are forced together, and the oobleck behaves like a solid. So cool!
Why Is Oobleck Called Oobleck?
Oobleck gets its name from a 1949 Dr Seuss book called Bartholomew and the Oobleck.
In the story, the king gets bored of the usual weather and calls on his magicians to make something new and different fall from the sky. As a result, a gooey green substance starts to rain down on the kingdom, paralyzing daily life in the process.
GRAB OUR 12 BEST SENSORY RECIPES!
Subscribe to our email newsletter to receive 12 of our most popular sensory recipes in PDF format as a welcome gift:

Already a subscriber? Don’t worry, you won’t be subscribed twice. By submitting your email address, you are agreeing to the terms of our Privacy Policy. You can unsubscribe at any time.
Required Ingredients
Here’s what you’ll need to make your own 2-ingredient oobleck slime at home:
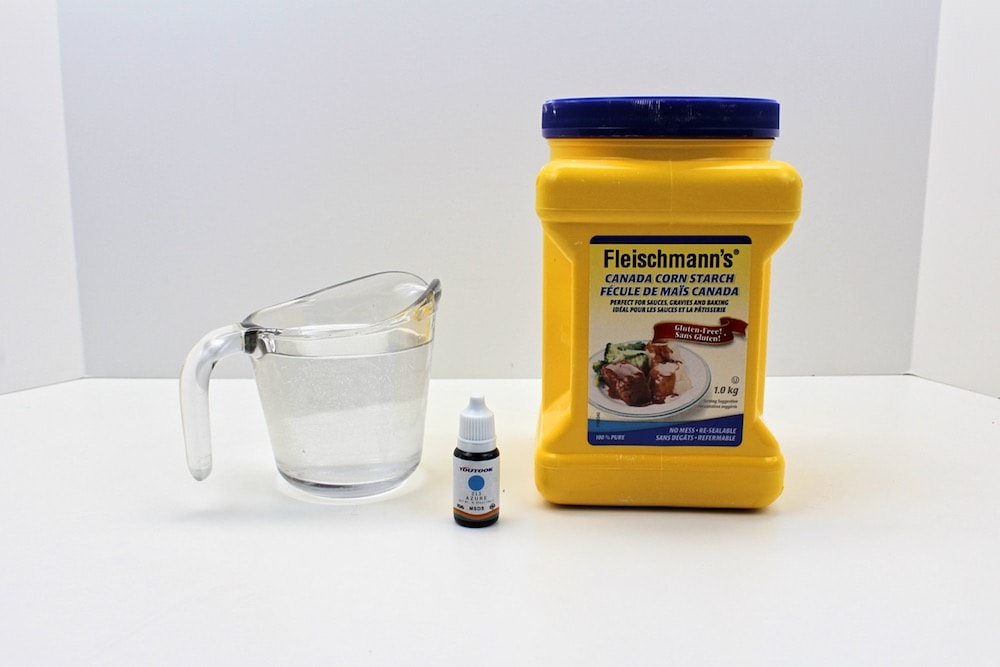
- Water
- Food colouring (optional)
- Cornstarch
For this recipe, I used 1 cup of water and 2 cups of cornstarch. However, you don’t need to use the same quantities as long as you follow the same 1:2 ratio of water to cornstarch.
For instance, if you want to use only 1 cup of cornstarch, simply reduce the quantity of water to ½ cup.
Note: For those of you in the U.K. and Australia, what we call “cornstarch” in North America is what you would call “corn flour”.
How to Make Homemade Oobleck (Step-by-Step)
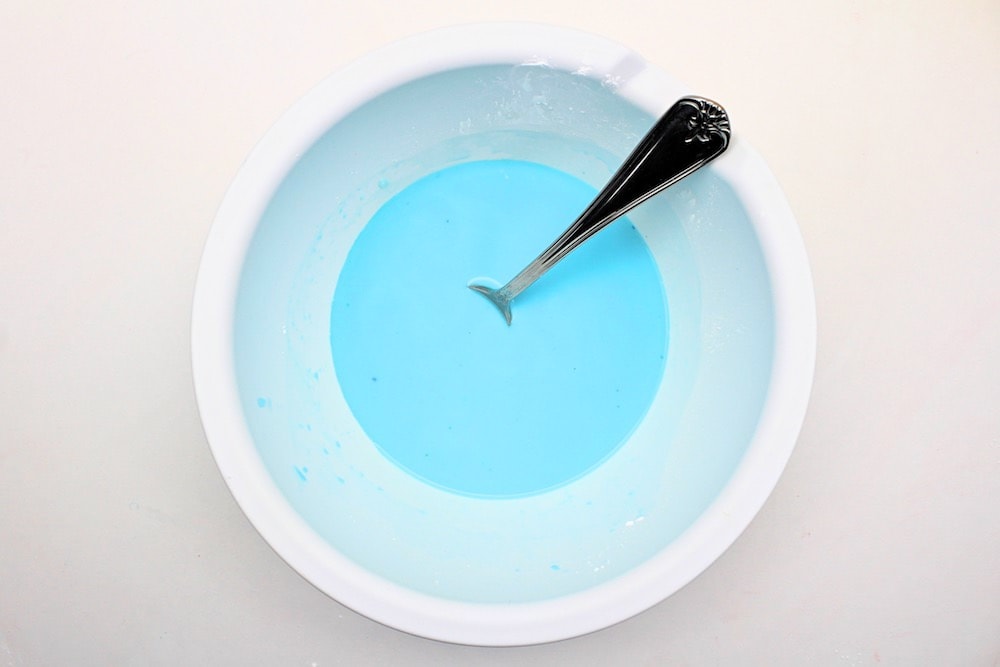
1. Add Food Colouring to Water
Start by pouring 1 cup of water into a mixing bowl and adding a few drops of food colouring. You can also use liquid watercolour paint if you don’t need this activity to be taste-safe—or you can skip the colour altogether and make white oobleck without food colouring or paint.
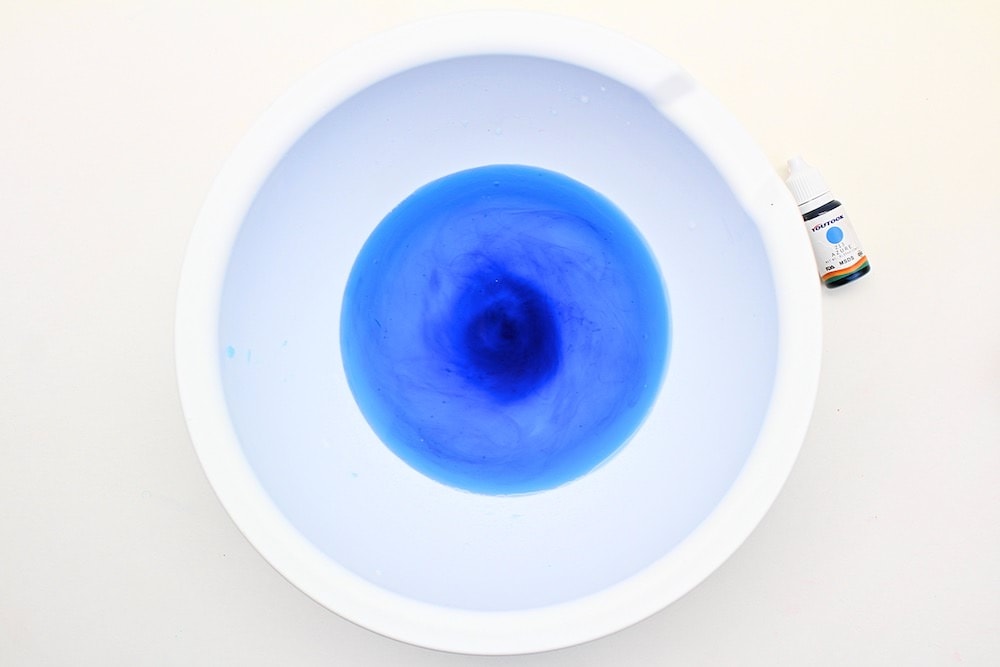
Note: The colour will become a lot duller once you add the cornstarch, so be sure to add lots of colouring if you want the oobleck to look nice and vibrant.
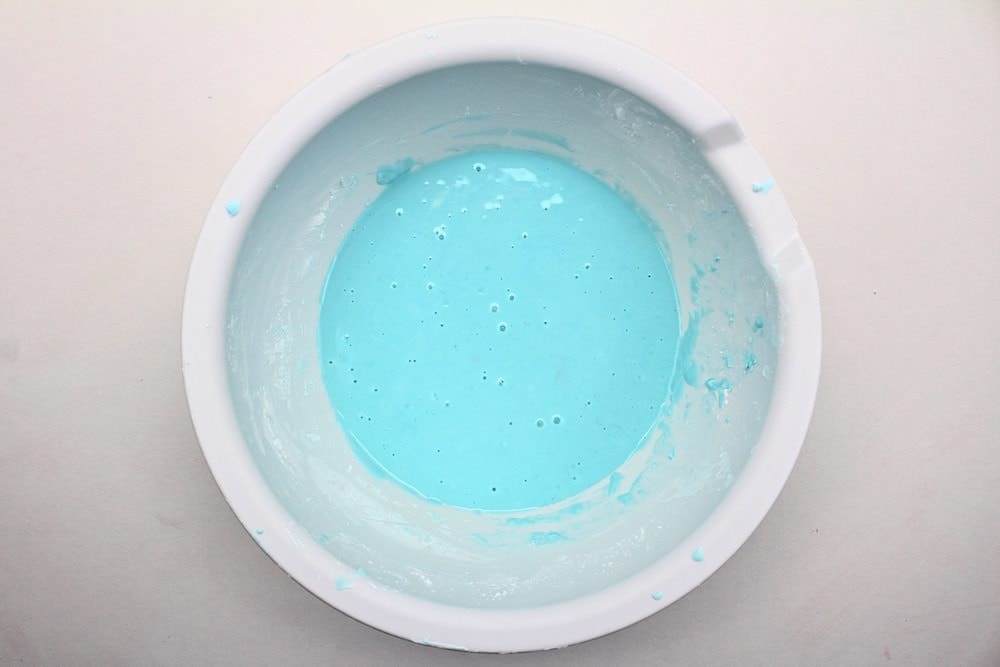
2. Add Half the Cornstarch
Add 1 cup of cornstarch to the water and stir until combined. You can always add all the cornstarch right away if you like, but I prefer to start with half because it makes it easier to mix.
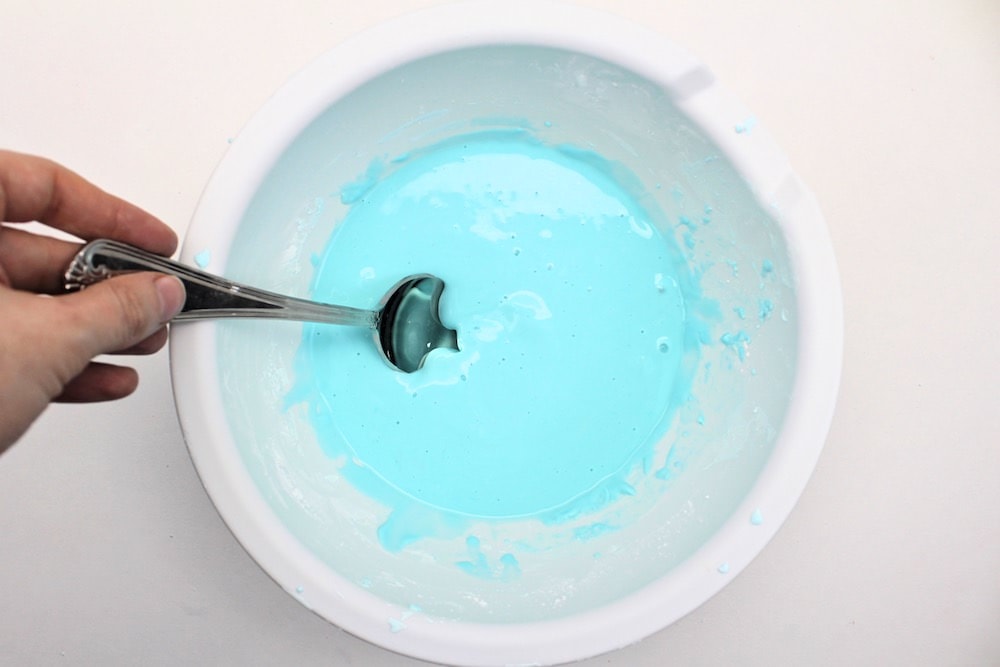
3. Add Rest of Cornstarch
Once the first cup of cornstarch is mixed into the water, add a second cup of cornstarch and gently stir the mixture with a spoon.
Because oobleck acts like a solid when pressure is applied to it, the mixture may become a bit more difficult to stir as it thickens. The trick is to stir it gently, without applying sudden pressure, to keep it in a liquid state.
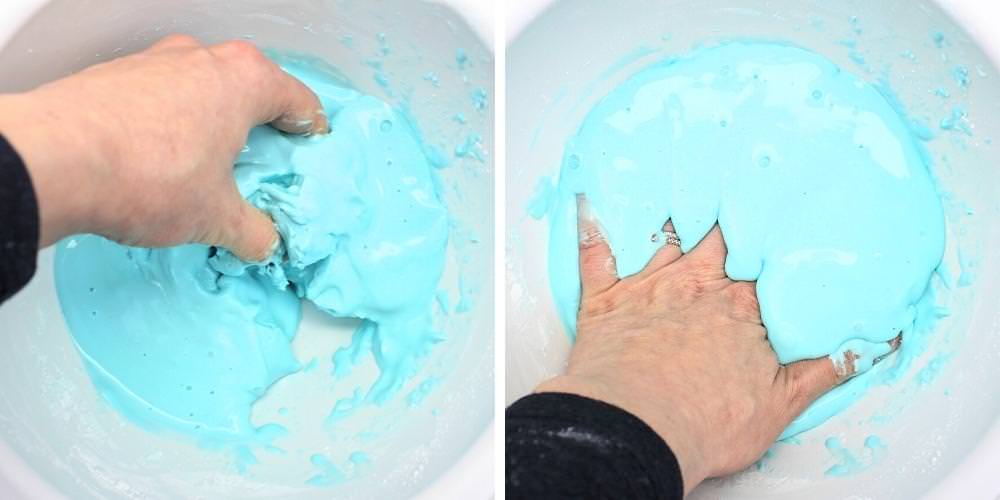
4. Adjust Consistency
When the cornstarch and water have been completely combined, test the texture of your oobleck and adjust it if necessary by adding more water or cornstarch.
Oobleck is really fun because it behaves like a solid when pressure it applied to it, but like a liquid the rest of the time.
To test the texture, try hitting it with a spoon. Then, gently place the spoon on top of it to see what happens.
The oobleck should remain unchanged when you hit it with the spoon (because it’s acting like a solid), but when you place the spoon on top, it should gently sink into it.
If your oobleck is behaving too much like a liquid, add a bit of cornstarch. If it’s behaving too much like a solid, add a bit of water.
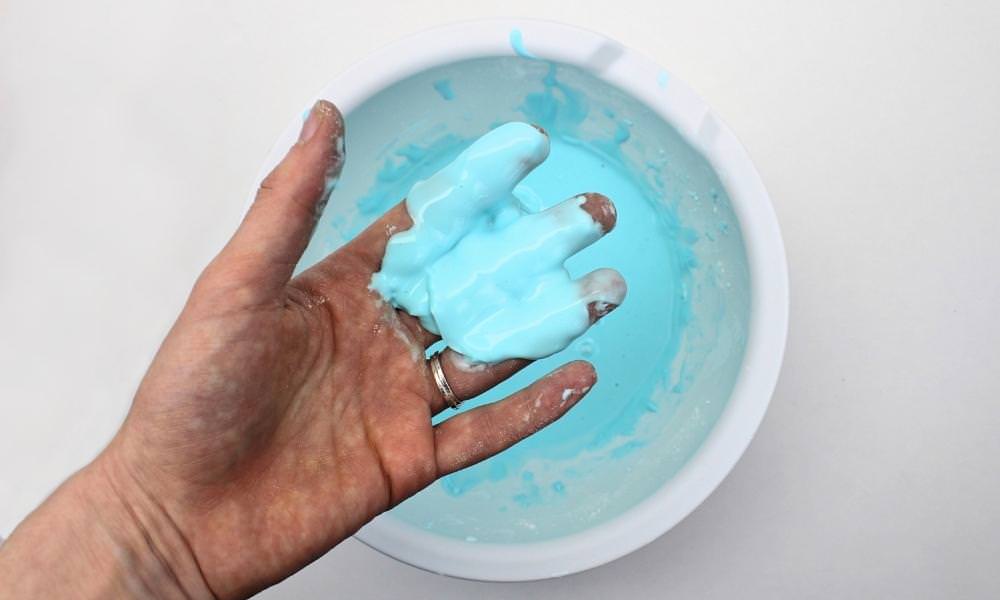
If you apply too much pressure while trying to pick up some of the oobleck with your hands, it will look like it’s breaking. But if you place your hand on top of it and don’t apply any pressure, your fingers will slowly sink into it until they’re completely covered.
5. Play!
Once the texture is perfect, give the DIY oobleck to your little ones to play with! Our kids like to add little plastic toys because they love to see them sink into the goop and disappear. There’s something so satisfying about it.
You’ll also notice that the oobleck can actually be picked up and shaped into a ball as long as you apply constant pressure to it.
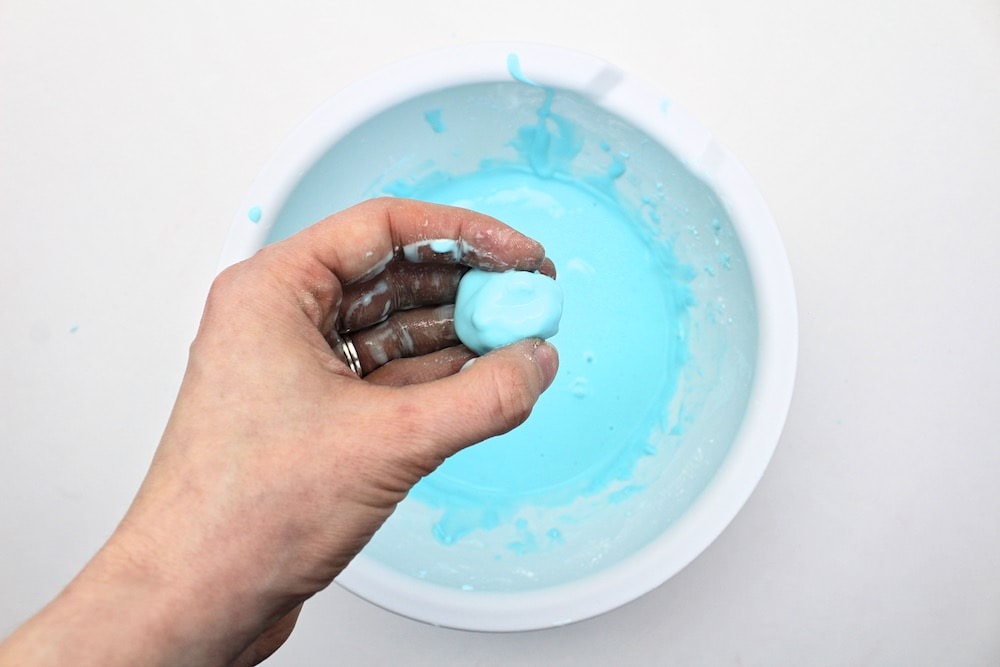
…But if you stop applying pressure, it will go back to its liquid state and ooze through your fingers. So cool!

How Long Will Oobleck Last?
Oobleck typically lasts a few hours, but it does dry out if you keep it out for too long. (In my experience, it takes about 24 hours to dry out completely. If you want to keep it overnight, place it in air airtight container and add some more water when it’s time to play again.)
That being said, if you want to save it for later, you may be able to extend its life by covering it with plastic wrap and storing it in an airtight container in the fridge. You’ll probably have to add a splash or two of water to restore its consistency, but this method may allow you to keep playing with it for up to two weeks.
You can also try letting it dry out in the open air before storing it in a container at room temperature. If you do this, you’ll once again have to add more water to revive it when your kids are ready to play with it. But at least you won’t have to throw it all out and you’ll be able to reuse the cornstarch the next time your kids are ready to play!
Finally, you can also freeze the oobleck in an ice cube tray or silicone mould and keep it in an airtight container in the freezer for next time. This will help it retain its water content, and playing with frozen oobleck is an activity in itself because its texture will go through a variety of transformations as it thaws.
Can You Pour Oobleck Down the Drain?
When comes the time to clean up your oobleck, don’t pour it down the drain. Doing so will likely end up clogging your pipes.
Instead, leave the oobleck out to dry overnight. Then, sweep up all the powder and dispose of it by throwing it in the trash or compost.
Can You Eat Oobleck?
While oobleck isn’t really meant to be eaten, it’s made from edible ingredients. This means that it’s taste-safe, and therefore suitable for babies and toddlers who like to put things in their mouths.
Since it’s just cornstarch and water, it probably won’t taste very good. But that’s a plus as far as I’m concerned, because our kids really don’t need any extra encouragement to eat our sensory activities!
Just make sure they don’t eat too much of it, because cornstarch is a little difficult to digest and can cause stomach aches and bloating if consumed in large quantities. A few nibbles won’t hurt though.
Can You Make Oobleck with Flour Instead of Cornstarch?
Unfortunately, you can’t make oobleck with regular all-purpose flour. However, if you don’t have any cornstarch on hand, you should be able to make it with other starchy flours like arrowroot flour, tapioca flour or potato starch.
Note: Using a different type of starch may change the ingredient ratios slightly, so don’t hesitate to experiment with ingredient quantities until you figure out what works best.
What Happens When You Freeze Oobleck?
Freezing oobleck is a great way to engage little scientists and get more mileage out of this activity. Frozen oobleck will behave like a solid, but as it thaws, its texture will transform in lots of different ways as it turns back into a liquid. So cool!
Freezing oobleck is also the best method to use if you want to make it ahead of time in order to transport it somewhere. Click here to find out more about freezing oobleck for transport.
What Happens If You Microwave Oobleck?
Microwaving oobleck will cause some of the water to evaporate, which will turn it into a solid. However, it will turn back into a liquid if you add some more water.
This makes microwaving oobleck a fun way to do some simple scientific exploration with kids who love science. (I know my 5-year-old is always doing little experiments to find out how the world works.)
Can You Make Oobleck in a Ziploc Bag?
Yes you can, and the process is very similar. You can use this method to get your kids involved in making the oobleck in a fun, hands-on way!
To make oobleck in a Ziploc bag, start by mixing some water and food colouring in a cup. Place some cornstarch in a large freezer bag (following the same ingredient ratio used above), then add a bit of the water mixture, seal the bag and mix the ingredients together by kneading the bag with your hands.
Once the ingredients are combined, unseal the bag and add the rest of the water. Then, seal it up again and knead it until all the ingredients are completely mixed, and your oobleck will be ready to play with!
How Do You Make Rainbow Oobleck?
In order to make rainbow oobleck, simply repeat the instructions above six times, using a different colour for each: purple, blue, green, yellow, orange and red. Then, place all the colours in a bin and let your child play.
Note: Unless you want to end up with an entire tub full of oobleck, I recommend reducing the quantities. Just make sure to use the same ratio of one part water and two parts cornstarch. (For instance, you could use ¼ cup of water and ½ cup of cornstarch per colour.)

2-Ingredient Oobleck
Ingredients
- 1 cup water
- food colouring as needed
- 2 cups cornstarch
Instructions
- Pour water into a mixing bowl and add 5-10 drops of food colouring.
- Add 1 cup of cornstarch and stir until combined.
- Add a second cup of cornstarch and stir until combined, using your hands if needed.
- Check the consistency of the oobleck. It should behave as a liquid when resting, and as a solid when pressure is applied to it. If mixture is too runny, add more cornstarch; if it is too solid, add more water. Then, give it to your child to play with!
Notes
Related Simple Sensory Recipes
Looking for more easy sensory activities to try with your kids? Check out these articles:
- Softest 2-Ingredient Play Dough (No-Cook + Gluten-Free)
- 5-Minute Soap Foam for Sensory Play
- 2-Ingredient Fake Snow (That’s Actually Cold!)
Join my mailing list using the form below to receive 12 of the most popular sensory recipes on my site in PDF format! You’ll be the first to know when I publish new recipes, and you’ll also gain access to my free printables library, which is filled with lots of printable activities for kids.
GRAB OUR 12 BEST SENSORY RECIPES!
Subscribe to our email newsletter to receive 12 of our most popular sensory recipes in PDF format as a welcome gift:
Already a subscriber? Don’t worry, you won’t be subscribed twice. By submitting your email address, you are agreeing to the terms of our Privacy Policy. You can unsubscribe at any time.
Only your name will be made public. Please note that by submitting your comment, you are agreeing to the terms of our Privacy Policy.