Halloween Stress Balls
Looking for a fun last-minute Halloween craft to make with your kids? These easy Halloween stress balls are super cute, super simple to make, and have a squishy texture that kids will love!
Servings: 1 stress ball
Ingredients
- 1 funnel (medium or large)
- 1 empty plastic bottle
- ¾ cup all-purpose flour more if desired
- 1 12-inch rubber or latex balloon orange or white
- 1 black fine point permanent marker
Instructions
- Use a funnel to pour the flour (or another filler of your choice) into an empty plastic bottle, wiggling the funnel as needed or pushing the flour down with a pencil to help it go through.
- Inflate and deflate a balloon 2 to 3 times to help stretch it and make it more pliable. Then, inflate it once more, keep it pinched shut with one hand to prevent the air from escaping, and use the other hand to pull the lip of the balloon over the neck of the plastic bottle.
- Flip the bottle upside down and allow the flour to fall from the bottle into the balloon, squeezing the bottle as needed to help it along. Continue until the bottle is empty and as much flour as possible has made its way into the balloon.
- Pinching the neck of the balloon with your fingers to prevent the air from escaping, use the fingers of your other hand to carefully extricate the balloon from the bottle. Then, using both hands to control the amount of air and flour that is allowed to escape, very slowly let the air out of the balloon until there is only flour remaining.
- Once you have removed as much air as possible from the balloon, carefully tie it up by making a knot as close to the base of the balloon as possible, making sure not to let any extra air in. If desired, you can use scissors to trim some of the excess balloon near the knot, and stretch a second balloon (neck cut off) over the filled balloon to cover the knot and help prevent leaks.
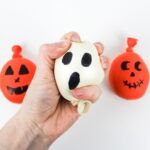
- Use a permanent marker to give your stress ball a face. Orange balloons can be decorated to look like jack-o’-lanterns, while white balloons can be made to look like ghosts. (You can also come up with your own design using whatever colors you have at home!) Allow the permanent marker ink to dry fully before you start using the stress ball.
Video
Notes
1. Alternate filler ideas: Instead of flour, try cornstarch, baking soda, rice, play dough, oobleck, water beads (only in homes without pets or young kids), moon sand or dried beans. Keep in mind that not all will fit inside a funnel.
2. Making studier stress balls: Stress balls will last a couple weeks to several months depending on the quality of the balloon and how often they are manipulated. To make them last longer, cut the neck off a second balloon and pull it over the first to create a second layer. This will make the stress ball sturdier, but less squishy.
3. Reusing fillers: When the balloon starts to thin and develop holes, you can split it open and collect the flour to use in a new stress ball.
4. Helpful tips:
-
- Don't skip the bottle: Funnelling flour directly into the balloon is less effective, and will make it harder to add the full ¾ cup.
- Use a dry bottle: This will prevent flour from sticking to the inside.
- Pinch the balloon shut: Make sure you don't let air or flour escape unintentionally from the balloon as you are making the stress ball.
- Remove all the air: For best results, only flour should remain inside the balloon when you tie it up.
- Allow the ink to dry: Allow the permanent marker ink to dry before you start playing with the stress ball. Designs that fade over time can be traced over again as needed.