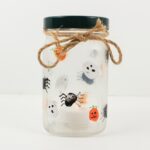
Halloween Fingerprint Candle Holder
Turn a glass jar into a Halloween fingerprint candle holder in just a few simple steps! This easy Halloween craft will transform your child’s tiny fingerprints into cute ghosts, jack-o’-lanterns and spiders.
Servings: 1 candle holder
Ingredients
- 1 glass jar with flat sides
- acrylic or washable paint (white, black and orange)
- 1 paintbrush
- 1 black acrylic paint pen
- 1 white acrylic paint pen
- 1 orange acrylic paint pen
- Mod Podge matte finish
- 1 piece of twine
Instructions
- Using a paintbrush, or simply by dipping their finger into paint or squeezing a dot of paint onto their finger, cover one of your child's fingers with paint.
- Press your child’s paint-covered finger onto a glass jar to leave an imprint. One color at a time, add orange, black and white fingerprints all over the surface of the jar. The orange and black fingerprints should be round, while the white ones should be slightly elongated. (To do this, simply flatten the imprint by pressing more of your child’s finger onto the surface of the jar.)
- Allow the jar to rest undisturbed for a few hours, until the paint is fully dry. Then, use acrylic paint pens to turn the white fingerprints into ghosts (by adding two eyes and a mouth with the black paint pen), the black fingerprints into spiders (by adding legs and eyes with the white and black paint pens) and the orange fingerprints into jack-o’-lanterns (by adding a face with the black paint pen, and a stem and some vines with the green paint pen).
- Wait about 30 minutes for the paint from the paint pens to dry, then use a paintbrush to cover the whole jar with a layer of Mod Podge. Allow it to fully dry before you move on to the next step.
- Wrap some twine, or a thin ribbon, around the neck of the jar. To use your candle holder, place a regular or battery-operated tea light inside the jar. (Using a battery-operated light will allow you to put the lid back on as the jar glows.)
Video
Notes
Helpful tips:
- Clean up the fingerprints: Clean up any paint drips using a tissue before the paint has a chance to dry.
- Remove the lid: For easier handling, remove the lid of the jar and hold it by the neck when decorating and covering it with Mod Podge.
- Allow the paint to dry: Make sure you allow enough time for the paint and Mod Podge to dry between steps.