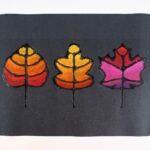
Glue & Chalk Pastel Fall Leaves
Love autumn colors? These gorgeous glue and chalk pastel fall leaves are colorful, easy to make and include a free fall leaf template that you can print out to make the crafting process a little easier!
Servings: 1 craft
Ingredients
- 1 sheet black cardstock
- 1 bottle liquid white school glue with precision tip
- chalk pastels assorted colors
Instructions
- Print the template on a sheet of cardstock (or draw your own leaf design in pencil), then use a bottle of liquid glue with a precision tip to trace over the lines.
- Let the sheet of cardstock sit undisturbed for at least 6 hours, or overnight, until the glue has fully dried and looks completely transparent, with no trace of white remaining.
- Use chalk pastel to color in between the lines of glue, allowing the glue to form a “wall” that divides each leaf into different sections. For added depth, create a gradient by using two or three similar colors inside each of these sections.
- Use a tissue or your fingers to spread the pigment of the chalk pastel in between the lines of glue, washing your hands in between each section to prevent any unintentional color mixing.
Video
Notes
1. Making the craft with younger kids: If your child is not old enough to trace the lines with glue, you can do this step for them and let them color in the leaves after the glue has dried.
2. Limiting the mess: Protect your work surface with parchment paper, keep a tissue on hand to wipe up unexpected smudges, and wash your hands frequently to remove excess residue from the chalk pastels.
3. Printing a template construction paper: If you don't have any cardstock, you can use construction paper instead, but you'll need to cut it down to size before you print the template, as construction paper tends to be too large for standard printers.
4. Helpful tips:
- Experiment with gradients: For best results, use two or three shades of the same color within each heart and gently blend them with your fingers to create a gradient.
- Avoid unintended mixing: Avoid mixing colors you don’t intend to mix by washing the previous color off your fingers when you’re switching colors. (You don't need to do this when creating gradients.)