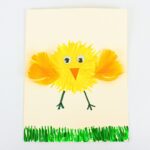
Fork Painted Easter Chick
Not only is this fork painted Easter chick super simple to make, but your kids will love the process of painting with a fork. If you’ve been looking for an easy Easter craft that uses supplies you already have at home, you’ll definitely want to give this one a try!
Servings: 1 chick
Ingredients
- 1 fork (pastic or metal)
- 1 paint palette
- paint (yellow and green) washable or acrylic
- 1 sheet light-colored cardstock
- 1 sheet orange construction paper
- 1 pair sharp scissors
- 2 large googly eyes
- liquid school glue
- 1 marker (black or dark orange)
- glue stick optional
- 4 yellow feathers optional
Instructions
- Pour some yellow paint onto a flat paint palette, then dip the back of the fork in paint to coat it.
- Press the paint-covered fork onto the middle of a sheet of cardstock, then gently glide it to create an imprint. Repeat as needed, dipping the fork in paint again as often as required and rotating it to create imprints that are positioned outward from the same center. Allow the paint to dry fully.
- If desired, pour some green paint onto the paint palette, dip the fork in paint to coat the back, and use it to create blades of grass at the bottom of the sheet of cardstock. (We recommend placing parchment paper underneath to protect your work surface.) Allow the paint to dry fully.
- Use scissors to cut a small orange triangle out of construction paper. Then, making sure the paint has dried fully before proceeding, glue two large googly eyes, along with the orange construction paper triangle, to the chick’s body, and use a marker to give your chick two legs.
- If you wish to add feathers to the chick, use scissors to cut off the base of the feathers, remove any loose strands, then use a glue stick to glue them to either side of the chick's body.