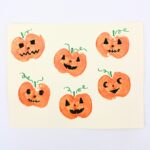
Jack-o'-Lantern Apple Stamping
Have more apples than you know what to do with? Use them to make this adorable pumpkin apple stamping craft with your kids!
Servings: 1 craft
Ingredients
- 1 apple
- 1 sharp knife
- 1 sheet light-colored cardstock
- orange paint washable or acrylic
- 1 paintbrush
- 1 black marker optional
- 1 green marker
Instructions
- Use a large, sharp knife to slice an apple neatly in half along the core. This step should be completed by an adult.
- If needed, pat the inside of the apple dry with a paper towel in order to remove humidity and make its surface less slippery. Then, cover the flat surface of the apple with an even coat of orange paint.
- Place the paint-covered apple face down, so that the painted side is turned toward the bottom, and press it down firmly onto the cardstock to create an imprint. For best results, gently apply pressure in a rotating fashion so that the entire outer edge of the apple slice comes into contact with the cardstock. Repeat as many time as you wish, adding more paint to the apple between each print. Allow the paint to dry fully before you move on to the next step.
- Once the paint has dried, use a black marker to add jack-o’-lantern features to the pumpkins. (You can skip this step if you want regular pumpkins.) Then, finish off the craft by drawing stems—and vines, if desired—with a green marker.
Video
Notes
Helpful tips:
- Make a straight cut: For apple stamps that work properly, use a large, sharp knife to make a cut that is as clean, straight and even as possible.
- Rotate your wrist: Gently rotate your wrist as you press down, applying pressure onto every outer edge of the apple to ensure that the entire stamp comes into contact with the cardstock.